
Operation Manual


18
Adjust time
To adjust the time on the display, proceed as follows:
1. Press the P / ESC button (B7) to enter the settings menu.
2. Press the ▽ and △ buttons (B5 and B6) until “ADJUST
TIME” is displayed;
3. Press the OK button (B4). The hours ash on the display;
4. Press the ▽ and △ buttons (B5 and B6) to change the
hours;
5. Press the OK button (B4) to conrm. The minutes ash on
the display;
6. Press the ▽ and △ buttons (B5 and B6) to change the
minutes;
7. Press the OK button (B4) to conrm;
8. Press the P / ESC button (B7) to exit the settings menu.
Auto-start
You can set the auto-start time in order to have the appliance
ready at a certain time (for example in the morning) so you can
make coee immediately.
Please note:
To enable this function, the time must be set correctly.
To enable Auto-on, proceed as follows:
1. Press the P / ESC button (B7) to enter the settings menu.
2. Press the ▽ and △ buttons (B5 and B6) until “AUTO
START” is displayed;
3. Press the OK button (B4). “ENABLE?” is displayed;
4. Press the OK button (B4). The hours ash on the display;
5. Press the ▽ and △ buttons (B5 and B6) to choose the
hours;
6. Press the OK button (B4) to conrm. The minutes ash on
the display;
7. Press the ▽ and △ buttons (B5 and B6) to change the
minutes;
8. Press the OK button (B4) to conrm. “ENABLED” appears
under “AUTOSTART”.
9. Press the P/ ESC button (B7) to exit the menu.
To disable the function:
1. Press the P / ESC button (B7) to enter the settings menu.
2. Press the ▽ and △ buttons (B5 and B6) until “AUTO
START” is displayed;
3. Press the OK button (B4). “DISABLE?” is displayed;
4. Press the OK button (B4) to conrm;
5. Press the P/ ESC button (B7) to exit the menu. “DISABLED” is
displayed.
Auto-o (Standby)
The appliance is set by default to go o if not used for two
hours.
The time can be changed so that the appliance switches o after
15 or 30 minutes, or after 1, 2 or 3 hours.
To re-programme Auto-o, proceed as follows:
1. Press the P / ESC button (B7) to enter the settings menu.
2. Press the ▽ and △ buttons (B5 and B6) until “AUTOOFF”
is displayed;
3. Press the OK button (B4);
4. Press the ▽ and △ buttons (B5 and B6) until the required
time (15 or 30 minutes, or 1, 2 or 3 hours) is displayed;
5. Press the OK button (B4) to conrm;
6. Press the P/ ESC button (B7) to exit the menu.
Auto-o is programmed.
Setting the temperature
To modify the temperature of the water used to make the coee,
proceed as follows:
1. Press the P / ESC button (B7) to enter the settings menu.
2. Press the ▽ and △ buttons (B5 and B6) until “SET TEMPE
RATURE” is displayed;
3. Press the OK button (B4);
4. Press the ▽ and △ buttons (B5 and B6) until the required
temperature is displayed (l = low, llll = high);
5. Press the OK button (B4) to conrm;
6. Press the P/ ESC button (B7) to exit the menu.
Setting water hardness
The operating period can be extended if required, making desca-
ling less frequent by programming the machine on the basis of
the real lime content in the water used.
Proceed as follows:
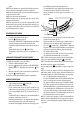
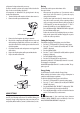
• Removethe“TotalHardnessTest”strip(attachedtopage2)
from its packaging then dip it fully in the water for a few
seconds.
Remove and wait about 30 seconds (until it changes colour
and forms red squares).
• Turn the appliance on by pressing the ON/OFF/standby but-
ton (A7).
• Press the P / ESC button (B7) to enter the menu and then the
▽ and △ buttons (B5 and B6) until “WATER HARDNESS” is
displayed.
• Press the OK button (B4);
• Press the ▽ and △ buttons (B5 and B6) until the number
coincides with the number of red squares on the test strip
(for example, if there are 3 red squares on the test strip, se-
lect the message “WATER HARDNESS lll” .
• Press the OK button (B4) to conrm.
The coee machine is now programmed to provide the de-
scale warning when actually necessary.