
Installation Guide

Installation instructions
Microwave
Type of construction 60-450
J939.113-4
26.6.12 WIMA
2
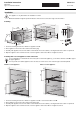
Installing
1. Screw the mounting rail to the floor with the 2 supplied screws A.
2. Place appliance in front of the niche and insert the mains plug.
3. Carefully slide appliance into the niche until it is flush with the front of the cabinets, ensuring that the mains cable is not pinched.
4. Open the appliance door and from the front secure the appliance at the sides with the 2 supplied screws S.
Installing with a second appliance in the same niche
1. Screw the mounting rail to the floor with the 2 supplied screws A or to the bracket with screws B.
2. Place appliance in front of the niche and insert the mains plug.
3. Carefully slide appliance into the niche until it is flush with the front of the cabinets, ensuring that the mains cable is not pinched.
4. Open the appliance door and from the front secure the appliance at the sides with the 2 supplied screws S.
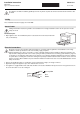
Installation
This appliance is only intended for the installation in a niche.
Minimum installation height: Keep 850 mm distance from the floor to the bottom edge of the microwave!
If a second appliance is installed in the same niche (above or below the appliance), you should use bracket set 60 W to support
the upper appliance.
It is not possible to install the appliance above an extractor oven because of the extraction pipes that lead upwards.
Below a second appliance Above a second appliance
350
(567)
454
596
540
~85˚
=
=
50
min. 550
600
560–568
20
~45
545
S
X
450
A
Detail X
374
Niche
378
Appliance
A, S=
B=
560–568
50
456
W
min. 550
A
560–568
450
min. 550
50
W
B