V-ZUG Ltd Range hood DF-E5 / DF-E6 Operating instructions
Thank you for choosing to buy one of our products. Your appliance is made to high standards and is easy to use. Nevertheless, please take the time to read these operating instructions in order to familiarize yourself with the appliance and get the best use out of it. Please follow the safety precautions. Modifications Text, diagrams and data correspond to the technical standard of the appliance at the time these operating instructions went to press.
Contents 1 2 Safety precautions 1.1 Before using for the first time 1.2 Correct use . . . . . . . . . . . . . . 1.3 Children in the home . . . . . . 1.4 Note on use . . . . . . . . . . . . . . . . . . . . . . . . . . . . . . . . . . . . . . . . . . . . . . . . . . . . . . . . . . . . . . . . . . . . . . . . . . . . . . . . . . . . . . . . . . . . . . . . . . . . . . . . . . . . . . . . . . . . . . . . . . . . . . . . . . . . . . . . . . . . . . . . . . . . .
1 Safety precautions The appliance corresponds to recognised technology standards and the relevant safety regulations. Proper use of the appliance is however essential to avoid damage and accidents. Please therefore follow the precautions given in these operating instructions.
1 Safety precautions 1.2 Correct use • The appliance is designed for use in the home for extracting cooking fumes and smells from above the cooking surface. • Any repairs, modifications or manipulations to the appliance, especially any electrically live parts, should only be carried out by the manufacturer, its Customer Services or similarly qualified persons.
1 Safety precautions 1.4 Note on use • If the appliance is visibly damaged, do not use it. Contact our Customer Services. • If the appliance is not operating properly, disconnect it from the electricity supply immediately. • If the mains cable of the appliance is damaged, it must be replaced by Customer Services in order to avoid hazard. • Caution: Accessible parts may become hot when used with cooking appliances.
1 Safety precautions • If other appliances – fuelled by gas or other fuels – are being used at the same time, ensure that there is a sufficient supply of fresh air. This does not apply to air recirculation appliances. • If other firing systems are being used at the same time (e.g. wood, gas, oil or coal-fired heating appliances), safe operation is only possible providing a room negative pressure of 4 Pa (0.04 mbar) is not exceeded at the location of the appliance.
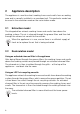
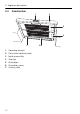
2 Appliance description The appliance is used to extract cooking fumes and smells from a cooking area and is normally installed in an overhead unit. This particular model can be used in the extraction mode or the recirculation mode. 2.1 Extraction model The integrated fan extracts cooking fumes and smells from above the cooking surface. The air is cleaned through the grease filters and then fed through the exhaust air conduit to the outside.
2 Appliance description 2.3 Features • Flat pull-out deflector plate • 2 extractor fans with 3 power levels • 2 metal grease filters • Illumination • 1 activated charcoal filter (not included in scope of delivery) The extractor fans have 3 power levels: 1, 2 and 3 • 1 = low, 2 = medium, 3 = high extraction rates. • Power levels 1 and 2 are suitable for continuous operation. • Power level 3 (high) is used for short bursts of intensive extraction of cooking fumes and smells, e.g. when searing meat.
2 Appliance description 2.
2 Appliance description 2.5 Operating elements Illumination ON–OFF Extractor fan power level 1 ON, all power levels OFF Extractor fan power level 2 ON–OFF Extractor fan power level 3 ON–OFF Depending on the model and features, the specification of your appliance may differ from the standard specification described.
3 Operation Switching the appliance on ➤ Pull the deflector plate out. To switch the illumination and the extractor fan on, the deflector plate must be slightly pulled out. The appliance is most effective when the deflector plate is fully pulled out. Switching the extractor fan on/off ➤ Power level 1 ON: Press the button 1×. ➤ Power level 2 ON: Press the button 1×. ➤ Power level 3 ON: Press the button 1×. Switching from power level 3 to power level 2: ➤ Press the button 1×.
3 Operation Switching the illumination on/off ➤ To switch on: Press the button 1×. ➤ To switch off: Press the button again. Switching the appliance off ➤ Push the deflector plate completely in. – This switches off the extractor fan and the illumination even if both are still switched on. If the deflector plate is pulled slightly out again, the extractor fan switches on at the level set and the illumination comes on.
4 Care and maintenance 4.1 Cleaning the housing Take care that no water gets into the housing of the appliance! If water gets into the housing, it can cause damage. Do not use abrasive cleaners, scouring pads, steel wool, etc. as they can damage the surface. Remove the screw fuse or switch off the circuit breaker. Cleaning the outside/inside ➤ Clean the outside using a slightly damp cloth – and detergent if necessary – and wipe dry.
4 Care and maintenance 4.3 Cleaning the grease filters The grease filters should be cleaned at least once a month with normal use. If properly cared for, the grease filters should provide unlimited years of service. ➤ The grease filters can be cleaned in a dishwasher. ➤ Select an «intensive» – or «heavy soil» – wash programme with a warm pre-wash. Cleaning may cause the grease filters to become discoloured. However, this will not affect the functioning of the filters in any way.
4 Care and maintenance Removing the grease filters ➤ Push the deflector plate 1 completely in. ➤ Press right or left edge of grip flap 2 so that it folds down and can be gripped. ➤ Hold the grip 2 and pull towards the middle of the appliance. – This releases the grease filter, allowing it to be removed. ➤ Remove the upper grease filter in the same way. ➤ Clean the grease filters. 1 2 Installing the grease filters ➤ Push the deflector plate 1 completely in.
4 Care and maintenance 4.4 Replacing the standard activated charcoal filter Remove screw fuse for the appliance or switch off circuit breaker. Standard activated charcoal filters are only used in the recirculation model. The standard activated charcoal filter is to be replaced after an operating time of 3 to 6 months. Activated charcoal filters cannot be washed or regenerated. The spent standard activated charcoal filter can be disposed of with the household waste. ➤ Remove both metal grease filters 1.
4 Care and maintenance 4.5 Cleaning and replacing long-life activated charcoal filters Remove screw fuse or switch off circuit breaker. Long-life activated charcoal filters are only used in the recirculation model. Unlike the standard activated charcoal filter, the long-life activated filter can be cleaned and reactivated. With normal use of the appliance, the long-life activated charcoal filter should be cleaned every month.
4 Care and maintenance 4.6 Replacing the halogen light bulb Remove the appliance’s screw fuse or switch off the circuit breaker. Halogen light bulbs get hot during operation! Allow to cool down first. Open the illumination cover 1: ➤ Push back both locking slides 2 and swing down the illumination cover. ➤ Unscrew the halogen light bulb from the fixture and replace it with a new halogen light bulb of the same type (see designation on the light bulb housing or on the identification plate).
5 Trouble-shooting 5.1 What to do if … … the illumination is not working Possible cause Solution • The fuse or the circuit breaker for electrical installations in the home is faulty. ➤ Replace the fuse. ➤ Reset the circuit breaker. • Interruption in the power supply. ➤ Check the mains supply. • The halogen light bulb is defective. ➤ Replace the halogen light bulb. … the appliance is not extracting enough air Possible cause Solution • The grease filters are dirty.
6 Accessories and spare parts Please give model number of the appliance and exact description of the accessory or spare part when ordering parts. Halogen light bulb 230 V / 28 W Metal grease filter Standard activated charcoal filter Long-life activated charcoal filter The halogen light bulb is also available from specialist retailers.
7 Technical data Electrical connection ➤ See identification plate. ➤ Remove the grease filter. – The identification plate is located on the inside of the appliance.
8 Disposal Packaging • All packaging materials (cardboard, plastic film (PE) and polystyrene (EPS)) are marked and should, if possible, be collected for recycling and disposed of in an environmentally friendly way. Disconnection • Disconnect the appliance from the mains power supply. With a fixed appliance, this is to be carried out by a qualified electrician! Safety • Disable the appliance to prevent accidents caused by improper use, especially through children playing.
9 24 Notes
10 Index A Accessories . . . . . . . . . . Ordering . . . . . . . . . . . Activated charcoal filter . Air recycling cassette . . . . . . . . . . . . . . . . . . . . . . . . . . . . . . . . . . 21 27 . 8 . 8 C Care. . . . . . . . . . . . . . Children in the home . Cleaning . . . . . . . . . . Grease filter . . . . . . . Construction . . . . . . . . . . . . . . . . . . . . . . . . . . . . . . . . . . . . . . . . . . . . . . . 14 . 5 14 15 10 . . . . . . . . . . D Deflector plate . . .
10 Index O Operating element . Operating elements. Operation . . . . . . . . Orders. . . . . . . . . . . . . . . . . . . . . . . . . . . . . . . . . . . . . . . . . . . . . . . . . . . . . . . 10 11 12 27 P Packaging . . . . . . . . . . . . . . . . . . . 23 Power level Selecting . . . . . . . . . . . . . . . . . . . 12 Q Queries . . . . . . . . . . . . . . . . . . . . . 27 Quick instructions . . . . . . . . . . . . . 28 R Recirculation model . . . . . . . . . . . . . 8 Repair service . . . . .
11 Repair service The Trouble-shooting section will help you to carry out small repairs yourself, saving you the time and trouble of calling out a service technician and the cost that goes along with it. Whether you contact us about a malfunction or an order, please always state the serial number (FN) and the model type of your appliance. Enter these details below and also on the service sticker which comes with the appliance. Stick it in a conspicuous place or in your telephone or address book.
12 Quick instructions Please first read the safety precautions in these operating instructions! To switch on ➤ Pull out the deflector plate. Illumination ➤ Press the button 1×. Extractor fan ➤ Press the button 1× (power level 1). ➤ Press the button 1× (power level 2). ➤ Press the button 1× (power level 3). To switch off ➤ Press the button again. ➤ Press the button again ➤ or push in the deflector plate. V-ZUG Ltd Industriestrasse 66, 6301 Zug Tel.