
Operation Manual

8
• Failuretorespecttheseinstructionsmayresultinburnsor
damage to the appliance.
The manufacturer is not liable for damage deriving from
failure to respect these instructions.
Please note: The appliance has a cooling fan.
This comes on whenever coee, steam or hot water is delivered.
After several minutes, the fan goes o automatically.
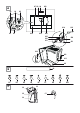
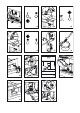
DESCRIPTION
Description of the appliance
(page 3 - A)
A1. Cup tray
A2. Service door
A3. Coee guide
A4. Waste coee container
A5. Infuser
A6. Cup tray lights
A7. On-O/stand-by button
A8. Control panel
A9. Tray
A10. Hot water and steam nozzle
A11. IEC connector
A12. Water tank
A13. Coee spout (adjustable height)
A14. Drip tray
A15. Bean container lid
A16. Bean container
A17. Grinding adjustment dial
A18. Pre-ground coee funnel door
A19. Measure
A20. Measure compartment
A21. Pre-ground coee funnel
A22. Power cable
A23. Main switch
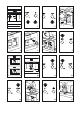
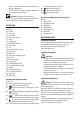
Description of the control panel
(page 3 - B)
B1. Display: guides the user in using the appliance.
B2. button to select the coee taste
B3. button to select the type of coee (espresso, coee,
long coee)
B4. / OK button to make one cup of coee and conrm the
selected function
B5. / ▽ button to make two cups of coee and scroll
backwards through the menu to display the various modes
B6. / △ button to deliver hot water and scroll forwards
through the menu to display the various modes
B7. P / ESC button to enable or disable menu parameter setting
mode and exit from the chosen mode
B8. button to make cappuccino
B9. button to make latte macchiato
B10. button to make caelatte
Description of milk container and accessories
(page 3 - C)
C1. Froth regulator
C2. Milk container handle
C3. CLEAN button
C4. Milk intake tube
C5. Frothed milk spout
C6. Milk frother
C7. Hot water spout
PRELIMINARY CHECKS
Checking the appliance
After removing the packaging, make sure the product is comple-
te and undamaged and that all accessories are present.
Do not use the appliance if it is visibly damaged.
Contact Customer Services.
Installing the appliance
Important!
• Installation must be performed by a qualied professional
in compliance with legislation in force in the country of in-
stallation (see section “Built-in installation”).
• The packing elements (plastic bags, polystyrene foam, etc.)
should be kept out of reach of children.
• Never install the appliance in rooms where the temperature
may drop to 0°C or lower.
• Customise the water hardness as soon as possible following
the instructions in the “Setting water hardness” section.
Connecting the appliance
Danger! Check that the mains power supply voltage
corresponds to the value indicated on the rating plate on the
bottom of the appliance.
Connecttheappliancetoanecientlyearthedandcorrectlyin-
stalled socket with a minimum current rating of 10A only.
If the power socket does not match the plug on the appliance,
have the socket replaced with a suitable type by a qualied pro-
fessional.
To comply with safety directives, an omnipolar switch with a mi-
nimum contact distance of 3 mm must be installed.
Do not use multiple sockets or extensions.