
Operation Manual

16
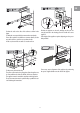
2. Remove the drip tray and the grounds container (g. 17).
3. Empty the drip tray and grounds container (A4) and wash
them.
4. Replace the drip tray complete with grounds container
(A4).
5. Close the service door.
Cleaning the water tank
1. Clean the water tank (A12) regularly (about once a month)
with a damp cloth and a little mild washing up liquid.
2. Remove all traces of washing up liquid.
Cleaning the spouts
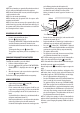
1. Clean the nozzles periodically using a sponge (g. 29).
2. Check regularly that the holes in the coee spout are not
blocked. If necessary, remove coee deposits with a too-
thpick (g. 27).
Cleaning the pre-ground coee funnel
Check regularly (about once a month) that the pre-ground coee
funnel is not blocked (g. 21).
Danger! Before performing any cleaning operations,
the machine must be turned o by pressing the main switch
(A23) and unplugged from the mains power supply.
Never immerse the coee machine in water.
Cleaning the inside of the coee machine
1. Check regularly (about once a week) that the inside of the
appliance is not dirty.
If necessary, remove coee deposits with a sponge.
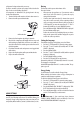
2. Remove the residues with a vacuum cleaner (g. 30).
Cleaning the infuser
The infuser must be cleaned at least once a month.
Important! The infuser (A5) must not be removed
when the appliance is on.
Do not use force to remove the infuser.
1. Make sure the machine is correctly turned o (see “Turning
o”).
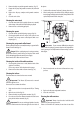
2. Open the service door (g. 16).
3. Remove the drip tray and grounds container (g. 17).
4. Press the two red release buttons inwards and at the same
time pull the infuser outwards (g. 31).
Important! Do not use washing up liquid to clean the
infuser. It would remove the lubricant applied to the inside of
the piston.
5. Soak the infuser in water for about 5 minutes, then rinse.
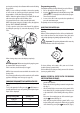
6. After cleaning, replace the infuser (A5) by sliding it onto the
internal support and pin at the bottom, then push the PUSH
symbol fully in until it clicks into place.
Please note: Ifyouencounterdicultyinsertingthe
infuser, before inserting it you must adapt it to the right dimen-
sion by pressing it forcefully from the bottom and top as shown
in the gure.
7. Once inserted, make sure the two red buttons have snap-
ped out.
8. Replace the drip tray and grounds container.
9. Close the service door.
Cleaning the milk container
Important! Always clean the tubes inside the milk
container (C) when you prepare milk.
If there is still milk in the container, do not leave it out of the