ENGLISH VIDEO DOOR PHONE SYSTEM USER MANUAL Manual Monitor 1 2 3 4 Memory Playback ? About Monitor Album Intercom User Setup Multimedia Close 09/30/2010 Thu.
CONTENTS 1. Parts and Functions............................................................ 1 2. Monitor Mounting.............................................................. 1 3. Operation Instructions........................................................ 2 4. Basic Setup Instructions..................................................... 4 5. Built-in Memory and SD Card........................................... 7 6.Specification........................................................................
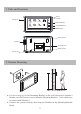
1. Parts and Functions Screen Indicator Microphone Manual Monitor Memory Playback Intercom Monitor User Setup Album ? About Multimedia UNLOCK Button TALK/MON Button Close MENU Button 09/30/2010 Thu.16:41 Mounting Hook Speaker Connection Port BT1 BT2 EH GND VD DIPS ON 123456 L1 L2 Mounting Hook SD card slot 145~160 cm 2. Monitor Mounting ●● Use the screws to fix the Mounting Bracket on the wall.
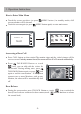
3. Operation Instructions How to Enter Main Menu MENU button ) in standby mode,a full ●● Touch the screen anywhere (or press screen calendar will be showed. MENU button again) to enter main menu. ●● Touch the screen again (or press 09/30/2010 Manual Monitor Thu. 16:41 Memory Playback ? About Monitor Album Intercom User Setup Multimedia Close 09/30/2010 Thu.16:41 Answering a Door Call ●● Press CALL button on door station.The monitor rings,and the visitor's image will be seen on screen.
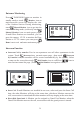
Entrance Monitoring Press TALK/MON button on monitor in Monitor icon on standby mode,or touch main menu.the screen will display the view of the Outdoor Station. During monitoring, Manual Monitor icon to get into the touch camera switching mode, (or directly touch Manual Monitor icon on main menu page). if multi Door Stations are installed, you can press the camera 1/2/3/4 to monitor the Door Station or CCTV camera you want.press Home icon to exit and enter main menu page.
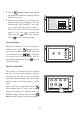
4. Basic Setup Instructions Ring Tone Setting User Setup icon on main menu ●● Touch page to enter call tone setting screen,touch Door station call tone/intercom call tone/ door bell call tone,12 pieces ring tones will be displayed , Choose a ring tone which you want, then touch icon to save and exit, the ring tone will be performed. or touch icon to unsave and exit.
Night Ring Volume Night Ring Volume Ring Volume Night Ring Volume 4 4 Exit&Save Exit&Save Adjust + Adjust - 7 Adjust + Adjust - Exit&Unsave Exit&Unsave Monitor Time Setting Manual Monitor icon to enter next page.then ●● Enter main menu page,thenTouch Monitor Time icon to enter monitor time setting page. press ●● Input digitals by pressing the digital keypad, and press * icon to change the setting location,and press # icon to save.
Installer setup icon,a digital ●● Touch keypad and installation setting will be showed on screen. ●● Input code number by touching the digital keypad.According to the left instructions, 8010 and 8011 are used to set the unlock mode(0 and 1). 8021~8029 are used to set the unlock time (1s~9s) .use to cancel the input,and use to save the setting. Touch icon to return last page .
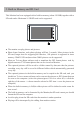
5. Built-in Memory and SD Card This Monitor has been equipped with a built-in memory (about 120 MB) together with a SD card reader. Maximum 16 GB SD card can be supported. Micro SD card ●● The monitor can play photos and pictures. ●● Photo frame function, each photo playing will last 5 seconds, More pictures in the SD card, longer time for triggering the function, 800 pictures is supported in inner memory. With 2G SD card,more than 30000 pictures can be supported.
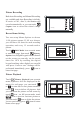
Picture Recording Both Auto-Recording and Manual-Recording are available.and Auto-Recording is default. If receive a Call , after 3s, the monitor will record automatically. or you can touch Capture icon to record the visitor's image manually. DS1 00:03 Talking 1:1 Standard Screen Unlock Talk Capture Recording... Home Record times Setting You can setup Memo Options to choose 1/4/8 pictures memo. If 4/8 was chosen, you will have 4/8 shots for each recording operation, and every 1.
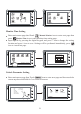
Photo Frame Photo Playing Album icon on main menu to play the photos(must plug in SD card).it can be Touch played both manually and automatically,use your fingers to slide right or left on screen to play last/next photo.
The design and specifications can be changed without notice to the user. Right to interpret and copyright of this manual are preserved.