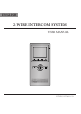
ENGLISH 2-WIRE INTERCOM SYSTEM USER MANUAL 2 TALK MENU MONITOR DT-ENG-DT16D3-V2
Precautions ●● Slots or openings in the back of the monitor, are provided for ventilation and to ensure reliable operation of the video monitor or equipment and to protect if from overheating. These openings must not be blocked or covered. The monitor should never be placed near or over a radiator or heat register and should not be placed in a built-in installation such as a bookcase unless proper ventilation is provided. ●● All parts should be protected from violence vibration.
Contents 1.Parts and Functions......................................................................... 1 2.Monitor Mounting........................................................................... 1 3. Basic Door Release Operation....................................................... 2 4.Intercom Function........................................................................... 2 5.Basic Setup Instructions.................................................................. 3 5.
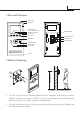
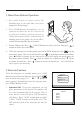
1 1.Parts and Functions LCD Screen Microphone UNLOCK Button Second UNLOCK Button Staircase Light Button LED Indicator 2 Mounting Hook CALL Button Connection Port MENU Button ON TALK 123456 MENU MONITOR Extend Port DIP Switches MONITOR Button Direction Button TALK Button Speaker 145~160 cm 2.Monitor Mounting 1. Use the screws to fix the Mounting Bracket on the mounting box.
2 3. Basic Door Release Operation 1. Press CALL button on outdoor station , the Monitor rings, at the same time, the screen displays the visitor image. 2. Press TALK Button on monitor, you can communicate hands free with the visitor for 90 seconds.After finishing communication,press "TALK" button again to end the communication. If nobody answers the phone, the screen will be turned off automatically after 40 seconds. 3.
3 Inner Call: If multi Monitors are installed in the same apartment, select Inner Call, 2. all the other Monitors will ring at the same time, whichever Monitor answers the call, conversation is started.and the other monitors will stop ringing at the same time.(note:the DIP switches setting of all monitors must be same. ) Direct Dial Guard unit: A Monitor can be assigned as Guard Unit Monitor; when the 3. Guard Unit Monitor answers the call, conversation with the guard person is started.. 5.
4 5.3 Date and Time Setting 1. 2. Select item on main menu page to enter setup page,then use ▲ / ▼ button to select Advanced set... item. A password will be asked before enter next sub menu.the password is 2008, use ▲ / ▼ Button to increase / decrease the value; use / Button to select last/next digital. After inputing,press MENU Button to confirm and enter the sub menu page. setup Select Date and Time Set... item.
5 6.Screen and Volume Adjustment During monitoring or talking, press MENU Button,the ADJUST MENU will be displayed. Use ▲ / ▼ Button to select the adjustment item; use / Button to decrease / increase the value. 1. The first item is Scene mode selection: Total 4 screen modes can be selected in sequence: Normal, User, Soft and Bright. Whenever you modify Brightness or colour, Scene item will be set to User mode automatically. user scene 5 Brightness RGB 4 Colour 2 Ring Volume 6 Talk Volume 2.
6 Note
The design and specifications can be changed without notice to the user. Right to interpret and copyright of this manual are preserved.