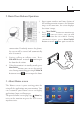
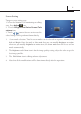
ENGLISH VIDEO DOOR PHONE SYSTEM USER MANUAL Monitor Manual Intercom Direct Call Guard Unit Alarm Security Multimedia 1 2 3 4 User Setup Intelligent Estate Home Management Close 09/08/2011 Tue.
Precautions ●● Slots or openings in the back of the monitor, are provided for ventilation and to ensure reliable operation of the video monitor or equipment and to protect if from overheating. These openings must not be blocked or covered. The monitor should never be placed near or over a radiator or heat register and should not be placed in a built-in installation such as a bookcase unless proper ventilation is provided. ●● All parts should be protected from violence vibration.
Contents 1. Parts and Functions........................................................................ 1 2. Basic Door Release Operation....................................................... 2 3. About Home screen........................................................................ 2 4. Basic Setup Instructions................................................................. 3 5.Memory SD card............................................................................. 7 6.Intercom function...........
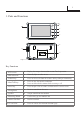
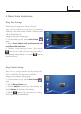
1 1. Parts and Functions 1 2 6 3 4 5 8 7 9 10 Key Functions 1. LCD screen ●● Display the images from outdoor station.Touch operation. 2. LED indicator ●● Normally light on when in use 3. Unlock key ●● Press to release the door for visitors during talking or monitoring. 4. Mon/Talk key ●● ●● Press to view the outside condiction. Press to talk with the visitors while receiving a call. 5. Menu key ●● Press to open a list of actions available on the current screen. 6.
2 2. Basic Door Release Operation 1. Input room numbers on Door Station of the building or main entrance, the Monitor rings, at the same time, the screen displays the visitor's image. 2. Press Mon/TALK Button on monitor or touch icon on screen, you can talk with the visitor for 90 seconds. During c o m m u n i c a t i o n , p r e s s M o n / TA L K Button or touch icon again to end the conversation. If nobody answers the phone, the screen will be turned off automatically after 30 seconds. 3.
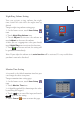
3 4. Basic Setup Instructions Ring Tone Settings Total 12 pieces ring tones can be selected. You can set different ring tones to identify different calls from Door Station call,Intercom call or Door Bell call. To open ring tone setting page: 1. On the home screen, touch User Setup icon. 2. Touch Door Station call tone/Intercom call tone/Door Bell call tone. 3. Choose a ring tone you want , then touch icon to save and exit, the ring tone will be performed immediately. Or touch icon to unsave and exit.
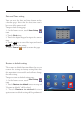
4 Night Ring Volume Setting You can activate a ring volume for night time,18:00 PM~6:00 AM is the night time by default. To open night ring volume setting page: 1. On the home screen, touch User Setup icon. 2. Touch Night Ring Volume item. 3. Touch Adjust+ to increase the volume or touch Adjust- to decrease the volume. 4.After you set a appropriate value,you should touch Night Ring icon to activate the function. 5. Touch icon to save and exit, the setting will be performed immediately.
5 Date and Time setting You can reset the date and time shown on the calendar page. Note that the date/time won't lose even if the power is off. To open clock setting page: 1. On the home screen, touch User Setup icon. 2. Touch Clock item. 3. Touch the digital keypad to input the correct time. 4. Touch key to cancel the input,and touch key to save the setting. 5.
6 Screen Setting To open screen setting page: 1. When the Monitor is in monitoring or talking state, Press Adjust icon. 2. Touch Brightness/Color/Scene/Talk volume item. 3. Touch / icon to decrease or increase the value.Settings will be performed immediately. 1. Scene mode selection: Total 4 screen modes can be selected in sequence: Normal, User, Soft and Bright. Note that only at User mode that you can modify Brightness or colour.
7 5.Memory SD card Your video phone comes with a removable microSD memory card where you can store multimedia files, such as digital photos ,images and so on. To install the memory card: 1. Insert the memory card with the gold contacts facing up. 2. Push the card in until it clicks. To remove the memory card, press the card in and release. 1 2 3 4 Note: Micro SD card 1. The monitor has been equipped with a built-in memory (about 120 MB) together with a microSD card.
8 Picture Recording Both Auto-Recording and Manual-Recording are available.but Auto-Recording is default. If Capture receive a Call , after 3s, the monitor will record automatically. or you can touch icon to record the visitor's image manually. Record times setting: You can setup Memo Options to choose 1/4/8 pictures memo. If 4/8 was chosen, you will have 4/8 shots for each recording operation, and every 1.5 seconds catch a picture. To open record times setting page: 1.
9 Photo frame Playing photos: Album icon to play the On the home screen, touch Multimedia icon,then touch photos(must plug in SD card).it can be played both manually and automatically,use your fingers to slide right or left on screen to play last/next photo. Playing time setting: 1.On the home screen, touch Multimedia icon 2.Touch Album Option item. 3. Input playing time by touching the digital keypad . 4. Touch key to cancel the input,and touch key to save the setting. 5.
10 7. Defense Alarm Operation(optional) This system have auto-alarm function to ensure the security for the house owner. Total 4 different sensors were placed to protect different defense area. When the sensor was triggered, the monitor will send out alarm sound immediately and will send the alarm signal to the guard center at the same time. Note that your system may not have all the 4 sensors according to the system configuration.
11 3. If you stay at home, and you want to activate the defense function, you should touch Armed Stay Home icon to trigger all defense function except Infrared defense ,If the armed function is activated,the status bar will be shown"Status:Been-Armed". 4.
12 item). [C] Button: Disarm button, press and hold this button for 1s will disarm the system(the same result as entering Home screen --> Alarm security menu, select Disarmed item). [D] Button: Use this button to release the door.(the same result as pressing the Unlock button on monitor). NOTE: 1. Remote control distance is normally up to 50 meters, and will extend if the built-in telescopic antenna is taken out. 2.
Please read this manual carefully before using the product you purchase, and keep it well for future use.We reserve the right to modify the specification in this manual at any time without notice.