•••••• POV.1.5 User Manual Copyright © 2008, V.I.O., Inc. All rights reserved. POV.1.5, POV Manager, V.I.O. and the V.I.O. logo are trademarks of V.I.O., Inc. All other product and brand names may be trademarks or registered trademarks of their respective owners.
Contents Introduction to the POV.1.5 3 Overview of Shoot, Tag, Edit, and Share 4 Set-up the POV.1.5 Recorder 4 Mount the camera head 4 The POV.1.5 Recorder 5 Setting up the POV.1.5 5 Settings 9 Using the POV.1.5 11 Recording Video with the POV.1.5 12 Clip Recording vs.
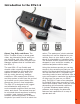
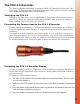
Introduction to the POV.1.5 The POV.1.5 Recorder, Camera Head, Digital A/V Cable, and Wireless Remote Shoot, Tag, Edit, and Share. The POV.1.5 makes it easy to shoot great video, tag interesting shots while you are recording, edit your video, and then share videos online using the POV Manager software that is included with the POV.1.5. action. The waterproof, shock-resistant recording unit can be attached to your vehicle, worn on your belt or vest, or stored in a backpack or hydration pack.
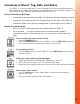
Overview of Shoot, Tag, Edit, and Share The POV.1.5 is intuitive and easy to use. Although this manual provides detailed information about using the hardware and software, here are the basic steps you’ll take to Shoot, Tag, Edit and Share video with the POV.1.5: Set-up the POV.1.5 Recorder • Connect the camera head to the POV.1.5 Recorder using the digital A/V cable • Install the 4 AA batteries into the compartment on the back of the POV.1.
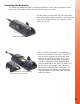
The POV.1.5 Recorder This section explains the details of using the POV.1.5 Recorder to Shoot and Tag your video. To find out how to Edit and Share your video, refer to the POV Manager User Guide that appears later in this manual. Setting up the POV.1.5 Setting up the POV.1.5 is very straightforward. Just connect the camera head to the POV.1.5 Recorder, install the batteries and SDHC Card, and you’re ready to start creating video from your Point Of View. Connecting the Camera Head to the POV.1.
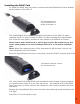
Installing the Batteries To install the batteries start by turning the POV.1.5 unit over and place it face down on a flat clean surface to avoid scratching the screen. Pull the tabs on each side. Do not force them down any further than necessary, the tabs only need to be opened as far as is shown in the photo to the left Back of the POV.1.5 Back of the POV.1.5 with the battery compartment cover removed. Now, remove the battery compartment cover from between the tabs.
Installing the SDHC Card To install the SDHC card you need to remove the Input/Output Port cover located at the bottom of the POV.1.5. The Input/Output Port cover is located on the bottom of the POV.1.5 The Input/Output Port cover is attached to the bottom of the POV.1.5 with a retaining screw. In order to keep the POV.1.5 water-resistant the Input/Output Port cover fits very tightly, and thus it may appear to be difficult to remove. Note: Please use a small coin or nail to pry it open.
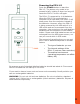
Powering the POV.1.5 Press the POWER button to start the POV.1.5. The button only needs to be pressed briefly, holding it down too long will cause the POV.1.5 to turn off again. The POV.1.5 is powered by 4 AA batteries. When the POV.1.5 is connected to a computer via a USB cable, the POV.1.5 will draw power from the computer instead of the batteries. However, when the POV.1.
Settings The POV.1.5 offers an array of different settings, some of which have been discussed earlier in this manual. To access the Settings menu Press the SETTINGS button once. Use the PREV and NXT soft keys to navigate to the desired setting and the SELECT soft key to choose the item that you would like to change. After changing a setting you can press the PLAY button to return to Standby mode. Settings change from white to red during adjustment.
Powering and changing the Remote Control and I.D. Channel The wireless remote control unit uses an A27 12 volt battery, which is included with the unit and pre-installed. If you need to replace the battery in the wireless remote control: 1 Place the remote unit on a flat surface with the buttons facing up. 2 Unscrew the four small Phillips screws in each corner and lift the cover from the remote. Take care to protect the inside of the remote control unit from dust and moisture while the cover is removed.
Using the POV.1.5 Before using the POV.1.5 to record or play back video, you should familiarize yourself with the layout and controls of the POV.1.5 main unit. In the upper left corner of the POV.1.5 is the INDICATOR LIGHT which lets you know the current status of the unit: •DARK: Off •ORANGE: Booting Up •GREEN: Standby •FLASHING RED: Recording •FLASHING ORANGE: Warning/Alert Condition At the top of the POV.1.5 is the LCD display.
Recording Video with the POV.1.5 The POV.1.5 offers a number of different recording options to suit a wide variety of applications. You should familiarize yourself with the basic recording modes and settings so that you can choose the recording method that is best suited for your needs. Clip Recording vs. Loop Recording The POV.1.5 Recorder offers two different recording options, Clip mode and Loop mode. • Clip recording - this works like a traditional video camera.
The Video Recording Display Screen When you turn on the POV.1.5 it is placed in Standby mode, and ready for you to record video. The display of the POV.1.5 Recorder provides you with some basic information about the status of the unit. The status light at the top of the display is green when the unit is in standby • When the unit is in Standby mode this displays the amount of recording time remaining on the SDHC card based on the current resolution, frame rate, and video quality settings.
record mode. Then, when something happens that you want to save you simply press TAG or REC/TAG to save that loop. In order to make sure you don’t miss any of the action, Loop mode will also grab more than one loop if you Tag a loop near the beginning or end of a loop. Here’s how it works: • If you press the TAG soft key on the POV.1.
press TAG or REC/TAG. Press the RECORD button to stop recording and switch the unit to Standby mode. If you want to switch back to Clip recording mode you will need to go back to the Settings menu. The upper left corner of the display will show PLAY and the top center of the display will indicate the number of the current clip and total number of saved clips.
Playing Video When the POV.1.5 is first turned on it is placed in Standby mode. To play video on the POV.1.5, press the PLAY button to switch it into Play mode. The display will change to show the opening frame of the most recently saved video. Press the PREV or NXT soft keys to step through the video clips that are saved on the SDHC card. • Each time you step through the clips the first frame of that clip will be shown in the display.
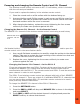
To change from NTSC format to PAL: 1. Press the SETTINGS button on the POV.1.5 2. Press the NXT soft key until VIDEO OUTPUT is shown in the display, and press SELECT 3. Use PREV or NXT to choose the appropriate setting, and then press SELECT If you set the format to PAL you should also change the FRAME RATE setting to 25 frames per second to optimize PAL video playback. 1. Press the SETTINGS button on the POV.1.5 2.
Mounting the Camera Head The POV.1.5 comes with a Star mount, and the Double Hook and Loop mount to assist you in mounting the camera head. The Star Mount • Primary Uses: Hats, Smooth Surfaced Helmets, and Vented Helmets • Camera Clamp & Star Mount Compatible w/ or w/o OPS base • Magnets Provide for a quick Hat mount Solution • Caution: Magnets are very powerful The Double Hook and Loop Mount This hassle-free mount easily secures the helmet to most vented helmets using a hook and loop fastening system.
• Another person • Your helmet visor • The handlebars or wheel of a bike or motorcycle • Your skis or ski boots • Your snowboard or surfboard • The front of a vehicle, boat, snowmobile or jet ski • The barrel of a rifle If you are in a race you might want to consider mounting the camera so that it faces behind you. This lets you capture the other competitors actions and emotions as they try to catch up with you or pass you. Be careful to check the video on the POV.1.
Tip If you need to keep the camera cable secure when you are mounting the camera on your head or body you can use the clip with snaps that is included with your unit. Just snap the strip around the cable and clip it to your clothing in a position that keeps the cable in place. Optional Mounting Accessories If the accessories provided with the POV.1.
You can adjust the sensitivity of the mic using the Settings menu. 1. Press the SETTINGS button on the POV.1.5 2. Press the NXT soft key until MIC LEVEL is shown in the display 3. Press SELECT 4. Use the PREV and NXT soft keys to choose the appropriate setting (0-9) 5. Press SELECT to choose that setting For some applications you may find it helpful to use an external microphone. The microphone input connector is located at the bottom of the POV.1.
Connecting the POV.1.5 to a Computer You can connect the POV.1.5 to either a PC or a Macintosh computer. When connecting to a PC the POV.1.5 integrates with the POV Manager software. When connecting to a Mac, the POV.1.5 appears as a removable storage device, and you can access the video that you recorded the same way you would access any other storage device. Connecting to a PC The included USB cable allows connection between the POV.1.5 and a PC.
The POV Manager This section contains an overview of the POV Manager software and instructions on how to perform common tasks such as editing and sharing your videos. Getting Started POV Manager allows you to create your own video by combining and editing clips from various video segments. Note Video files are encoded with the DivX Codec as .AVI files. You can save the recorded video clips only in .avi format.
Installing the POV Manager Software Insert the CD-ROM into the CD-ROM drive. The install program should start automatically. If the install program does not start, run the Setup.exe program found on the CD-ROM. Note The POV.1.5 Manager installation program will check to make sure the following software is already installed on your system: • Microsoft .NET2.
Creating a new user account When the POV Manager launches for the first time, it displays the following “Sign In” screen. If you check the “Remember Me” box the POV Manager will bypass this screen when you logon in the future. 1. Select Sign Up to create a profile 2. Enter Email address • Use a valid email address as you will receive important notifications and an initial V.I.O. verification. This information is used for signing into the V.I.O. website 3.
Understanding the POV Manager Interface The POV Manager user interface is divided into three main panes: The List pane(1), the View pane (2), and the Storyboard pane(3). The View Pane The List Pane The Storyboard Pane List Pane List pane displays a collection of videos from the POV.1.5 Recorder and the POV Library. You can use videos from your collection to view, create, and customize a new video clip using the View pane. The POV Recorder list shows the videos on the POV.1.5 recorder’s SDHC card.
Using the POV Manager Managing your Videos You can manage your videos in the List pane using the POV Recorder panel and the POV Library panel. Copying Videos to the POV Library Click and drag the video that you want to copy from the POV Recorder panel to the POV Library panel. The POV Library will notify you if the file exists in the library. Deleting Videos To delete video clips from either the POV Recorder or the POV Library: 1. Select one or more videos from the POV Recorder or the POV Library panels.
Editing Videos You can create a new video by editing clips from your video collection, the POV.1.5, or the POV library. You can create custom videos by editing the content of existing clips, extracting and using specific video clips, and arranging the video clip sequence. The custom videos can be created and edited in the Storyboard pane.The Storyboard displays your work in progress including your video clip sequence.
Extracting Clips To extract a clip 1. Drag the video to the View pane The video clip will play automatically 2. Mark the area for extraction using the handles. Drag the LS of the Timeline indicator to select the start of the clip that you want to extract. Drag the RS of the Timeline indicator to select the end of the clip that you want to extract. The area marked for extraction is highlighted in orange and flagged by the extraction handles 3.
Sharing Videos To share your video: 1. Select the video(s) to be shared in the List pane 2. Click the Share button at the bottom of the List pane The Share Screen dialog is displayed Note: If you had not signed in you will be prompted to sign in. You must sign in to share your videos. 3. Enter the recipient’s email information. You can send your video to multiple people via a single email. Enter a single email address per line or add a semicolon (;) between each email address 4.
Legal and Specifications FCC Compliance The POV.1.5 has been tested and found to comply with the limits for a Class B digital device, pursuant to Part 15 of the FCC rules. These limits are designed to provide reasonable protection against harmful interference in a residential installation. This equipment generates, uses and can radiate radio frequency energy and, if not installed and used in accordance with the instructions, may cause harmful interference to radio communications.
Return Policy Any Product item, other than Special or Custom Orders, purchased from V.I.O. may be returned within thirty days of purchase for any reason for a refund, exchange, or credit towards another V.I.O. purchase. The returned items must be in original condition and packaging. All original warranties, instructions, and accessories must be accompanied by the original sales receipt. Return freight must be prepaid. No C.O.D. returns will be accepted. V.I.O.
Specifications POV.1.
External Picture Storage Image storage priority DATA HANDLING Recording Capacity File Functions I/O Ports USER INTERFACE Navigation Controls Auxiliary Controls Functionality SIZE & MASS Recording Unit Imaging Head Remote Control LVDS Tether Cable POWER Battery Type Battery Life Recharge Circuit DC-in REGULATORY Safety EMC Green Environment Manual Version Secure Digital (SDHC) Card, supports up to 8G SDHC Card 8 gigabytes maximum on SDHC Card Record, Playback, Delete SDHC card slot, USB 2.