ChromaDoc-It™ Imaging System Installation and User Instructions UVP, LLC Ultra-Violet Products Ltd. 2066 W. 11th Street Upland, CA 91786 Phone: (800) 452-6788 / (909) 946-3197 Fax: (909) 946-3597 Unit 1, Trinity Hall Farm Estate Nuffield Road, Cambridge CB4 1TG UK Phone: +44(0)1223-420022 Fax: +44(0)1223-420561 Web Site: www.uvp.
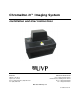
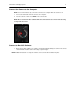
ChromaDoc-It Imaging System 2 Introduction The ChromaDoc-It Imaging System is designed for capturing brilliant Thin Layer Chromatography (TLC) images.
ChromaDoc-It Imaging System 3 Doc-ItLS Software The Doc-ItLS software loads onto the user’s existing computer. The software controls the camera acquisition functions as well as enhancement and reporting features. For information on installation and use of the software, refer to the Doc-ItLS Software Manual (pdf file on the software CD). Doc-ItLS Acquisition Software Operating System Requirements • Windows 7, Vista or XP SP2 or later • Internet Explorer 6.
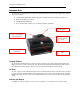
ChromaDoc-It Imaging System 4 System Setup DO NOT ATTEMPT TO CONNECT ANY WIRING WHILE THE EQUIPMENT IS CONNECTED TO ANY POWER SUPPLY. CAUTION: Do not install the system in places with high moisture, dust or high temperature. Do not use any oil or petroleum based cleaner for the cabinet. Use only mild soap or detergent solution for cleaning. Ensure that the system is turned OFF during cleaning. Keep the equipment away from motors or other large magnetic equipment apparatus.
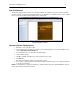
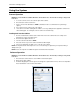
ChromaDoc-It Imaging System 5 Connect the Camera to the Computer NOTE: It is recommended to only connect the camera to the computer while the camera is off. 1. 2. Connect the USB cable from the camera to the computer. Turn the camera on and select A-DEP on the camera dial. NOTE: Do not use the Doc-ItLS software while the camera dial is set to movie mode as doing so may result in an error. Camera set to A-DEP Connect to Doc-ItLS Software 1. Open the Doc-ItLS software.
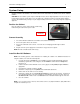
ChromaDoc-It Imaging System 6 Using the System Camera Operation NOTE: Do not use the Doc-It software while the camera dial is set to movie mode as doing so may result in an error. 1. 2. 3. 4. 5. To use the camera, remove the camera cap from the cabinet. Ensure that the camera is turned on. Set the camera mode dial button to A-DEP. (Automatic mode is recommended for a quick image capture) Close and secure the camera cap on the cabinet.
ChromaDoc-It Imaging System 7 4. 5. 6. To take images in color, ensure that the Color Capture box is checked. Select Preview at the top of the software to preview the image. While in preview mode, the Brightness slider can be adjusted to brighten dark images. 7. The user may adjust the focus manually to enhance the appearance of the previewed image. Click the Manual focus radio button on the Preview window, then use the left and right arrows (shown in the red box, below) to adjust the focus settings.
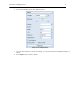
ChromaDoc-It Imaging System 2. 8 A new camera window appears with additional options: Camera Control in Manual Mode 3. 4. Select the desired options for an enhanced image. See the camera manual for detailed descriptions of options. Select Capture at the top of the software.
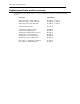
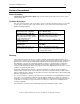
ChromaDoc-It Imaging System 9 Replacement Parts and Accessories The following replacement parts and accessories are available for use with the ChromaDoc-It Imaging System: Description Part Numbers Replacement Tube, 15 watt, 254nm UV Replacement Tube, 15 watt, 365nm UV Replacement Tube, 4 watt, white light 34-0008-01 – 2 required 34-0009-02 – 2 required 34-0066-01 – 2 required Doc-ItLS Analysis Software 97-0185-02 Thermal Printer, Digital (115/230V) Thermal Printer, Digital (230V) Thermal Printer, Di
ChromaDoc-It Imaging System 10 Service Procedures Return Procedure A Returned Goods Authorization (RGA) number must be obtained from UVP Customer Service before returning any product. Technical Assistance UVP offers technical support on all of its products. If there are questions about the product’s use, operation or repair, please contact our offices at the locations below, or go to UVP’s web site and click the Tech Support > BioImaging Systems.