Automated BioLite™ MultiSpectral Light Source Installation and User Instructions UVP, LLC 2066 W. 11th Street Upland, CA 91786 Phone: (800) 452-6788 Fax: (909) 946-3597 Ultra-Violet Products Ltd. Unit 1, Trinity Hall Farm Estate Nuffield Road, Cambridge CB4 1TG UK Phone: +44(0)1223-420022 Fax: +44(0)1223-420561 Web Site: www.uvp.
Automated BioLite MultiSpectral Light Source 2 Table of Contents Introduction ..................................................................................................................................................................3 System Components ...................................................................................................................................................4 Specifications ......................................................................................
Automated BioLite MultiSpectral Light Source 3 Introduction The Automated BioLite MultiSpectral Light Source is a 150 watt quartz halogen visible light source designed for use with select UVP Advanced Imaging Systems. The unit features a closed optical path to tightly control the output spectrum, allowing consistent and repeatable measurements with superior signal to noise.
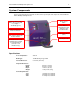
Automated BioLite MultiSpectral Light Source 4 System Components Refer to the packing slip and schematic shown below for specific parts and components included with the BioLite MultiSpectral Light Source.
Automated BioLite MultiSpectral Light Source 5 Output Spectrum Intensity The graph below displays the spectral emission curve for the halogen light source within the BioLite (shown without filtering): Wavelength (nm) Safety Information WARNING: The device will overheat if the fan outlet on the back of the BioLite is blocked. WARNING: The quartz halogen bulb becomes very hot with use. Do not open the bottom access panel while the BioLite is running or without allowing it to fully cool.
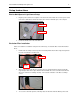
Automated BioLite MultiSpectral Light Source 6 Setup Instructions BioLite MultiSpectral Light Source Setup 1. Plug the power cord into the receptacle on the back of the unit and the other end to a power outlet. Connect the USB cable to the BioLite and the other end to an available port on the computer. USB Cable Power Cord 2. Position the BioLite to the left of the darkroom. Excitation Filter Installation Filters are installed in a metal black casing from the UVP factory.
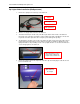
Automated BioLite MultiSpectral Light Source 7 Epi Light Guide Installation (BioSpectrum®) 1. Remove the epi light covers at the top of the darkroom. Stopper Fiber Optic Cable Epi Light Guides 2. Remove one stopper at the left side of the darkroom. 3.
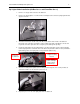
Automated BioLite MultiSpectral Light Source 8 Epi Light Guide Installation (GelDoc-It®2/TS2 and ChemiDoc-It®2/TS2) 1. Remove one stopper at the left side of the darkroom. 2. Remove any existing plates or screws from the mounting bracket so that the epi light guide bracket appears as follows: 3.
Automated BioLite MultiSpectral Light Source 7. 9 Remove the rubber cap from the input side of the fiber optic trunk and plug the cable into the left port on the BioLite unit. Plug the Fiber Optic Cable into the left port Fiber Optic Light Table (Transilluminator) Installation 1. Remove one stopper at the left side of the darkroom. 2. If the imaging system already contains a transilluminator, unplug and remove the transilluminator. 3.
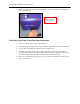
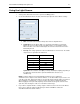
Automated BioLite MultiSpectral Light Source 10 Using the Light Source 1. Set the power switch on the front of the system to the ON (I) position. 2. Use the VisionWorksLS “BioLite” module (shown below) to adjust the various BioLite settings: a. Filter: Select the desired excitation filter position from the dropdown menu. b. Light Engine: Turn the BioLite bulb on or off using the radio buttons (note that the BioLite’s green power switch must be in the ON position to use the lighting controls).
Automated BioLite MultiSpectral Light Source 11 Fiber Optic Lighting Selector Light Source Switch Light Intensity Switch Filter Position Switch a. Fiber Optic Lighting: Press this button to select either Epi or Transillumination lighting. Note that both epi and transillumination cannot be used simultaneously. b. Light Source: Press this button to turn the halogen light bulb on or off. When the bulb is on, the lower indicator light to the left of the switch will glow red. c.
Automated BioLite MultiSpectral Light Source 12 Service Procedures Bulb Replacement The BioLite’s Type EKE 150 watt halogen bulb has a standard life of 200 hours. It must be replaced with the same bulb type only. The UVP part number is 34-0088-01. The BioLite bulb replacement procedure is as follows: 1. After allowing the unit sufficient time to cool after last use (at least 1/2 hour), unplug the BioLite from its power source. 2.
Automated BioLite MultiSpectral Light Source 13 5. Insert the replacement EKE halogen 150 watt bulb, ensuring that it is fully seated. 6. Replace the cover and secure with the brass nut before plugging unit back in or turning it on. Return Procedure A Returned Goods Authorization (RGA) number must be obtained from UVP Customer Service before returning any product. See “Technical Support” below for contact information.
Automated BioLite MultiSpectral Light Source 14 Care and Cleaning Use only mild soap or detergent solution for cleaning. Do NOT use oil- or petroleum-based cleaners for the cabinet. Ensure that the system is turned OFF and unplugged during cleaning. Technical Support UVP offers free lifetime technical support on all of its products and software. Should you have any questions regarding the product’s use, operation or repair, contact UVP’s offices at the locations below, or visit www.uvp.com.