PCR Workstations and Cabinets Installation and User Instructions UVP, LLC 2066 W 11th Street, Upland, CA 91786 Tel: (800) 452-6788 / (909) 946-3197 Fax: (909) 946-3597 Ultra-Violet Products Ltd. Unit 1, Trinity Hall Farm Estate Nuffield Road Cambridge CB4 1TG UK Tel: +44(0)1223-420022 / Fax: +44(0)1223-420561 Web Site: www.uvp.
PCR Workstations and Cabinets Page 2 Introduction The UV1 and UV2 PCR Hoods create an ideal environment for preparing PCR and other samples by reducing the chance of contamination. The built-in high intensity shortwave (254nm) UV provides a source for inactivation of DNA between experiments. Additional contamination control is provided by the specially-coated stainless steel and aluminum design that maintains antimicrobial ® efficacy. The surface resists growth of destructive bacteria, molds and fungi.
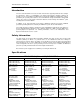
PCR Workstations and Cabinets Page 3 HEPA/UV3 PCR MODELS HEPA UV3 PCR Cabinet HEPA UV3 PCR Workstation 95-0434-01 115V 95-0434-02 230V UK 95-0434-04 230V Euro 95-0434-03 100V 95-0438-01 115V 95-0438-02 230V UK 95-0438-04 230V Euro 95-0438-03 100V Light Sources: 254nm 8-watt UV: Filter area Chamber UV/air circulator White – 8-watt: Chamber Three stage filters: Pre-filter Carbon filter HEPA filter Features include: Two power outlets Two small shelves UV Timer Antimicrobial coated stainless steel
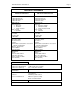
PCR Workstations and Cabinets Page 4 Operational Ratings • PCR Hoods are intended to be used indoors only • Altitude must not exceed 2,000m • Ambient temperature must not exceed 5°C to 40°C (41°F to 104°F) • Relative humidity must not exceed 80% for temperatures up to 31°C (88°F) decreasing linearly to 50% relative humidity at 40°C (104°F) • Mains supply voltage fluctuations must not exceed ±10% of the nominal voltage • Pollution rating 2 or better for laboratory areas Part Number Voltage Ma
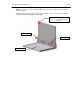
PCR Workstations and Cabinets Page 5 Assembling the PCR System Carefully remove the PCR Hood components from the packaging. CAUTION: Use care when unboxing the PCR Hood, as staples with sharp ends may have been used in packaging. Follow the assembly instructions provided in this manual. NOTE: Place the PCR Hood Base on a level surface large enough to accommodate the entire Base. The surface must be level to ensure ® proper alignment of the Makrolon panels.
PCR Workstations and Cabinets Page 6 NOTE: It is advised to use the remaining bubble wrap to protect the antibacterial-coated surfaces during assembly. 3. Attach the Outer Back Panel to the Base Assembly with two screws, as shown below. Leave the screws loose (do not fully tighten at this time). Outer Back Panel. Note the notch in the top of the panel allows room for the wires.
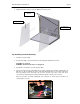
PCR Workstations and Cabinets Page 7 Inner Back Panel 1. Position the Inner Back Panel so that the screw holes align with the Outer Back Panel. Attach the Inner Back Panel to the Outer Back Panel with two (2) screws, as shown. Make sure the wires come out of the cutout in the back panel, as shown by the red circle below, for later connection to the Top Assembly. 2. Secure the Shelf Bracket to the front of the Inner Back Panel using: a. b.
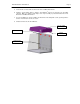
PCR Workstations and Cabinets 5. Page 8 ® Tighten all Frame screws to secure the Makrolon Panels in place. ® Makrolon Panel Frames ® Makrolon Panels Shelf Bracket Top Assembly and Shelf Assembly 1. Unwrap the Top Assembly. 2. Rest the Assembly on top of the Back Panel Assembly and side Makrolon Panels. ® CAUTION: Top is heavy! WARNING: Ensure that the unit is not plugged in. 3. Pull all of the colored wires out of the Top Assembly. 4.
PCR Workstations and Cabinets Page 9 5. Tuck all of the connected wires between the Inner and Outer Back Panels. 6. Slide the Top Assembly down so that the side Makrolon Panels are inside the Top Assembly channels. Make sure that the back flange of the Top Assembly is positioned between the Inner Back Panel and Outer Back Panel. 7. Secure and tighten the Top Assembly to the Back Panel Assembly with screws, pushing from the back to ensure that the screws are secure. 8.
PCR Workstations and Cabinets Page 10 Door Assembly ® 1. Remove the protective film from the Makrolon panels. 2. Slide the upper panel of the Door Assembly into slotted area in the Top Assembly. Holding the door in position, use the black thumb screws (qty. 3) to attach the upper door panel to the Top Assembly. NOTE: To help the screw holes align, slide the Door Assembly fully up into the Top Assembly, then slightly lower the Door Assembly. 3.
PCR Workstations and Cabinets Page 11 Operating the PCR Hood The PCR Hoods feature: • • • • • • • • • Three-stage HEPA filtration system with pre filter, carbon filter and HEPA filter (UV3 models only) Overhead UV for decontamination of the chamber or PCR equipment UV safety switch and keylock for preventing exposure to UV Antimicrobial coated stainless steel and aluminum for reducing bacterial growth Easy-access door Overhead white light Shelves for placement of tools Power outlets built into the chambe
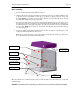
PCR Workstations and Cabinets Page 12 HEPA/UV3 Control Panel: 30-Minute UV Timer Timer Calibration Button Hole Power Switch for UV/Air Circulator Overhead White Light UV Keylock UV1 and UV2 Control Panel: Overhead White Light Power Switch for UV/Air Circulator 30-Minute UV Timer Timer Calibration Button Hole To use the UV decontamination function, turn the UV Keylock ON, then press the UV Timer to operate the germicidal lamp housed within the chamber.
PCR Workstations and Cabinets Page 13 ® The Makrolon door is UV blocking and will not allow UV radiation to pass through the door. The germicidal tubes will shut off if the door is opened. The PCR Workstation contains a powerful source of UV radiation that will cause damage to unprotected eyes and skin. Before operating any unit, be sure all personnel in the area are properly protected. Even though the unit shuts the UV off when the door is open, UV Blocking Eyewear should be worn as well.
PCR Workstations and Cabinets Page 14 Care and Cleaning The PCR Hoods are built to provide trouble-free operation. ® NOTE: The door and side panels are made of Makrolon and are subject to scuffing and scratches if improperly cleaned. ® NOTE: Crazing is a normal process for Makrolon panels exposed to UV light. Crazing will occur over a period of time. Reduce crazing by keeping UV exposure to a minimum.
PCR Workstations and Cabinets Page 15 Maintenance and Replacement Parts/Accessories Replacement Parts and Accessories Replacement parts are listed below. Only authorized UVP service personnel should perform repairs or replacements other than specified in the procedures within this user manual. Replacement Parts Fuse (2 required) Shelf, small 8.
PCR Workstations and Cabinets Page 16 Replacing the Fuses Fuses are located on lower corner of the system. To remove the fuse, use a flathead screwdriver to turn the fuseholder counter-clockwise. Pull the fuse out. Insert the new fuse and, using the screwdriver, turn the fuseholder clockwise to lock. Replacing Tubes in the Chamber Turn the system power off and unplug the unit from the outlet. Open the Door and locate the tubes.
PCR Workstations and Cabinets 4. Page 17 Carbon Filter: Slide the filter assembly out of the chamber. The Carbon Filter (76-0352-01) then slides to the right out of the filter assembly. If the filter does not slide out easily, loosen the thumb screws in front of the filter. Carbon Filter Thumb Screws 5. HEPA Filter: To replace the HEPA filter, slide the filter assembly out of the chamber and remove the carbon filter if not already removed. Turn the knobs counterclockwise to loosen. Open the HEPA door.
PCR Workstations and Cabinets Page 18 Measuring the UV Tube Intensity As the ultraviolet tubes age, the intensity and germicidal destruction rate decreases. It is important to monitor the efficiency of the tubes to ensure that the germicidal requirements are met. The germicidal destruction rate is a function of the UV intensity at a wavelength of 254nm and the exposure time. The lower the tube intensity, the longer the lamps must be on to accomplish the same objective.
PCR Workstations and Cabinets Page 19 Technical Assistance Note: A Returned Goods Authorization (RGA) number must be obtained from UVP Customer Service before returning any product. UVP offers free lifetime technical support on all of its products and software. Should you have any questions regarding the product’s use, operation or repair, contact UVP’s offices at the locations below, or visit www.uvp.com.