
Use Instructions

14UV Smart D60 | Instructions for Use | Revision 1 US
9. Use
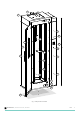
With initial placement of the D60, it is recommended to mount the D60 to a wall using the wall mount. Be aware that if the
D60 is not mounted to the wall, the device may tip over when a force is applied to the front or back of the D60.
UV Smart qualied personnel will connect the D60 power cable to the mains power supply (wall socket) and make sure
the wall socket where the D60 power cable is plugged into is always in reach of users in case of emergency. In case of
emergency, users can unplug the power cable from the wall socket to shut o the D60. After connecting the D60 to the
mains power supply, the personnel will then switch on the D60 and perform the rst time setup, together with a client
responsible. In the case of a connected D60, UV Smart qualied personnel will install UV Soft on the client’s PC and
connect both UV Soft and the D60 to the intranet.
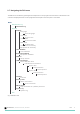
During setup the following settings are congured:
- Language
- Time zone
- Time and date
- D60 description
These settings can be adjusted at any moment by a master user in the D60 menu. Refer to chapter 9.7 of this Instructions
for Use. After the setup 4 users are pre-installed (1 master and 3 normal users) and 3 equipments (see 9.7.4 and 9.7.5).
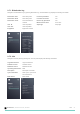
9.2. First time use (setup)
9.1. Connected and standalone D60
Two congurations of the D60 are available: A connected D60 and a standalone D60. During the rst time use (setup), the
conguration selection is made by the user, depending on the user’s needs. The dierence between the congurations is
described below:
Connected D60
A connected D60 is connected to the client’s intranet, via ethernet cable. This D60 works together with UV Soft, UV
Smart’s data logging software. The software is installed on a client’s PC, connected to the same intranet. Within UV Soft,
users and equipment for disinfection can be added and edited and use data can be viewed and exported. Refer to chapter
10 for UV Soft details.
Standalone D60
A standalone D60 is not connected to any network. Users and equipment for disinfection are imported into the D60 via
USB ash drive. Use data can be viewed and exported from the D60 interface.
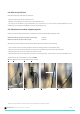
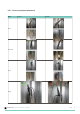
9.3. Before every D60 use
Perform the following steps before every D60 use.
1. Make sure there are no signs of D60 damage or D60 material degradation.
2. In case the display indicates an error or maintenance state, contact your local distributor.
3. Make sure no equipment from the previous disinfection cycle is present in the disinfection area.
4. Make sure all visible debris is removed from the disinfection area.
5. Make sure the door is closed.
6. Make sure the D60 setup has been performed.
When all steps have been performed and the D60 display enables to start the disinfection process, the D60 is
suitable for use.
- ID necessity: Does the client want to make use of user identication?
- Equipment ID necessity: Does the client want to make use of equipment identication?
- Network settings