EVDO USB Modem UM100C www.utstar.
CONTENTS CONTENTS 1. BEFORE USING UM100C ................................................................................1 1.1 About this User’s Manual ..........................................................................................1 1.2 Product Overview ......................................................................................................1 1.3 Product Package Contents .......................................................................................1 1.
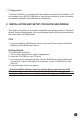
1. BEFORE USING UM100C 1.1 About this User’s Manual You will find all the information you need to install and use the UM100C in this user’s manual. Before using the UM100C, you must properly install the UM100C by closely following the installation instructions. Instructions • Install the UM100C software before inserting the UM100C USB Device into your PC. The installation software is included in the product package. Insert the CD into your CD-ROM drive. Installation may take a few minutes.
1.4 Introduction to UM100C USB Modem The UM100C is designed for your PC’s USB port, which is available in most PC models. The UM100C can be used to access the Internet, your company’s intranet, or you can use it to send and receive email. It is extremely useful when you are away from the office, on the road, or wherever wireline Internet access is not readily available. 1.
1.7 Configuration To use the UM100C, you should install the software included in the installation CD and configure the UM100C USB device. See the next section for more information on software installation and USB device configuration. 2. INSTALLATION AND SETUP FOR QUICKLINK MOBILE This section will guide you through the installation and setup process for QuickLink Mobile. Before getting started, you should become familiar with the documentation that came with your USB Modem. CD’s 1.
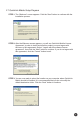
2.1 QuickLink Mobile Setup Program STEP 1: The “Welcome” screen appears. Click the “Next” button to continue with the installation process. STEP 2: After the Welcome screen appears, you will see QuickLink Mobile License Agreement. In order to install and use this product you must agree with the terms of this agreement. Select “I agree with this software license agreement”, then click the “Next” button to continue. If you do not agree with this agreement, click the “Cancel” button to exit.
STEP 4: During this step the components of QuickLink Mobile product are being installed onto your computer. Installation will occur to the destination folder specified in Step 3 above. STEP 5: Installation is now complete. Click the “Finish” button to leave the QuickLink Mobile setup program and begin using your new software. * The setup program will automatically create a QuickLink Mobile shortcut on your desktop.
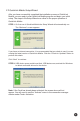
2.2 QuickLink Mobile Setup Wizard After you have successfully completed the installation process of QuickLink Mobile, you are ready to start QuickLink Mobile program and begin your initial setup. The steps in the Setup Wizard are critical to the proper operation of QuickLink Mobile. STEP 1: On first-run of QuickLink Mobile the Setup Wizard will automatically run. The “Welcome” screen appears.
STEP 3: The detection and configuration process for your wireless device is now complete. In this step you can elect to run QuickLink Mobile automatically every time you start your computer. Click “Finish” when complete. Please familiarize yourself with the information in the “Using QuickLink Mobile” and “Connecting to the Internet” sections of this guide.
3. USING QUICKLINK MOBILE Today’s online world offers more services everyday and Wireless gives you the tools you need to take advantage of the best in connectivity solutions. With QuickLink Mobile, enjoy the freedom and convenience of wireless Internet connectivity from your notebook computer! 3.1 Features WWAN (Wireless Wide Area Network, 1xEV-DO/1xRTT/CDMA) Specific Features: • Configures your PC to use your USB Modem. • Creates a Data Connection if using an EVDO capable USB Modem.
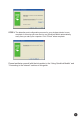
At a glance you can see the signal strength and battery level. Select “Refresh Networks” from the “Tools” menu to update the information in this panel. Your current connection state and the elapsed time of the connection are displayed along the bottom of the status bar. If your expected connection does not appear after starting QuickLink Mobile, select “Refresh Networks” from the “Tools” menu. * If you change USB Modems, you will need to run the Setup Wizard again.
QuickLink Mobile will display status information at the bottom during the connection process as well as while connected. When not connected, the status text in the lower left corner will display “Not connected” for the currently selected network. The timer will display “00:00:00”. Once connected, the status text will display “Connected” and the elapsed timer will begin to run.
Dormancy: The data session becomes dormant if you are not sending or receiving any data. As soon as you resume sending or receiving data, the data session will return to an active state. Depending on your device and service plan, your data session may disconnect during a dormant state. 3.4 SMS Messaging QuickLink Mobile supports SMS Messaging for the UM100C. Receiving SMS Messages • All of your SMS messages will appear in the list box at the top of the SMS messaging view.
• To forward an inbound message, select the message and press “Forward” button. The message will be populated in the send area below prefixed with a “FW:.” Press the “Send” button to send the message. • To resend a sent message, select the message and press the “Resend” button. The phone number and message will be populated in the send area below. Press the “Send” button to send the message again.
4. QUICKLINK MOBILE PREFERENCES 4.1 General Preferences Options Tab Click on “Options”, then “Preferences”. Minimize application into tray: When you minimize the application it will now appear in the Windows task bar. To restore the application click on QuickLink Mobile tray icon, and select “Show Application”. Show popup status windows by tray: Displays small popup sliding windows in the lower right corner of the screen when connections are made, and when network connections are lost.
This feature allows QuickLink Mobile to automatically check for software updates. If an update is available, you will be notified of its size and approximate download times. You will be given the choice to download or cancel. If you select download, a display appears that shows the progress as the update is downloading with the option to cancel if desired. You do not need to download the updates wirelessly; you can use any connection to the Internet.
Connect Tab When you select the “Set Options” button from the screen above, the following options will appear (“Options”, “Preferences”, “WWAN tab”, “Set Options. . . “) : Do not open my browser: With this option selected, when you connect to a WWAN network, QuickLink Mobile will not automatically launch your default web browser.
VPN Tab The following options exist on the VPN tab (“Options”, “Preferences”, “WWAN” tab, “Set Options. . . “, “VPN” tab) : VPN Client: QuickLink Mobile automatically detects if certain VPN clients like Microsoft, Cisco, CheckPoint, etc are installed on the computer and allows you to select the one you wish to use. Check with your network administrator to setup your VPN connection. If the VPN client you wish to use does not appear in the list, you can select “Other VPN Application”.
4.3 SMS Settings SMS (Short Text Message Service) is a messaging application for your wireless device which allows you to compose and send text messages to other wireless phones and email accounts. The SMS tab in the preferences dialog allows you to configure certain text message delivery options.
4.4 Additional Features In addition to the basic features mentioned in previous sections, QuickLink Mobile has the additional features listed below. The Status Bar The details of your current connection can be seen in the status bar at the bottom of QuickLink Mobile interface. This status bar is always visible when the interface is fully expanded. You can see the service area as an icon appearing on the left bottom of the QuickLink Mobile interface.
The Session Menu Connect / Disconnect: You can connect or disconnect the wireless networks. Log: This provides a concise session log of your network activity. Click on a column heading to sort the log. This window also displays the total number of sessions as well as the total time connected. The information displayed in the Usage log can be customized using the controls that appear just below the list.
The Tools Menu Test WWAN Device: Retrieve and display detailed information about your WWAN device (1xEV-DO/1xRTT/CDMA USB Modem) such as manufacturer, model, version, etc. This information can be valuable when troubleshooting a problem. Run Wizard: Runs the Setup Wizard again. This is useful if you need to reconfigure QuickLink Mobile to use a new USB Modem. Activation: Programs the activation code, phone number, and IMSI(MIN) to the USB Modem. Data Setup: Please contact the service provider for details.
The Options Menu Control Panels: From this menu you have access to your system’s “Modem”, “Network and Dial-Up Connections”, and “Internet” control panels. You can also see all control panels by selecting “All”. Preferences: This is used to select preferences for connection settings. Please see WWAN Specific Settings for details.
5. INSTALLING UM100C 5.1 Precautions 1) Do not insert the UM100C before installing the software on the computer. When you complete the software installation, the system will prompt you to insert the UM100C into the USB port. 2) Once the modem has been inserted into the PC, do not remove it from your PC without first completing the unplugging/ejection process. 5.
5.3 Installing Software 5.3.1 Warnings • Make sure to complete the unplugging/ejection process before removing the UM100C. If you remove the device improperly, the product may be damaged. • Before inserting the UM100C into your PC’s USB port, remove the Installation CD from the CD-ROM drive. 5.3.2 Notes • If you have inserted the device properly, Windows will inform you of the new hardware. Wait until Windows completes the “Found New Hardware” task.
5.3.3 Using the Device Power status LED Signal strength indicator Power statue LED • Green: Power OK. • Red: Not enough power. If you see Red on the power status LED it is recommend that you use the USB modem extension Y cable. Signal strength indicator • 0~4: weak or no signal strength, 4: high signal strength. Note: Make sure to complete the unplugging/ejection process before removing the UM100C. If you remove the device improperly, the product may be damaged. 5.3.
1) Unplug or Eject Hardware with Windows 2000 • As shown in the above figure, two “NEC PCI to USB Open Host Controller” options will be displayed in the Hardware devices list of Win2000. However, one of them is disabled and marked with “V”. Select the device with no “V” mark. If you select it and click the “Stop” button, the following window will appear: • Select either of the “NEC PCI to USB Open Host Controller” and click the [OK] button. • The dialog box above will appear. Click the [OK] button.
• Then, the above window will appear. It is now safe to unplug the UM100C. 2) Unplug or Eject Hardware with Windows XP • As shown above, only one “NEC PCI to USB Open Host Controller” option will be displayed in Windows XP. Select “NEC PCI to USB Open Host Controller” and click the “Stop” button. • Then, two “NEC PCI to USB Open Host Controller” options will be displayed. Select either one of them and click the [OK] button.
• Click the [Close] button. It is now safe to unplug the UM100C. 3) Unplug or Eject Hardware with Windows Vista • As shown above, only one “NEC PCI to USB Open Host Controller” option will be displayed in Windows Vista. Select “NEC PCI to USB Open Host Controller” and click the “Stop” button. • Then, two “NEC PCI to USB Open Host Controller” options will be displayed. Select one of them and click the [OK] button.
• Click the [Close] button. It is now safe to unplug the UM100C. 5.3.5 Remove the UM100C from your laptop • Remove the UM100C from your laptop. When removing the UM100C, always grip the sides of the modem and push/pull carefully. 5.3.6 Using the USB Modem Extension Y Cable • The UM100C Modem package includes an extension USB Y-shaped cable. Although the Y cable is not required for use with your UM100C Modem, it offers increased performance for your UM100C Modem under certain operating conditions.
3) The device is connected to and powered by the computer as soon as the USB Y cable is plugged properly into the appropriate Type A USB port(s). 4) Click Connect.
6. REGULATORY AND SAFETY INFORMATION 6.1 Regulatory Notices UM100C complies with Parts 15, 22, and 24 of the FCC rules. It has been tested with the typical personal computer with a USB port. This USB device must not be co-located or operated in conjunction with any other antenna or transmitter. If you use this USB device in any other configuration, the FCC RF Exposure compliance limit can be exceeded. 6.
• Consult the dealer or an experienced radio/TV technician for help. 4) This USB device does not exceed the Class B limits for radio noise emissions from digital apparatus as set out in the interference causing equipment standard entitled “Digital Apparatus”, ICES-003 of the Department of Communications.
4) Do not use this USB device while driving a car, since it can distract driver’s driving. In some area, using the communication device while driving a car is illegal. 6.5 Specific Absorption Rates (SAR) THIS MODEL DEVICE MEETS THE GOVERNMENT’S REQUIREMENTS FOR EXPOSURE TO RADIO WAVES. Your wireless device is a radio transmitter and receiver. It is designed and manufactured not to exceed the emission limits for exposure to radiofrequency (RF) energy set by the Federal Communications Commission of the U.S.
* In the United States and Canada, the SAR limit for mobile phones used by the public is 1.6 watts/kg (W/kg) averaged over one gram of tissue. The standard incorporates a substantial margin of safety to give additional protection for the public and to account for any variations in measurements. 6.6 Safety Information for FCC RF Exposure WARNING! READ THIS INFORMATION BEFORE USING YOUR DEVICE.
6.8 FCC Compliance Information This device complies with Part 15 of FCC Rules. Operation is subject to the following two conditions: (1) This device may not cause harmful interference, and (2) This device must accept any interference received. Including interference that may cause undesired operation. Information to User This equipment has been tested and found to comply with the limits for a Class B digital device, pursuant to part 15 of the FCC Rules.
(d) Damage resulting from connection to, or use of any accessory or other product not approved or authorized by the Company; (e) Defects in appearance, cosmetic, decorative or structural items such as framing and non-operative parts; (f) Product damaged from external causes such as fire, flooding, dirt, sand, weather conditions, battery leakage, blown fuse, theft or improper usage of any electrical source.
ANY IMPLIED WARRANTIES, INCLUDING ANY IMPLIED WARRANTY OF MERCHANTABILITY OR FITNESS FOR A PARTICULAR PURPOSE, SHALL BE LIMITED TO THE DURATION OF THIS WRITTEN WARRANTY. ANY ACTION FOR BREACH OF ANY WARRANTY MUST BE BROUGHT WITHIN A PERIOD OF 18 MONTHS FROM DATE OF ORIGINAL PURCHASE. IN NO CASE SHALL THE COMPANY BE LIABLE FOR AN SPECIAL CONSEQUENTIAL OR INCIDENTAL DAMAGES FOR BREACH OF THIS OR ANY OTHER WARRANTY, EXPRESS OR IMPLIED, WHATSOEVER.