User Manual must provide user information: Instruction Manual Federal Communication Commission Interference Statement This equipment has been tested and found to comply with the limits for a Class B digital device, pursuant to Part 15 of the FCC Rules. These limits are designed to provide reasonable protection against harmful interference in a residential installation.
UT300-R Ethernet ADSL MODEM USER MANUAL UT-300R Ethernet ADSL MODEM USER MANUAL -2-
UT300-R Ethernet ADSL MODEM USER MANUAL CONTENTS CHAPTER 1 OVERVIEW ................................................................................................................................... 4 1.1 ABOUT ADSL......................................................................................................................................... 4 1.2 DEVICE INTRODUCTION ................................................................................................................... 4 1.
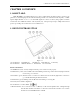
UT300-R Ethernet ADSL MODEM USER MANUAL CHAPTER 1 OVERVIEW 1.1 ABOUT ADSL ADSL MODEM is a broadband Internet access device which utilizes the high frequency segment of the phone line to transmit high-speed data without interfering with the voice transmission. The frequency of ADSL signal is higher than that of voice, so voice and ADSL signal can coexist in one line by using a splitter to insulate each from the other. ADSL data transfer on the asymmetry way.
UT300-R Ethernet ADSL MODEM USER MANUAL 8. Line Interface: To be connected to a telephone. 9. Power switch: To turn on or off the power. 1.3 PROTOCOLS ADSL Modem supports the following protocols: 1. PPPoA PPP over ATM LLC encapsulation or VCMUX encapsulation 2. PPPoE (PPP over Ethernet) LLC encapsulation or VCMUX encapsulation 3. 1483 bridge 1483 Bridged IP over ATM LLC encapsulation or VCMUX encapsulation 4. 1483 routing 1483 Routing IP over ATM LLC encapsulation or VCMUX encapsulation 5.
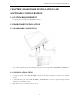
UT300-R Ethernet ADSL MODEM USER MANUAL CHAPTER 2 HARDWARE INSTALLATION AND SOFTWARE CONFIGURATION 2.1 SYSTEM REQUIREMENT A computer with a network card with Ethernet interface. 2.2 HARDWARE INSTALLATION 2.2.1 HARDWARE CONNECTION Figure 2.1 To go online and make phone calls simultaneously, please refer to Appendix B: SPLITTER CONNECTION. 2.2.2 INSTALLATION STEPS 1. 2. 3. Connect line port 8 of the ADSL MODEM to telephone jack with the telephone cord that comes with the modem.
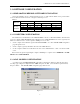
UT300-R Ethernet ADSL MODEM USER MANUAL 2.3 SOFTWARE CONFIGURATION 2.3.1 PREPARATION BEFORE SOFTWARE INSTALLATION Before the installation, please confirm information below or consult with the ADSL service provider. Table 2.1 shows all the information needed to configure for different protocols. Table 2.
UT300-R Ethernet ADSL MODEM USER MANUAL 2.3.4 ADSL MODEM WORK MODE CONFIGURATION 1. For different protocols, the users need to set ADSL Modem accordingly as listed below: Table 2.
UT300-R Ethernet ADSL MODEM USER MANUAL Figure 2.3 2.3.5 ADSL MODEM SOFTWARE INTRODUCTION The same toolbar will appear on different pages, for example“LAN config”is on the page“LAN”and“Routing”. You can modify on either page. 1. Home The page shows the complete configuration. You can click any item to enter the detail configuration page. 2. LAN You can set the IP address and subnet mask, configure the modem as DHCP server, or add DHCP pool on the page. 3.
UT300-R Ethernet ADSL MODEM USER MANUAL 6. Services You can configure the NAT, RIP, firewall and DNS or check it on this page. 7. Admin You can modify user’s password, save modified configuration, reboot ADSL MODEM, update software, and check alarm and port settings information and diagnostics on this page Usually you will be able to complete most of the settings needed on the pages of Home, LAN, WAN, Admin.
UT300-R Ethernet ADSL MODEM USER MANUAL CHAPTER 3 PROTOCOL CONFIGURATION 3.1 HIERARCHY OF PROTOCOLS The hierarchy of protocols interface is shown in Figure 3.1. Figure 3.1 Both PPP and EOA module are build on ATM level interface. If you want to setup PPP, EOA or IPOA modules you must ensure you have an ATM interface first. Please configure protocol modules as stated below: 1. Setup LAN module Eth-0; 2. Setup ATM module.
UT300-R Ethernet ADSL MODEM USER MANUAL Figure 3.
UT300-R Ethernet ADSL MODEM USER MANUAL Figure 3.3 2. EOA Configuration Click EOA label. The factory –set configuration has 7 EOAs. Here we add one more new EOA : eoa-7 as an example. − − − Click “Add” button, the pop up Window is shown as Figure 3.4. Choose aal5-7 option for Lower interface; Disable option for Default Route. Don’t change other items. Click “Submit” button, the result window is shown as Figure 3.5.
UT300-R Ethernet ADSL MODEM USER MANUAL Figure 3.
UT300-R Ethernet ADSL MODEM USER MANUAL Figure 3.5 3. Click “Bridging” Page -> choose eoa-7 option for interface name -> click “Add” button -> click “Submit” button. 4. Click Commit & Reboot label in the page Admin, shown as in Figure 2.3. Click “Commit” button to save. When it shows “Changes Committed Successfully...” click “Reboot” button or turn off then turn on the ADSL MODEM. The MODEM will work on the new parameters. 3.
UT300-R Ethernet ADSL MODEM USER MANUAL − − Choose enable for Default Route option Fill the IP address, IP subnet mask and gateway IP address items with the parameters provided by DSL ISP. Here we will use “202.117.118.25”, “255.255.255.0” and “202.96.199.133” as examples. − Don’t change other options, click “Submit” button, and the result window is shown as Figure 3.7 Figure 3.6 c) Click Commit & Reboot label in Page Admin to access save configuration tools page, shown as Figure 2.3.
UT300-R Ethernet ADSL MODEM USER MANUAL Internal virtual Dialup function in the MODEM 1. ATM VCC configuration Use one of the factory set ATM VCCs for example: aal5-0 (VPI=14, VCI=24) 2. PPP configuration − Click “PPP” label on the Page “WAN”. − Click “Add” button, the pop up window is shown as Figure 3.7. − Choose aal5-0 for the Lower Interface option. − Choose Enable for DNS option. − Fill in the User Name and Password provided by the DSL ISP. − Do not change other options.
UT300-R Ethernet ADSL MODEM USER MANUAL Figure 3.
UT300-R Ethernet ADSL MODEM USER MANUAL CHAPTER 4 OTHER FUNCTIONS AND CONFIGURATION 4.1 STATUS Checking The working status of ADSL Modem can be monitored by some pages. 1 System Information As shown in Figure 4.1, the information of hardware version, software version, DSL link status, link speed, LAN interface and WAN interface can be viewed on this page. Figure 4.1 2 DSL Information As shown in Figure 4.
UT300-R Ethernet ADSL MODEM USER MANUAL Figure 4.2 4.2 CONFIGURATION OF MODEM’S IP ADDRESS AND PASSWORD 1. CONFIGURATION OF ’S IP ADDRESS As a network device, ADSL Modem has its own IP address and MAC address. The factory sets the at a default IP address of 192.168.1.1 and subnet mask of 255.255.255.0. The user can configure these addresses through the LAN configuration tab on page LAN. 2.
UT300-R Ethernet ADSL MODEM USER MANUAL CHAPTER 5 RESET TO DEFAULT SETTING If you are experiencing difficulty logging on to the configuration page (For example: you forget the password), you can reset the ADSL MODEM to the default configuration Then you will be able to log on with the default username and password. Method: Turn on the ADSL MODEM, put a pin into the eyelet, and press it quickly three times.
UT300-R Ethernet ADSL MODEM USER MANUAL CHAPTER 6 SPECIFICATION 6.1 Power supply Exterior power adapter Input: 110VAC, 60Hz Output: 11VDC 700mA. Polarity 6.2 Dimension 140mm Length x130mm Width x32mm Height 6.3 Weight Weight: about 200 gram 6.4 Standards EMI/Immunity: FCC Part 15 Class B, CE Mark (EN55022 Class B/EN50082) Safety Standard: UL EN60950 Communication: FCC Part 68, CYR21 Electromagnetic: in accordance with FCC, ETSI and CISPR standard 6.
UT300-R Ethernet ADSL MODEM USER MANUAL APPENDIX A. TROUBLESHOOTING Phenomena Solution 1. Make sure the connection of power supply is good. The indicator of power supply is not on 2. Make sure the switch of power supply is turned on. 3. Make sure the output of power supply is correct. 1. Check the connection between the cable and the network card. The indicator of PC is not on 2. Make sure that the correct cable is used. 3. Make sure the cable works fine by pinging the host IP address. 1.
UT300-R Ethernet ADSL MODEM USER MANUAL APPENDIX B. SPLITTER CONNECTION 1. Splitter 2. Connection Firstly, use a telephone cord to connect the LINE port of the splitter and the RJ-11 port (the phone jack) on the wall. Then use another telephone cord to connect the ADSL port of the splitter and the LINE port of the ADSL Modem. Finally, use another telephone cord to connect the telephone set and the PHONE port of the splitter.
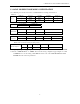
UT300-R Ethernet ADSL MODEM USER MANUAL APPENDIX C. CONFIGURATION OF TCP/IP PROTOCOL Here we will explain the configuration which using Windows 2000 operation system as an example. For other operation systems the process is similar. 1. Right click on the “Local Area Connection”, click “Properties” on the pop up menu, as shown in Figure C.1. 2. Figure C.1 The dialog box of networks is shown in Figure C.2.
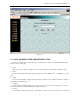
UT300-R Ethernet ADSL MODEM USER MANUAL 3. The “Internet Protocol (TCP/IP) properties” pop up window is shown as Figure C.3. Select “Use the following IP address”. Input the following IP address: 192.168.1.11 and subnet mask: 255.255.255.0 (These addresses and subnet mask are similar with the factory default setting. The user can set different IP addresse and subnet mask whenever necessary). Select “Gateway”, input the default IP address of the gateway: 192.168.1.
UT300-R Ethernet ADSL MODEM USER MANUAL ADSL MODEM Warranty Certificate Cable Cat5 RJ45 Splitter Telephone Line (RJ-11) User Manual Power Adapter - 27 -
UT300-R Ethernet ADSL MODEM USER MANUAL Please use the factory recommended power supply.