
User's Manual


32 Chapter 4 Web-based Configuration
User Guide WA3001-S Access Point
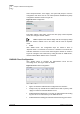
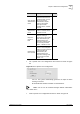
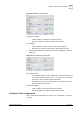
Select “Repeater Mode”, click <Apply>, the system will prompt to save the
configuration and reboot the AP. The WDS (Wireless Distribution System)
configuration window is shown in Figure 40.
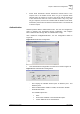
Figure 40 WDS Configuration
Enter MAC address, click <Add>, and set the other party of AP in Repeater
mode, then configure its MAC address
Note: Implement the wireless bridge and AP coverage by setting
one AP’s wireless network card in AP mode, and the other in Repeater
mode.
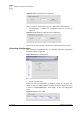
• P2MP
Click “P2MP mode”. The configuration steps are similar to those in
“Repeater mode”. A central AP can connect to a maximum of 6 remote APs.
Add MAC addresses for each remote AP through the window as shown in
Figure 40. Configure each remote AP by setting the mode to “P2MP mode”,
and then add the MAC address for the central AP.
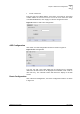
RADIUS Client Configuration
Click “Radius Client” to configure the authentication server and the
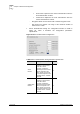
accounting server. See Figure 41 for the details.
Figure 41 Radius Client Configuration
• Figure 41 shows the RADIUS Client configuration user interface
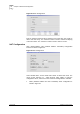
• Priority Level (1-3): AP will select a RADIUS server with 1
st
priority. Click
“Apply” to enable the selected RADIUS server.
• Authentication/Accounting Key: In the AP, the authentication/Accounting
key must be set to match the key in the RADIUS server.
• Authentication/Accounting port: Authentication/Accounting port number