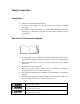
Safety Precautions Introduction z z z Thank you for purchasing the FSU811 To ensure correct usage of your phone, please read this User Guide thoroughly The display screens, illustrations, etc., used in this document were created expressly for instructional purposes and may differ slightly from the actual phone. How to Use This Instruction Manual z z z z z z In this manual, “press” means to press the key and then release; “press and hold down” means to press the key for 2 sec or more and then release.
z The following symbols indicate explanations of what is to be observed. This symbol indicates a prohibited action. This symbol indicates an action that must always be performed. This symbol indicates that disassembly is prohibited. This symbol indicates that the plug of the power cord must be removed form the outlet. This equipment has been tested and found to comply with the limits for a Class B digital device pursuant to Part 15 of the FCC Rules.
Handling the Phone Do not use the phone while driving. Otherwise, it may cause a traffic accident. Stop the vehicle in a safe place before using the phone. Disconnect the AC adapter and remove the battery in areas such as aircraft, hospital, etc., where such usage is forbidden to avoid influence on electronic devices and electrical medical equipment. Observe the relative stipulations when you have to use the phone in such area. Do not use the phone near electronic equipment easy to be interfered.
Do not use or leave the battery close to places such as a fire, heater, etc., where temperature is high. This could result in battery leakage, overheating, cracking and fire. When the battery is recharged or stored, if there is something wrong such as generation of heat, discoloration, deformation, etc., remove the battery from the phone and do not use it any more. Otherwise, it may result in battery leakage, overheating, cracking or fire.
Do not touch the AC adapter, power cord or power outlet with wet hands. Otherwise, it may cause electrical shock. Always disconnect the power plug from the power outlet before cleaning to avoid any chance of electrical shock. Do not place heavy objects on the power cord or make modifications. Such action may result in electrical shock or fire. Requests Concerning the Phone Avoid extremely high or low temperature.
Safety Precautions............................................................................................................. 1 1. Getting Started ................................................................................................. 1-1 1.1 1.2 1.3 1.4 1.5 2. Check the Phone and its Accessories ......................................................................................... 1-1 Phone Specifications .....................................................................................
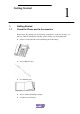
Getting Started 1. Getting Started 1.1 Check the Phone and its Accessories 1 Please check the package for the following components. If any are missing, or if the User Guide is damaged or unusable, please contact your local distributor.
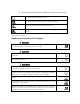
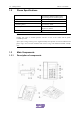
1-2 Getting Started 1.2 FSU811 User Guide Phone Specifications Size Approximately 220mm×190mm×73mm (not including antenna and Microphone) Weight Approximately 0.94kg Battery Ni-MH 4.8V 1600mAH Transmitting Power Approximately 10mW Power Adaptor Input 80V--320V Output 6.5V, 680mA Battery Standby Time Approximately 48~60 hours Note: Standby time refers to normal operation with the receiver in the cradle and the phone available for calls.
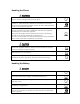
FSU811 User Guide Getting Started 1-3 1. 2. 3. 4. 5. 6. 7. Antenna Power adapter socket RJ-11 phone extension socket Microphone Liquid crystal display (LCD) MENU/OK key Performs the functions indicated in the message display ESC key Returns to standby mode; accesses the phone book directory when the phone is in standby. 8. DIR key Displays phone book records when the receiver is in the cradle. 9. DEL key Deletes last action. 10.
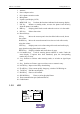
1-4 Getting Started 1. FSU811 User Guide : Indicate signal strength. When the phone is within a service area, the signal strength bar will be displayed. 2. : Displayed after picking up the receiver (off-the-hook). 3. : Displayed when the alarm function is enabled. 4. : 5. R: 6. : Displayed when a battery is connected. This icon gives information on the electric energy left in the battery. Displayed if the ring is not set to “OFF”. Indicating that there is a RJ11 extension in use.
FSU811 User Guide Getting Started 1-5 To decrease the phone height, press “PRESS” in the center of the stand. And at the same time press downward on the side with black rubber foot. The angle between the stand and the base of the phone can be reduced. 3. Adjust the two stands to identical angles. Turn the phone right side up. z Note: Avoid overexerting when regulating the height of phone to prevent the phone from being damaged. There is a hole in both right and left sides of the base of the phone.
1-6 Getting Started 1.4.2 FSU811 User Guide Battery Installation To ensure proper operation in the event of a power failure, the battery must be correctly installed. z When power is cut, the battery is used; if the battery is exhausted please don’t remove it. When AC power resumes, the battery will gradually be recharged. 1. Remove the battery compartment cover. z 2. Install the battery. Note: Be sure to observe proper polarity direction when installing the battery. 3.
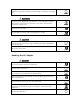
FSU811 User Guide Tue. 2003- 11- 05 12: 23 Menu z z Getting Started 1-7 Wel come Names In case of power failure, pay attention to the battery capacity display . In case of power failure, if battery capacity is insufficient, the battery icon will flash, and an alert will sound. This indicates that the phone will quickly cease to operate.
Basic Operations 2. 2 Basic Operations z z z z Menu options that correspond to a number, may be accessed by pressing the appropriate number key. You can also select an option by pressing the UP or DOWN keys to select the desired option→press the MENU/OK key. This guide primarily refers to the key-entry, selection method. All menu options may be browsed cyclically using the cursor keys. When the last menu option is selected, press the DOWN key to return to the first menu option.
2-2 Basic Operations z FSU811 User Guide After dialing the number, the call timer is activated and the call duration is displayed. The time displayed here is for reference only, and should not be used as a basis for disputing charges. 2003- 11- 05 Tal ki ng. . . COMPANY 12: 23: 03 01: 32 12345678 3.
FSU811 User Guide z z 2.2 Basic Operations 2-3 After dialing the number, the call timer is activated, and the call duration is displayed. The time displayed here is for reference only, and should not be used as a basis for disputing charges After the call, press SPEAKER key to hang up, or put the MIC back to the phone. One-Key Dial 1. Pick up the receiver (off-the-hook) or press the SPEAKER key; the off-thehook screen will be displayed. 2.
2-4 Basic Operations z FSU811 User Guide The call duration is displayed. The time displayed here is for reference only, and cannot be used as a basis for disputing charges. 2003- 11- 05 Tal ki ng. . . 12: 23: 03 01: 11 COMPANY 12345678 3. After the call, hang up the receiver (hang-up) or press the SPEAKER key again to return to the menu displayed prior to the call. 2.4 Call Hold During the call, press the HOLD key to place the call on hold. Press the HOLD key again to resume the call.
FSU811 User Guide Basic Operations 2-5 3. After the call, A hangs up the receiver (hang-up) or presses the ESC key to disconnect with both B and C and return to the previous operation mode. 2.6 Adjust Earphone Volume During a Call During a call, the earphone volume can be increased or decreased by pressing the 【Up Down】keys. The volume icon is displayed in the lower right-hand corner of the screen. 2003- 11- 05 Tal ki ng. . .
2-6 Basic Operations FSU811 User Guide As shown in the Figure 01/17, the upper right corner display indicates the last dialed number and that the phone has stored 17 dialed numbers. z If there is no dialed numbers, “No Record” will be displayed. z In standby status, you can also view the Dialed Call Log by pressing UP key. 4. Press UP and DOWN key to browse the dialed numbers. z If the number has been stored in the Phonebook, the name stored in the Phonebook will be displayed.
FSU811 User Guide Basic Operations 2-7 When there are missed calls, the message “Missed Call ” will be displayed, , along with their quantity. Press MENU/OK key to view the unanswered incoming calls. If there is more than one unviewed incoming calls are more than one, press UP or DOWN key to browse. 2.9 Received Call Log The phone can store the last 60 received call numbers (Each number has a max of 24 digits). You can search the received calls and dial them.
2-8 Basic Operations FSU811 User Guide 2. Press 1 to display the Call Log menu. 3. Press 4 key to select “Delete Logs”. 4. Press UP key or DOWN key to select the deleting method→then press MENU/OK key ,the password entry prompt will be displayed. z The available deletion methods are: “1 Delete Missed Log”, “ 2 Delete Received Log”, “3 Delete Dialed Log” and “4 Delete All”. z You can also press the corresponding number to select and confirm a deletion method. 5.
3 Phonebook 3. Phonebook 3.1 Entry method z z z Upper/lower case English letters entry and numeric entry modes are available. You can English letters and numbers.
3-2 Phonebook 3.1.1 FSU811 User Guide Introduction to the Entry Display A 拼 B I nput Name: OK 1. 2. 3. 4. 3.1.2 AB A BC2 Back Text display area (cursor flashes here) Entry mode display area Entry area Character selection area Entry Method In Upper/Lower case English letter entry mode, when pressing keys 2-9, the current letter and letter combination that can be entered with the key is displayed on the right side of the entry area.
FSU811 User Guide 3.1.4 Delete/Modify Characters z z z 3.2 Phonebook 3-3 To delete a character during input, press the DEL key To modify characters, use LEFT RIGHYT keys to move the cursor in the middle of the text. The character selected by the cursor will flash. Press DEL to delete the character that is before the selected character. Then input the correct character(s). To modify characters, use the LEFT RIGHT keys to select the appropriate text location. The selected character will flash.
3-4 Phonebook z 3.3 FSU811 User Guide If a record with the same name and the same number is already stored in the phone book, after pressing【MENU/OK】, the message “In Existence” will be displayed, and the phone will sound an alert tone. This duplicate record cannot be stored. Search Phone Number 1. In standby mode, press the MENU/OK key, then press 2 to display the Phonebook menu. z You can also enter the “Phonebook” menu by pressing ESC in standby mode. 2.
FSU811 User Guide Phonebook 3-5 4. Modify the name, then press the MENU/OK key. z The modification screen of the telephone number in the record is displayed on the screen. z When modifying the name, first press DEL key to delete the original name, then input the new name. 5. Modify the telephone number, then press MENU/OK .The message “Accomplished” appears, indicating the record has been successfully modified.
3-6 Phonebook FSU811 User Guide Note: If key 0 has been set to One- Key Dial, after picking up the receiver, press and hold 0 to dial the corresponding phone number. After step 2, press UP/DOWN to select the key that has been set to One-Key dial, then press MENU/OK, then press 1 to select “Change”; the phone book records will be displayed. Press UP/DOWN to select a new record; then press MENU/OK. The phone book record corresponding to this key will be changed.
4 The Additional Functions 4. Additional Functions 4.
4-2 The Additional Functions 4.2.2 FSU811 User Guide Delete Your Number 1. Press MENU/OK , then 3 ,then 1. z If your number has not been entered yet, only “Own Number” will be displayed. z If your number has already been entered, both “Own Number” and the number you entered will be displayed. 2. Press MENU/OK to proceed. 3. Press 2 to select “Delete”, the message “Delete?” will be displayed. 4.
FSU811 User Guide 4.4 The Additional Functions 4-3 Time setting z After setting the time/date, they will be displayed in standby mode. Please enter the time correctly. Other functions (such as the alarms) refer to the time and will only function properly when it has been set. z The phone’s default time/date setting is Jan 1, 2003 00:00. The date setting options range from Jan 1, 2000 to Dec 31, 2049. 1. Press MENU/OK→3→3, to display the date and time entry menu. 2.
4-4 The Additional Functions FSU811 User Guide Press the Right key to increase the contrast by 4, and press the Left key to decrease the contrast by 4. z Press the UP key to increase the contrast by 1, and press the DOWN key decrease the contrast by 1. z During the adjustment, the current selected contrast will be displayed for reference. 3. Press MENU/OK to confirm the selected contrast. If the setting is successful, “Finished” will be displayed; otherwise, prompt of failed will be displayed. z 4.
FSU811 User Guide 4.8 The Additional Functions 4-5 View the Calendar 1. Press MENU/OK→4→1 to display the calendar menu. z The cursor identifies the current date. z In standby status, you can also enter the calendar screen by pressing Right key. SUN . . . SAT. Back 2 2. Press Up/ Down/ Left/ Right to browse dates. z Press the Left key, to select the previous day; press the Right key to select the next day. z Press the UP/DOWN keys to browse forward or backward by week.
4-6 The Additional Functions If the alarm has been set to “On”, the “ 4.9.2 FSU811 User Guide ” icon will be displayed. Set Alarm Time 1. Press MENU/OK→4→2 to display the alarm settings menu. 2. Press 2 to select “Time”; the time entry menu is displayed. z You can also press UP/DOWN to select “Time”, and then press MENU/OK to display the time entry menu. 3. Enter the alarm time. z Enter the alarm time in 24-hour format. z The selected number will flash.
5 Use of RJ11 Extension 5. Use of RJ11 extension z The FSU811 phone can be connected via RJ-11 extension to additional devices such as phones or fax. The connection method is similar to that of common wall extensions. Insert the extension cable into the phone’s RJ-11 jack. Connect Tel ephone or Fax machi ne z z When an extension is connected, the “R” icon will flash. The FSU811 phone and its extensions may respond differently depending on use. Please refer to the following table for details.
5-2 Use of RJJ Extension Status 2 Status 3 Status 4 Status 5 Status 6 Status 7 Both FSU811 phone and its extension are in standby mode, have incoming calls. FSU811 User Guide 1. Pick up the extension. Now, the extension can be used to answer the call. 2. Pick up FSU811 phone. The extension can continue answering the call, while from FSU811 phone nothing can be heard. 3. Hang up FSU811 phone. The extension can still be used to answer the call. 4. Hang up the extension.
FSU811 User Guide Use of RJJ Extension 5-3 2, Pick up the extension. Busy tone is heard from the extension, while the off-the-hook dial tone can still be heard from FSU811 phone. 3, Hang up the extension. The off-the-hook dial tone can still be heard from FSU811 phone. 4, Hang up FSU811 phone. FSU811 phone returns back to the standby mode.
Wireless Access to The Internet 6. 6 Wireless Internet Access(Requires Network Support) When used in conjunction with the PAS modem, the FSU811 can provide 32K wireless access to the Internet, and can communicate with computers wirelessly at 32K. Please refer to the PAS modem User Guide 1. Insert the PAS modem’s DDI connector into the data communication port (labeled as DATA) on the right side of FSU811 phone. 2. Insert the USB connector of the PAS modem into the USB port of the computer.
7 Reference 7. Reference 7.1 Phone Maintenance Daily cleaning Dust and dirt on the phone’s exterior can be removed with a soft cloth. z Cleaning of obstinate dirt For difficult to clean areas, please use a soft wet towel with diluted cleaning agent, then wipe with a dry cloth. z Do not use solvents like benzene, thinner or gas. These solvents may damage or fade the phone’s exterior z 7.