
User Manual

RPC/RP Manual RPC/RP Configuration
19June2000 WLL-RPC/RP-IN/UM-1.0
4-
9
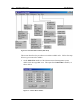
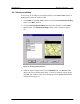
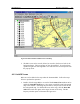
Figure 4-10: RPC Window with RPC icons on the Map
3. The RPC icons can be moved, deleted, or moved to the front or back of the
background map. Their properties can also be modified. To perform these
operations right click the target RPC icon and select the relevant option from
the pop-up menu.
4.1.3 Add RP Icons
RP icons can be added to the map under the dominant RPC. Follow the steps
below to perform the operation.
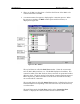
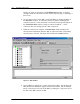
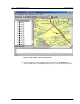
1. Double click the target RPC to access the blank Status View window and to
enable the Draw RP Node button. Now users can add the same background
map to the window. Following the procedure in the previous section to add
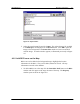
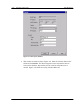
the background map. To add the RP icons on the map, click the Draw RP
Node button and click again on the target location of the map. The RP
Property window opens as illustrated in Figure 4-11.