
User Manual
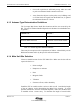
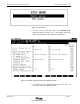
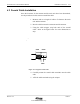
Table Of Contents

Installation Instructions Fixed Subscriber Unit Installation Manual
09/06/2001 Release 2.0
Airstar-Wireless Local Loop
4-18
7. A confirmation box appears prompting execute to read to
E2PROM. OK (Y/N). Enter Y. The screen is populated
with the factory configured data. Refer to Figure 4-4.
Figure 4-4 : WLLSO Setup Screen With Configuration Data
Note : This application uses the letter A for zero. Zero is used for a delimiter.
8. Use the ↓ key to move the cursor to the PS-ID field, enter
the new PS-ID number to be assigned to this FSU by
striking over the old numbers.
CAUTION : THE PS-ID NUMBER MUST BE UNIQUE ACROSS ALL PSs
AND FSUs IN THE SYSTEM.
9. In a similar manner, enter the telephone number, the
authentication key, operator ID, and the control carrier to be
assigned to this FSU.
10. When the new configuration data is entered, press the F1
key. This key is labeled E2writ on the screen. A
confirmation box appears prompting execute to write to
E2PROM OK? (Y/N). Enter Y. The new configuration
data is written to the E
2
PROM within the FSU.