
User Manual
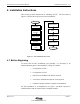
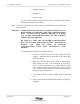
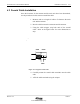
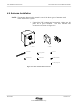
Table Of Contents

Installation Instructions Fixed Subscriber Unit Installation Manual
09/06/2001 Release 2.0
Airstar-Wireless Local Loop
4-16
• Authentication key
• Operator ID
• Control carrier
The above data is entered using the PSJ_Jr. device connected to a PC that has
been loaded with the FSUJ software.
Note : The FSUJ screens shown in this section are presented in inverse black and
white for clarity.
WARNING : MAKE SURE THAT THE FSU’S CONFIGURATION DATA IS
READ PRIOR TO WRITING THE NEW CONFIGURATION
DATA. IF THE DATA IS WRITTEN BEFORE IT IS READ,
ALL OF THE CONFIGURATION DATA ON THE CURRENT
SCREEN WILL BE ERASED.
BE SURE TO COPY THE STANDARD CONFIGURATION
DATA TO A FLOPPY DISK FROM ANY FSU. THIS BACK UP
FLOPPY CAN THEN BE USED TO RE-LOAD
CONFIGURATION DATA THAT ACCIDENTLY GETS
ERASED.
Use the following procedures to configure an FSU:
1. Connect the PSJ_Jr. device to the PC running the FSUJ
software. Attach the RS-232 connector to the COM1 port
on back of the PC.
2. Make sure that the FSU’s power cable is disconnected.
Then connect the FSU to be configured to the PSJ_Jr.
device. Raise the connector cover and attach the special
FSU connector to the the back of the FSU. Refer to Figure
4-11. Attach the other end of the cable to the connector on
the PSJ_Jr. device labeled PS.
3. To execute the FSUJ software, double click on the f.bat
icon.
4. Enter the password and the FSUJ Menu shown in Figure 4-
2 displays.