
Product Manual


- 4 -
Subject To Change Without Notice
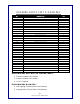
LIGHTING & WIRING (See Figure #3)
SYMBOL
COLOR
DESCRIPTION
OPERATION
G
GREEN
Passenger Side / Right
Right Signal
Brakes
B
BROWN
Running Lights
Taillight Marker
Yellow Side Marker
Y
YELLOW
Driver Side / Left
Left Signal
Brake
W
WHITE
Ground
Trailer Ground
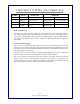
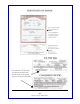
To test vehicle wiring:
You will need a 12V light tester. Attach the wire clamp of the tester to the ground wire on
the vehicle plug (see Fig 3). Then touch the tester pin into one of the vehicle plug contacts.
Turn on the corresponding vehicle operation i.e. Running lights. This will illuminate the
tester light if the vehicle wiring is correct. Follow the same procedure for the signal and
brake lights.
To test the Trailer wiring:
Once you have confirmed that the vehicle trailer plug is operating properly, connect the
trailer plug to your vehicle. Proceed to test each of the lights and power leads using your 12V
light tester. Follow the wiring legend and diagram to test each corresponding wire for power
when trailer light is not operating.
Always be sure to check your brake, running and signal lights before each use. Make sure
that all of your connections are solid and that all wiring is in good condition.
Note: Bare, striped or pinched wire will cause a short in the trailer, which will cause the
vehicle to blow a fuse. A solid ground is required for your lights to work properly. All
contacts must be to bare metal. Light covers should be well maintained and kept clean. Be
sure that your lights are always visible, not obstructed by your load.