
Use and Care Guide
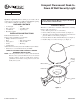


204461-01
3
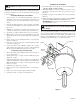
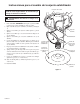
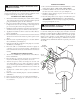
Figure 3
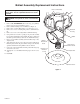
Ballast Assembly Replacement Instructions
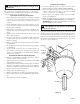
1. Removebulb.ATTENTION:Whenremoving,graspbulbby
thebase.Donotgraspglassbulbtoremove.
2. Removediffuserlockingscrewanddiffuser(seeFigure1).
3. Removethreescrewsholdingplasticcoverandremovecover.
4. Removetwoscrewsconnectinglampsockettoaluminumhous-
ing.
5. Removetwoscrewsconnectingballasttoaluminumhousing.
6. Usingaat-headscrewdriver,gentlyprythephotocellassembly
loose from the aluminum housing. Note: The photocell lens and
therubbergrommetwillstayattachedtothealuminumhousing.
7. Disposeofusedballastassembly(includesballast,lampsocket,
and photocell).
8. Applyhigh-tempadhesivetothereplacementphotocellbrackets.
Insertthephotocellintothephotocelllensandpressthebrackets
against the aluminum housing until the adhesive hardens.
9. Connectthereplacementballastandlampsocketfollowingsteps
4 and 5 in reverse order.
10. Attachplasticcoveranddiffuserfollowingsteps2and3inreverse
order.
11. Installbulb.
Ballast assembly can be replaced without the cutting
of any wires. Use of a qualified electrician is recom-
mended.
WARNING: Turn power off at the circuit breaker
or fuse.
Aluminum
Housing
Photocell Assembly
Ballast
Lamp Socket
Plastic Cover
Lamp Socket
Retention Screw
Ballast
Retention
Screw
Plastic Cover
Retention
Screw