
Use and Care Guide
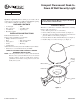


204461-01
2
Thisxturecanbedirectlywallmountedorwallmountedusinga
weatherproofjunctionbox.Usetheinstructionsbelowthatapply
to your application.
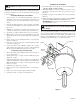
Installation Without A Junction Box
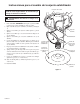
1. Selectalocationonaatwallwithstructurallysoundwood
andfrom5to25feet(1.5to7.6m)fromtheground.Thewood
shouldbeatleastoneinch(25mm)thicktosafelysecurethe
xture.
2. Usingthemountingtemplateasaguide,markthe3mounting
holes.Wesuggestdrilling3/16"(4.8mm)pilotholesforthe
lagscrews.
3. Installthetwobottomlagscrewsrst.Screwinthelagscrews
sothatthereisabout3/8"(9.5mm)ofspaceunderthehead.
4. Applysiliconecaulkaroundthreadedholeonrearofxture.
5. Placethextureonthesetwoscrewsandinstallthetoplagscrew.
Tightenthetoplagscrewrst,thentightentheremaininglag
screws.
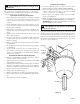
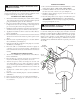
6. Removethetwoscrewsattachingthexturecoverplatetothe
xture(seeFigure2).
7. Routetheservicewiresfromtheconduitthroughthexture
coverplate(seeFigure2).
8. Secureyouroutdoorcableorexibleconduittothecoverplate
withatting(notsupplied)inaccordancewiththeNational
Electrical Code (Canadian Electrical Code in Canada).
Installation Using A Junction Box
1. Thread1/2"NPTcoupler(supplied)intothethreadedholeon
therearofthexture.
2. Attachjunctionbox coverplatewith1/2" NPT threads(not
supplied) to coupler.
3. Verifythemountingholesonthecoverplatearecorrectlyaligned
withthemountingholesonthejunctionboxandinstallthe1/2"
NPTnutbehindthecoverplate.Securelytightennutagainst
backofcoverplate.
4. Caulkbetweencouplerandcoverplate.
5. Removethetwoscrewsattachingthexturecoverplatetothe
xture.
6. Routeservicewiresthroughcouplerandintothexture.
7. Securelyattachthecoverplatetothejunctionbox.
CAUTION: Do not use any other wattage lamps
in this fixture.
To test operation during daylight, cover the photocontrol (round
objectonfrontofxture)withblackelectricaltape.Turnonthe
power.Thelightshouldcomeonimmediatelyandwilltakeafew
minutestoreachfullbrightness.Uncoverthephotocontrolandyour
unitwilloperateautomatically—onatdusk,offatdawn.
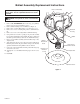
Complete The Installation
1. ConnectthexturewirestotheservicewiresasshowninFigure
2(black to black and white to white).
2. Thisxturemustbeconnectedtoground.Securetheservice
groundwireunderthe head ofthegreenground screw(see
Figure2).
3. Installthecoverplate.Securewiththetwoscrewsprovided(see
Figure2).
4. Pluginthe42wattcompactuorescentlampprovided(NEMA
designationCFTR42W/GX24QwithGX24Q-4base).
ATTENTION:Whenremoving,graspbulbbythebase.Donot
graspglassbulbtoremove.
Cover Plate
Figure 2
Caulk
Ground
Screw
Bulb
Lag Screw
WARNING: Turn power off at the circuit breaker
or fuse.