
Use and Care Guide


6
Lowes.com
INSTALLATION INSTRUCTIONS
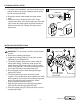
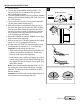
4. Test the sensor:
a. Turn on the circuit breaker and light switch. The
sensor (C) has a 1-1/2 minute warm up period
before it will detect motion.
b. Turn the RANGE control to the mid position (halfway
between MIN and MAX) and the ON-TIME control to
the TEST position.
c. Loosen the clamp screw (1) in the sensor ball joint
(2) and gently rotate the sensor (C).
d. Walk through the coverage area noting where you
several times when motion is detected). Move the
sensor (C) head up, down, or sideways to change
the coverage area. Keep the sensor at least 1 in.
(2.5 cm) away from the lamps.
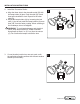
e. Adjust the RANGE as needed. RANGE set too high
may increase false triggering.
f. Secure the sensor (C) head by tightening the clamp
screw (1). Do not overtighten the screw.
g. Set the amount of TIME you want the lights to stay
on after motion is detected (1, 5, or 10 minutes).
Important: Avoid aiming the control at:
– Objects that change temperature rapidly, such as
heating vents and air conditioners. These heat
sources could cause false triggering.
–
–
may trigger the shut-off feature. Do not point other
lights at the sensor.
Note:
m), aiming the sensor down will reduce coverage
distance. The detector is less sensitive to motion
directly toward it.
Important:
4
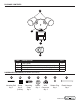
RANGE
10 5 1 TEST
ON-TIME
MAXMIN
RANGEON-TIME
10 5 1 TEST
MINUTES
MIN MAX
Bottom of Senso
1
2
Aim Down
Aim Up
Least Sensitive Most Sensitive
r
C