
Installation Guide


ASSEMBLY INSTRUCTIONS
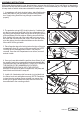
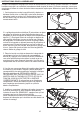
7. Place fixture (A) up to the mounting surface and mark
the positions of the mounting holes on the mounting
surface with a pencil. The 2 screw hole locations must be
exact for the fixture to mount properly.
8. WALL STUD MOUNTING: For mounting over the wall
stud, drill two small pilot holes for the screws. Screw both
wood screws (BB) into the wooden studs. Approximately
1/2 in. of the screw should still be protruding from the
ceiling.
DRYWALL MOUNTING: For mounting into drywall, drill
3/16 in. holes for the plastic wall anchors. Insert the plastic
wall anchors (CC) into the proper holes and screw them
into place so they are flush with the surface of your drywall.
Screw both screws (BB) into the plastic anchors.
Approximately 1/2 in. of the screw should still be protruding
from the ceiling.
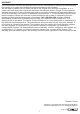
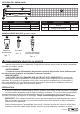
6.
For safety and proper operation, your fixture
must be properly grounded. If you are
unfamiliar with the methods of properly
grounding your fixture, consult a
qualified electrician. A bare copper or
green insulated ground wire is
pre-attached to your fixture. If your
electrical system is self-grounded, your
fixture will ground via the connector
attached through the knock-out hole. If you
are connecting your fixture to a flexible whip or
NM cable, the fixture grounding wire and the electrical
supply ground wire should be connected together using
one of the wire nuts (AA). Connect the supply leads from
the electrical box to the fixture wire leads using the wire
nuts (AA). The black lead(s) from the fixture connect to the
black supply lead and the white lead(s) from the fixture
connect to the white supply lead. Tighten the wire nuts
properly to prevent the wires from coming loose. Tape the
wire nuts to the wire using electrical tape.
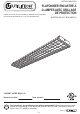
Hardware Used
Wire Nut x 3
AA
Drywall
Anchor
CC
x 2
Hardware Used
Wood Screw x 2
BB
BB
6
AA
AA
5
7
8
A
Lowes.com
BB
CC
4