
Installation Guide


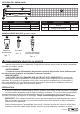

With power disconnected to your electrical box, remove the old fixture. If your old fixture is attached to
an electrical box that has more than two (2) wire leads, it is recommended you use tape and markings
to keep track of which wires were attached to each other.
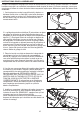
ASSEMBLY INSTRUCTIONS
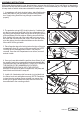
5.
Install a UL-listed strain relief connector (not included) into
the fixture knock-out and tighten securely. NOTE: Remember
to have the wire coupling screws oriented in a manner that
allows you to tighten/ loosen the clamp after the fixture has
been attached to the mounting surface.
3.
Place fingertips above the locking tab on the face of the wire
compartment cover (D), press on the cover and lift up. NOTE:
You may have to disengage each before it can freely be
removed. Once the wire compartment cover is free, remove it
and set it aside.
2. The protective wire grid (E) is held in place by 2 catches that
run the long way down each side of the wire compartment (C).
By placing your fingertips under the top side of the grid, pull the
grid up and away from the catches. Starting at one end of the
grid, carefully free one end of the catch and work your way to
the other end until the entire side is free. Once one side is free,
pivot the grid up; the other side should become free from the
other catch. Set the grid aside.
4. Once you have determined the position where fixture (A) will
be mounted, mark the corresponding knock-out closest to the
insulated multi-wire end and remove it. CAREFULLY REMOVE
THE KNOCK-OUT BY HAMMERING A FLATHEAD
SCREWDRIVER OR PUNCH UNTIL THE SURFACE
BREAKS. If the knock-out does not break free, use pliers and
bend it back and forth until it snaps off.
1.
In accordance with local electrical codes, attach flexible whip
and/or NM cable to your pre-existing surface mount electrical
box. Supply wiring should be long enough to reach fixture
properly.
1
4
2
C
E
3
55
D
A
A
Lowes.com
3