
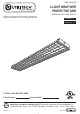
Installation Guide


SAFETY INFORMATION
Please read and understand this entire manual before attempting to assemble, operate
or install the product.
WARNING
• Shut off power at the circuit breaker or fuse panel before removing the old fixture or
installing the new one.
CAUTION
• DO NOT USE THIS FIXTURE WITH A DIMMING CIRCUIT. If you presently have dimmer
controls, you will need to remove them and replace them with regular electrical switches. If you
have a three-way dimmer, you will have to replace it with a regular three-way switch. If you are
unfamiliar with electrical installations, it is recommended you have a qualified electrician do
your installation.
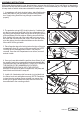
PREPARATION
Before beginning assembly of product, make sure all parts are present. Compare parts with
package contents list and hardware contents list. If any part is missing or damaged, do not
attempt to assemble the product. Estimated Assembly Time: 45 minutes
IMPORTANT: The installation of this fixture will require you to provide a means of holding the
fixture in place while securing the fixture to the mounting surface. If no means of support for the
fixture can be provided, the installation will require 2 people to install–one to hold the fixture up,
while another person secures the fixture to the mounting surface.
Tools required for assembly (not included): Phillips screwdriver, flathead screwdriver, safety
glasses, electrical tape, pliers, wire cutters, wire strippers, step ladder, hammer.
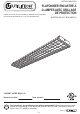
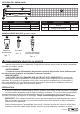
PACKAGE CONTENTS
HARDWARE CONTENTS (shown actual size)
Wire Nut
Qty. 3
AA
Qty. 2
Drywall
Anchor
CC
Qty. 2
Wood
Screw
BB
A
B
Fixture
Sockets
1
4
D Wire Compartment Cover 1
E Protective Grid 1
PART DESCRIPTION QUANTITY PART DESCRIPTION QUANTITY
C Wire Compartment
1
E
A
B
D
C
Lowes.com
2