ITEM #0432518 2-LIGHT WRAP WITH PROTECTIVE GRID MODEL #SH1017-BSS-48T82-U Utilitech & UT Design® and Grounded in Quality® are registered trademarks of LF, LLC. All Rights Reserved. Français p. 8 Español p. 15 ATTACH YOUR RECEIPT HERE Serial Number: Purchase Date: Questions, problems, missing parts? Contact the customer service department at 1-866-994-4148, 8 a.m. - 6 p.m., EST, Monday - Thursday, 8 a.m. - 5 p.m., EST, Friday. AB12421 1 Lowes.
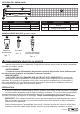
PACKAGE CONTENTS A C B E D PART A B C DESCRIPTION Fixture Sockets Wire Compartment QUANTITY 1 4 1 PART D E DESCRIPTION Wire Compartment Cover Protective Grid QUANTITY 1 1 HARDWARE CONTENTS (shown actual size) AA BB Wire Nut Wood Screw Qty. 3 Qty. 2 CC Drywall Anchor Qty. 2 SAFETY INFORMATION Please read and understand this entire manual before attempting to assemble, operate or install the product.
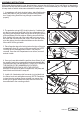
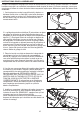
ASSEMBLY INSTRUCTIONS With power disconnected to your electrical box, remove the old fixture. If your old fixture is attached to an electrical box that has more than two (2) wire leads, it is recommended you use tape and markings to keep track of which wires were attached to each other. 1. In accordance with local electrical codes, attach flexible whip and/or NM cable to your pre-existing surface mount electrical box. Supply wiring should be long enough to reach fixture properly. 1 2.
ASSEMBLY INSTRUCTIONS 6. For safety and proper operation, your fixture must be properly grounded. If you are unfamiliar with the methods of properly grounding your fixture, consult a qualified electrician. A bare copper or AA green insulated ground wire is pre-attached to your fixture. If your AA electrical system is self-grounded, your fixture will ground via the connector attached through the knock-out hole.
ASSEMBLY INSTRUCTIONS 9. Install two 32-watt T8 (F32T8) bulbs (not included). Do not replace with any other wattage of linear fluorescent bulb. Install the bulb into the sockets by aligning the pins of the bulb with the slot in the sockets. Using your thumb and forefinger, press the metal ends of the bulb socket and roll the bulb forward until it rotates 90 degrees inside the socket, making contact between the bulb pins and the socket contacts. 10.
BULB REPLACEMENT INSTRUCTIONS 2. Remove the bulb from the fixture (A) by placing your thumbs on the metal ends of the bulb. While applying slight pressure on the bulb, roll the bulb toward you until the contact pins on the ends of the bulb disengage from the socket. Pull the bulb straight out from the socket. 2 B A 3. Install the new bulb in the same manner you removed the old bulb. Re-install the grid (E). Restore power to the fixture. 4.
WARRANTY The manufacturer warrants this lighting fixture to be free from defects in materials and workmanship for a period of (3) years from the date of original purchase by the consumer. We will repair or replace (at our option) the unit in the original color and style if available, or in a similar color and style if the original item has been discontinued, without charge.
ARTICLE #0432518 PLAFONNIER ENCASTRÉ À 2 LAMPES AVEC GRILLAGE DE PROTECTION Utilitech et le motif UT® et Grounded in Quality® sont des marques de commerce déposées de LF, LLC. Tous droitsréservés. MODÈLE #SH1017-BSS-48T82-U JOIGNEZ VOTRE REÇU ICI Numéro de série : Date d’achat : Des questions, des problèmes, des pièces manquantes? Communiquez avec notre service à la clientèle au 1 866 994 4148, entre 8 h et 18 h (HNE), du lundi au jeudi, ou entre 8 h et 17 h (HNE) le vendredi. 8 Lowes.
CONTENU DE L’EMBALLAGE A C B E D PIÉCE A B C DESCRIPTION Luminaire Douille Compartiment des fils QUANTITÉ 1 4 1 PIÉCE D E DESCRIPTION QUANTITÉ Couvercle du compartiment 1 des fils Grillage de protection 1 QUINCAILLERIE INCLUSE (grandeur réelle) AA BB Capuchon de connexion Vis à bois Qte : 3 Qte : 2 CC Cheville d'ancrage pour cloison sèche Qte : 2 RENSEIGNEMENTS RELATIFS À LA SÉCURITÉ Assurez-vous de lire et de comprendre l’intégralité du présent manuel avant de tenter d’assembler, d’install
INSTRUCTIONS POUR L’ASSEMBLAGE Coupez l‘alimentation électrique au coffret de branchement, puis retirez l’ancien luminaire. Si l’ancien luminaire est relié à un coffret de branchement doté de plus de deux (2) fils de connexion, nous vous suggérons d’utiliser du ruban isolant et des marques de repère pour déterminer quels fils étaient fixés ensemble. 1. Conformément aux codes locaux d'électricité, attachez un déviateur flexible et/ou un câble NM à votre boîtier électrique préexistant monté en surface.
INSTRUCTIONS POUR L’ASSEMBLAGE 6. Pour des raisons de sécurité et pour assurer un fonctionnement correct, votre luminaire doit être mis à la terre correctement. Contactez un électricien professionnel si vous ne savez pas comment mettre AA correctement votre luminaire à la terre. Un fil nu isolé, vert ou cuivre, de mise à AA la terre est déjà attaché à votre luminaire.
INSTRUCTIONS POUR L’ASSEMBLAGE 9. Installez (2) ampoules T8 de 32 watts (F32T8) (non incluses). Ne la remplacez pas par une autre ampoule fluorescente d'une puissance différente. Installez l'ampoule dans les douilles en alignant les chevilles de fixation de l'ampoule dans les fentes des prises.
INSTRUCTIONS POUR LE CHANGEMENT DE L’AMPOULE 2. Retirez l'ampoule du luminaire (A) en plaçant vos pouces sur les extrémités en métal de l'ampoule. Tout en faisant légèrement pression sur l'ampoule, roulez l'ampoule vers vous jusqu'à ce que les chevilles de contact aux extrémités de l'ampoule se dégagent de la douille. Tirez l'ampoule tout droit pour la faire sortir de la douille et mettez-la de côté pendant le montage. 2 B A 3.
GARANTIE Le fabricant garantit ce luminaire contre les défauts de matériaux ou de fabrication pour une période de troix (3) ans à compter de la date d’achat originale. Nous réparerons l’article ou nous le remplacerons (à notre discrétion) par un article de la même couleur et du même style sans frais.
ARTICULO #0432518 ENVOLTURA PARA 2 LUCES CON REJILLA PROTECTORA Utilitech y el diseño UT® y Grounded in Quality® son marcas registradas de LF, LLC. Todos los derechos reservados. MODELO #SH1017-BSS-48T82-U ADJUNTE SU RECIBO AQUÍ Número de serie : Fecha de compra : ¿Preguntas, problemas, piezas faltantes? Comuníquese con nuestro Departamento de Servicio al Cliente al 1-866-994-4148 de 8 a.m. a 6 p.m. de lunes a jueves y de 8 a.m. a 5 p.m. los viernes, hora estándar del Este. Lowes.
CONTENIDO DEL PAQUETE A C B E D PIEZA A B C DESCRIPTIÓN Lámpara Portalámpara Compartimiento de cables CANTIDAD 1 4 1 PIEZA D E DESCRIPTIÓN Tornillo para la cubierta del compartimiento de cables Rejilla protectora CANTIDAD 1 1 ADITAMENTOS (se muestran en tamaño real) AA BB Empalme plástico Tornillo para madera Cant. 3 Cant. 2 CC Ancla de expansión para panel de yeso Cant.
INSTRUCCIONES DE ENSAMBLAJE Desconecte la alimentación de la caja eléctrica y retire la lámpara antigua. Si la lámpara antigua está conectada a la caja eléctrica mediante más de dos (2) conductores, le sugerimos que use cinta y realice marcas para seguir un registro de los cables que estaban conectados a cada uno. 1. De acuerdo con los códigos eléctricos locales, conecte la conexión flexible y/o el cable NM a su caja eléctrica preexistente de montaje en superficie.
INSTRUCCIONES DE ENSAMBLAJE 5. Instale un conector protector contra jalones (no incluido) catalogado por UL en el destapadero del accesorio para iluminación y apriételo firmemente. NOTA: Recuerde tener los tornillos del acoplamiento de cable orientados de manera que le permitan apretar y aflojar la abrazadera después de haber sujetado el aplique de luz a la superficie de montaje. 5 A 6.
INSTRUCCIONES DE ENSAMBLAJE 8. MONTAJE EN MONTANTES DE PARED: Para realizar el montaje sobre el montante de la pared, taladre dos agujeros piloto pequeños para los tornillos. Enrosque ambos tornillos para madera (BB) en los montantes de madera. Aproximadamente 1,3 cm deben seguir sobresaliendo del techo. MONTAJE EN PANEL DE YESO: Para realizar el montaje en panel de yeso, taladre agujeros de 4,8 mm para los ancla de expansión para panelde yeso (CC) para pared.
INSTRUCCIONES PARA EL REEMPLAZO DE BOMBILLAS Reemplace la bombilla únicamente con una bombilla fluorescente lineal: Bombilla 32W F32T8. No la reemplace con una bombilla fluorescente lineal de otro vatiaje. Estas bombillas se pueden obtener en un centro local de artículos para el hogar y en la mayoría de las ferreterías grandes. Antes de reemplazar las bombillas, corte la alimentación a la lámpara desde el interruptor de circuito o el panel de fusibles.
GARANTÍA El fabricante garantiza que este producto de iluminación no presentará defectos de fabricación ni en los materiales durante un período de (3) años desde la fecha de compra original. Repararemos o reemplazaremos sin costo alguno (según nuestro criterio) la unidad en el color y el estilo original, si están disponibles, o en un estilo y color similares, si el original ha sido discontinuado.