
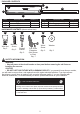
Installation Guide

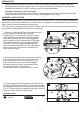

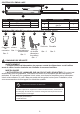

6. Connect the supply leads from the electrical box to the
fixture wire leads using the wire nuts (AA). The black lead
from the fixture (A) goes to the black supply lead and the
white lead from the fixture (A) goes to the white supply
lead (Fig. 6). Secure the wire nuts (AA) properly to prevent
the wires from coming loose. Tape the wire nuts (AA) to the
wire using electrical tape. Carefully push the spliced wires
back into the electrical box.
7.
Align the lip on both ends of the fixture (A) with the
catches on the wire compartment cover (E) (Fig. 7).
Press the wire compartment cover (E) in and slip the
edge under the locking tabs.
ASSEMBLY INSTRUCTIONS
AA
AA
AA
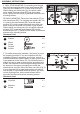
8.
Install the bulb (C) into the bulb sockets (D) by
aligning the pins of the bulb (C) with the slot in the bulb
sockets (D). Using your thumbs and forefinger, press the
metal ends of the bulb (C), and roll the bulb (C) forward
until it rotates 90 degrees inside the bulb socket (D),
making contact between the bulb pins and the bulb
socket contacts (Fig. 8). Do not touch the glass tube.
BULB REPLACEMENT INSTRUCTIONS
When bulb replacement is necessary, you must replace the bulb with a 15-watt,
120-volt/CCT-3000K/10,000 hour/F15T8 fluorescent bulb. These bulbs are readily available at your local
home center and most larger hardware stores.
Before replacing the bulb (C), shut off power to the fixture at the circuit breaker or fuse panel. Allow
sufficient time for fixture and bulb to cool.
C
D
A
E
Wire Nut x 1
AA
Hardware Used
6
7
8
A
E
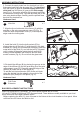
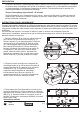
9. Re-install the diffuser (B) by placing the groove at the
edge of the diffuser (B) into the protruding lip of the wire
compartment cover (E). Press the opposite edge of the
diffuser (B) under the lip of the fixture (A).
To add the pull chain extension (DD) to the pull chain,
place the end ball into the adaptor on one end of the
extension (DD) and pull it into place (Fig. 9).
DD
DD
DD
Pull Chain
Extension
Hardware Used
x 1
9
5