
Installation Guide

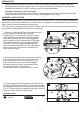

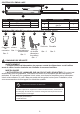

1.
Remove the diffuser (B) by pulling back and up on
the top edge of the diffuser (B) using your
fingertips (Fig. 1). Remove the bulb (C) by
using
your thumbs to press and roll the bulb 90 degrees
inside the bulb socket
(D)
. This will disengage the
bulb contact pins from the bulb socket
(D)
contacts.
Then slide the bulb pins out of the bulb socket
(D)
.
If the bulb (C) has a corrugated cardboard collar,
remove the collar and discard. Do NOT operate the
fixture (A) with the collar in place. Set the bulb (C)
aside during mounting.
2.
Place fingertips above the locking tab on the face
of the wire compartment cover (E), press on the
wire compartment cover (E) and lift up (Fig. 2).
Each locking tab may need to be disengaged
individually before the wire compartment cover
(E) can be removed. Once the wire
compartment is free, remove it and set it aside.
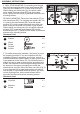
3.
Pull the supply wires through the center hole of the
fixture (A) and attach the fixture (A) to the electrical box
using either the old screws or the machine screws (BB)
(Fig. 3). Tighten the screw heads until the paint chips off
to ensure a bare metal-to-metal contact.
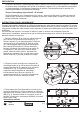
With power disconnected to your electrical box, remove the old fixture. If your old fixture is attached to
an electrical box having more than two (2) wire leads, we suggest you use tape and markings to keep
track of which wires were attached to each other.
This fixture is for indoor dry location use only. Make sure that the mounting surface and electrical box
are capable of supporting the fixture prior to installation.
PREPARATION
ASSEMBLY INSTRUCTIONS
Before beginning assembly of product, make sure all parts are present. Compare parts with
package contents list and diagram above. If any part is missing or damaged, do not attempt to
assemble the product. Contact customer service for replacement parts.
Estimated Assembly Time: 45 minutes
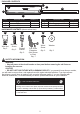
Tools Required for Assembly (not included):
Flathead Screwdriver, Safety Glasses, Electrical Tape
Phillips head Screwdriver, Wire Cutters, 2 Pliers, Wire Strippers, Step Ladder
.
Hardware Used
Machine
Screw
x 2
BB
1
A
D
D
A
C
C
B
2
E
E
A
A
A
BB
BB
3
3