ITEM #0337229 4 FT. 2-LIGHT DECORATIVE CEILING LIGHT MODEL #GU4482-T8-ORB Français p. 8 Español p. 15 ATTACH YOUR RECEIPT HERE Serial Number: Purchase Date: Questions, problems, missing parts? Contact the customer service department at 1-866-994-4148, 8 a.m. - 6 p.m., EST, Monday - Thursday, 8 a.m. - 5 p.m., EST, Friday.
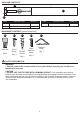
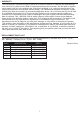
PACKAGE CONTENTS A C C B PART A B DESCRIPTION Fixture Socket QUANTITY 1 4 PART C DESCRIPTION Diffuser QUANTITY 1 HARDWARE CONTENTS (shown actual size) AA BB Wire Nut Wood Screw Qty. 3 Qty. 2 CC Drywall Anchor Qty. 2 EE DD Short Machine Screw Support Chain Qty. 1 Qty. 2 SAFETY INFORMATION WARNING • Shut off power at the circuit breaker or fuse panel before removing the old fixture or installing the new one. CAUTION • DO NOT USE THIS FIXTURE WITH A DIMMING CIRCUIT.
PREPARATION Before beginning assembly of product, make sure all parts are present. Compare parts with package contents list and diagram above. If any part is missing or damaged, do not attempt to assemble the product. Contact customer service for replacement parts. Estimated Assembly Time: 45 minutes Tools Required for Assembly (not included): Phillips head screwdriver, flathead screwdriver, safety glasses, electrical tape, pliers, wire cutters, wire strippers, step ladder, hammer.
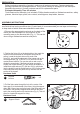
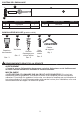
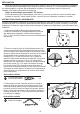
ASSEMBLY INSTRUCTIONS 4. For safety and proper operation, your fixture must be properly grounded (Fig. 4). If you are unfamiliar with the methods of properly grounding your fixture, consult a qualified electrician. A green or bare copper ground wire is pre-attached to your fixture pan (A).
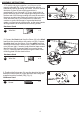
ASSEMBLY INSTRUCTIONS 7. CEILING JOIST MOUNTING: While holding the fixture (A) in line with the pilot holes, screw the wood screws (BB) into the wooden studs (Fig. 7). Tighten until the fixture (A) has been secured to the mounting surface. DRYWALL MOUNTING: For mounting into drywall, hold your fixture (A) in line with the drywall anchors (CC) that were installed in step 2, and screw all wood screws (CC) into the drywall anchors (CC). Tighten until the fixture has been secured to the mounting surface.
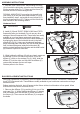
BULB REPLACEMENT INSTRUCTIONS 2. Remove the defective bulb by using your thumbs to press and roll the bulb 90 degrees inside the socket (B) (Fig. 2). This will disengage the bulb contact pins from the socket (B) contacts. Then slide the bulb pins out of the socket (B) slot. 2 B A 3. Install the new bulb in the same manner you removed the old bulb. Re-install the diffuser (C). Restore power to the fixture. 4. Dispose of the old bulb(s) in accordance with local, state, and/or federal laws, or go to www.
WARRANTY The manufacturer warrants this lighting fixture to be free from defects in materials and workmanship for a period of (3) years from the date of original purchase by the consumer. We will repair or replace (at our option) the unit in the original color, and style if available, or in a similar color and style if the original item has been discontinued, without charge.
ARTICLE #0337229 PLAFONNIER DÉCORATIF T8 DE 1,22 M À DEUX LUMIÈRES MODÈLE #GU4482-T8-ORB JOIGNEZ VOTRE REÇU ICI Numéro de série : Date d’achat : Des questions, des problèmes, des pièces manquantes? Communiquez avec notre service à la clientèle au 1 866 994 4148, entre 8 h et 18 h (HNE), du lundi au jeudi, ou entre 8 h et 17 h (HNE) le vendredi.
CONTENU DE L’EMBALLAGE A C C B PIÉCE A B DESCRIPTION Luminaire Douille QUANTITÉ 1 4 PIÉCE C DESCRIPTION Diffuseur QUANTITÉ 1 QUINCAILLERIE INCLUSE (grandeur réelle) AA Capuchon de connexion Qte : 3 BB Vis à bois Qte : 2 CC Cheville d'ancrage pour cloison sèche Qte : 2 DD Vis à métaux courte EE Chaîne de support Qty.
PRÉPARATION Avant de commencer l’assemblage du produit, assurez-vous d’avoir toutes les pièces. Comparez les pièces dans l’emballage avec la liste et le tableau ci-dessus. S'il y a des pièces manquantes ou endommagées, ne tentez pas d’assembler le produit. Communiquez avec le service à la clientèle pour obtenir des pièces de rechange.
INSTRUCTIONS POUR L’ASSEMBLAGE 4. Pour des raisons de sécurité et de bon fonctionnement, le luminaire (A) doit être correctement mis à la terre. Si les méthodes adéquates de mise à la terre d’un luminaire ne vous sont pas familières, faites appel aux services d’un électricien qualifié. Un fil de mise à la terre en cuivre dénudé est préfixé au luminaire (A).
INSTRUCTIONS POUR L’ASSEMBLAGE 7. INSTALLATION SUR SOLIVES DE PLAFOND : Tout en maintenant le luminaire (A) aligné sur les avant-trous, posez les vis à bois (BB) munies des rondelles (CC) dans le montant de cloison (Fig. 7). Serrez-les jusqu’à ce que le luminaire (A) soit solidement fixé.
INSTRUCTIONS POUR LE CHANGEMENT DE L’AMPOULE 2. Retirez le tube défectueux en appuyant dessus à l’aide de votre pouce et en le tournant de 90° dans la douille (B) (fig. 2). Vous dégagerez ainsi les broches du tube des contacts de la douille. Glissez ensuite les broches à l’extérieur des encoches de la douille. 2 B A 3. Suivez les étapes ci-dessus dans le sens inverse pour installer la nouvelle ampoule. Remettez le diffuseur (D) en place. Rétablissez l’alimentation électrique au luminaire. 4.
GARANTIE Le fabricant garantit ce luminaire contre les défauts de matériaux ou de fabrication pour une période de trois (3) ans à compter de la date d’achat originale. Nous réparerons l’article ou nous le remplacerons (à notre discrétion) par un article de la même couleur et du même style sans frais.
ITEM #0337229 LÁMPARA PARA TECHO DECORATIVA T8 DE 2 LUCES DE 1,21 M MODELO # GU4482-T8-ORB ADJUNTE SU RECIBO AQUÍ Número de serie : Fecha de compra : ¿Preguntas, problemas, piezas faltantes? Comuníquese con nuestro Departamento de Servicio al Cliente al 1-866-994-4148 de 8 a.m. a 6 p.m. de lunes a jueves y de 8 a.m. a 5 p.m. los viernes, hora estándar del Este.
CONTENIDO DEL PAQUETE A C C B PIEZA A B DESCRIPTIÓN Lámpara Portalámpara CANTIDAD 1 4 PIEZA C DESCRIPTIÓN Difusor CANTIDAD 1 ADITAMENTOS (se muestran en tamaño real) AA BB Tornillo para Empalme madera plástico Cant. 3 Cant. 2 DD CC Ancla de expansión para panel de yeso Cant. 2 EE Cadena de soporte Tornillo para metal corto Cant. 1 Cant.
PREPARACIÓN Antes de comenzar a ensamblar el producto, asegúrese de tener todas las piezas. Compare las piezas con la lista del contenido del paquete y el diagrama anterior. No intente ensamblar el producto si faltan piezas o si éstas están dañadas. Póngase en contacto con el Departamento de Servicio al Cliente para obtener piezas de repuesto.
INSTRUCCIONES DE ENSAMBLAJE 4. Para garantizar la seguridad y un funcionamiento adecuado, el ensamble (A) debe tener una puesta a tierra adecuada. Si no conoce los métodos para conectar el ensamble adecuadamente a tierra, consulte a un electricista calificado. La bandeja del ensamble (A) tiene un conductor desnudo de puesta a tierra de cobre previamente conectado (A).
INSTRUCCIONES DE ENSAMBLAJE 7. MONTAJE EN UNA VIGA DEL TECHO: Mientras sostiene la lámpara (A) alineada con los orificios guía, atornille los tornillos para madera (BB) y las arandelas (DD) en las vigas de madera (Fig. 7). Apriete hasta que la lámpara (A) quede fija en la superficie de montaje.
INSTRUCCIONES PARA EL REEMPLAZO DE BOMBILLAS 2. Para retirar la bombilla defectuosa, presiónela con los índices y gírela 90 grados dentro del portalámpara (B) (Fig. 2). Esto cortará el contacto entre las clavijas de la bombilla y los contactos del portalámpara (B). Luego retire las clavijas de la bombilla de las ranuras del portalámpara (B). 2 B A 3. Instale la bombilla nueva en la misma forma en la que retiró la bombilla antigua. Vuelva a instalar el difusor (D).
GARANTÍA El fabricante garantiza que este producto de iluminación no presentará defectos de fabricación ni en los materiales durante un período de (3) años desde la fecha de compra original. Repararemos o reemplazaremos sin costo alguno (según nuestro criterio) la unidad en el color y el estilo original, si están disponibles, o en un estilo y color similares, si el original ha sido discontinuado.