
Installation Guide


7
NEW CONSTRUCTION ASSEMBLY INSTRUCTIONS
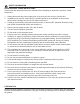
6. Remove wiring cover (6.1). Pull the house wires through
the wire box cover hole. Using a quick connector, secure
120 V AC house wiring from the wall switch to the fan
as shown in the wiring diagram on page 5. 14 AWG is
the smallest conductor that should be used for branch-
circuit wiring.
Carefully push the connected wires back into the wiring
box housing. Reattach the wiring box cover.
CAUTION: If the electrical wires do not match the colors
listed, you must determine what each house wire
represents before connecting. You may need to
consult an electrical contractor to determine safely.
6
Quick
connector
House
wires
Product
wires
7. Connect a 4 in. circular duct (7.1) (not supplied) and vent
to the outside. Secure it with duct tape (not supplied) or
clamp (not supplied) to make connection secure and
air tight.
Turn on power source. Check fan for any abnormal
sound or vibration.
7
6.1
7.1
EXISTING CONSTRUCTION ASSEMBLY INSTRUCTIONS
ATTACHING TO JOIST
NOTE: IT IS RECOMMENDED TO ATTACH DIRECTLY TO
JOISTS FROM BELOW.
BEFORE INSTALLATION: Turn off power source. Review all
safety precautions. Remove existing fan.
1
1. Measure the opening to ensure it is large enough
to accommodate the new fan housing (A)
(10.25 in. x 10.25 in.).
2. If this fan is not replacing an old fan, be sure to cut a
10.25 in. x 10.25 in. opening for the fan housing (A).
MAKE SURE ONE EDGE OF THE OPENING IS FLUSH
WITH JOIST FOR INSTALLATION FROM BELOW.
2
10.25"
10.25"
6.1