
Installation Guide


5
PREPARATION
Before beginning assembly of product, make sure all parts are present. Compare parts with package
contents list and hardware contents. If any part is missing or damaged, do not attempt to assemble
the product.
Estimated Assembly Time: 30 minutes
Tools Required for Assembly (not included): Hammer, Flathead Screwdriver, Wood Screws, Duct Tape,
Phillips Screwdriver, Utility Knife
Helpful Tools (not included): Electric Drill, Drill Bits
WARNING: Turn off electricity at breaker box before beginning installation.
Carefully remove unit from carton.
Check area above installation location to be sure that wiring can run to the planned location and that
duct work can be run and the area is sufcient for proper ventilation.
Inspect duct work and wiring before proceeding with installation.
Before installation, provide inspection and future maintenance access at a location that will not interfere
with installation work.
You may need the help of a second person to install this fan: one person on the attic side and one on
the room side.
Note: Installations may vary depending on how the previous bath fan was installed. Supplies necessary
for the installation of your bath fan are not all included; however, most are available at your local
home improvement or hardware store.
DIMENSIONS REQUIREMENTS
Ceiling
Opening (L)
Ceiling
Opening (W)
Ceiling
Opening (H)
7-1/2 in. 7-1/4 in. 5-3/4 in.
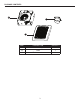
WIRING DIAGRAM
QUICK CONNECTOR INSTRUCTIONS
To be sold only with installation instructions.
WARNING: Wiring must comply with all appliable electrical
codes. Turn OFF power before removing or installing connectors.
WARNING: COPPER TO COPPER ONLY. Do not use aluminum wire.
CAUTION: Accessory part (quick connector) should meet
installation instructions below.
NOTE: The connector is reusable on solid wires of the same wire gage
or smaller. Do not reuse the connector on stranded wires.
NOTE: Important wire information. Maximum temperature rating 221˚F
(105˚C). 600 volts maximum for building wire and 1,000 volts maximum for
building wire and 1,000 volts maximum in signs and lighting xtures.
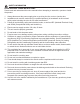
The acceptable wire range includes: Solid: 12-18 AWG.
• Strip wires 3/8 in. - 1/2 in.
• Grip the wire firmly and push the
stripped end of the wire into the
open port of the connector.
Use only one connector
per port.
• Verify the stripped end of the
wires is fully inserted to the
back of the connector.
Quick
connect
House
wires
Product
wires