
Installation Guide
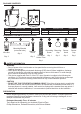


1.
Screw the threaded tube (DD) to the mounting bracket
(BB). Leave approximately 1 in. of the threaded tube
protruding beyond the front surface of the mounting
bracket.
2.
Using (2) machine screws (CC), attach the mounting
bracket (BB) to the electrical box. Pull the existing
electrical supply wires out of the box to either side of
the mounting bracket.
3.
For safe and proper operation, the fixture (A) must be
properly grounded. If the electrical box is made of
metal, and is already grounded, secure the bare end
of the fixture green/copper ground wire to the
mounting bracket (BB) using the green grounding
screw (EE). If the electrical box is a non-grounded
type, or made of plastic, connect both the fixture
green/copper ground wire AND the green/copper
ground wire inside the electrical box to the mounting
bracket (BB) using the green grounding screw (EE).
If unsure whether or not the electrical box is properly
grounded, or the box is plastic and has no ground
wire, or are unfamiliar with the methods of properly
grounding the fixture, consult a qualified electrician.
With power disconnected to the electrical box, remove the old fixture. If the old fixture is attached to
an electrical box having more than two (2) wire leads, use tape and markings to keep track of which
wires were attached together.
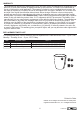
ASSEMBLY INSTRUCTIONS
Mounting
Bracket
BB
BB
x 1
Hardware Used
Threaded
Hollow Tube
DD
DD
x 1
Machine
Screw
CC
x 2
Hardware Used
AA
Wire Nut
Hardware Used
x 1
EE
Grounding Screw
x 1
SAFETY INFORMATION
WARNING
• Shut off power at the circuit breaker or fuse panel before removing the old fixture or
installing the new one.
• LEDs can be damaged by electrostatic discharge (ESD) shock. Before installation, discharge
yourself by touching a grounded bare metal surface to remove this hazard. To avoid damage,
do not remove the clear lens over the LED module.
• This device complies with Part 15 of the FCC rules. Operation is subject to the following two
conditions: (1) This device may not cause harmful interference, and (2) this device must accept
any interference received, including interference that may cause undesired operation.
CAUTION
• DO NOT USE THIS FIXTURE WITH A DIMMING CIRCUIT. If the fixture is being wired to a switch that
has dimmer controls, the dimmer switch will need to be replaced with a standard electrical switch. If a
three-way dimmer is currently installed, it will need to be replaced with a standard three-way switch. If
unfamiliar with electrical installations, it is recommended a qualified electrician do the installation.
1
Mounting
Bracket
BB
x 1
2
3
AA
EE
BB
D
A
BB
CC
CC
Lowes.com
3