
Installation Guide

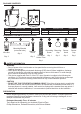


PACKAGE CONTENTS
HARDWARE CONTENTS (shown actual size)
PREPARATION
Before beginning assembly of product, make sure all parts are present. Compare parts with
package contents list and hardware contents list. If any part is missing or damaged, do not
attempt to assemble the product.
Estimated Assembly Time: 45 minutes
Tools Required for Assembly (not included):
Electrical Tape,
Phillips Screwdriver, Flathead Screwdriver, and Silicone Sealant.
Wire Nut
Qty. 3
AA
A Fixture 1 C
D
Dusk-to-Dawn Sensor
Grounding Wire
1
1
PART DESCRIPTION QUANTITY PART DESCRIPTION QUANTITY
B Diffuser 1
Qty. 1
Sensor
Cap
HH
Qty. 1
Sensor
Hood
GG
Qty. 2
Machine
Screw
CCBB
Mounting Bracket
(not actual size)
Qty. 1
C
B
A
Qty. 1
Threaded
Hollow Tube
DD
Qty. 1
Mounting
Cap
FF
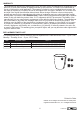
SAFETY INFORMATION
WARNING
• Shut off power at the circuit breaker or fuse panel before removing the old fixture or
installing the new one.
• LEDs can be damaged by electrostatic discharge (ESD) shock. Before installation, discharge
yourself by touching a grounded bare metal surface to remove this hazard. To avoid damage,
do not remove the clear lens over the LED module.
• This device complies with Part 15 of the FCC rules. Operation is subject to the following two
conditions: (1) This device may not cause harmful interference, and (2) this device must accept
any interference received, including interference that may cause undesired operation.
CAUTION
• DO NOT USE THIS FIXTURE WITH A DIMMING CIRCUIT. If the fixture is being wired to a switch that
has dimmer controls, the dimmer switch will need to be replaced with a standard electrical switch. If a
three-way dimmer is currently installed, it will need to be replaced with a standard three-way switch. If
unfamiliar with electrical installations, it is recommended a qualified electrician do the installation.
D
Qty. 1
Grounding
Screw
EE
Lowes.com
2