
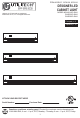
Installation Guide


DIRECT WIRE INSTALLATION
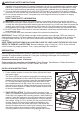
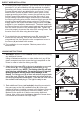
8. For safety and proper operation, your fixture must be properly
grounded. If you are unfamiliar with the methods of properly
grounding your fixture, consult a qualified electrician. A copper
or green ground wire is pre-attached to your fixture. If your
electrical box is made of plastic and/or has a green or bare
copper grounding wire inside, connect the ground wire to the
fixtures’ ground wire lead using one of the wire nuts. If your
fixture is being connected using a flexible whip or NM cable,
the fixture grounding wire and the electrical supply ground wire
should be connected togther using a wire nut. Connect the
supply leads to the fixture wire leads using the wire nuts (BB)
supplied in your installation hardware kit. The black leads from
the fixture connect to the black supply lead and the white leads
from the fixture connect to the white supply lead. Tighten the
wire nuts properly to prevent the wires from coming loose. Tape
the wire nuts to the wire using electrical tape.
9. To re-attach the wire compartment cover (B), screw the two
screws into the housing. Tuck all the wires into the wire
compartment first, then place the wire compartment cover to
the fixture (A) and attach with screws.
10. The installation is now complete. Restore power to the
electrical box.
6
BB
BB
BB
A
DD
8
9
10
A
D
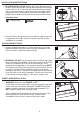
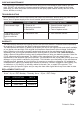
1. WARNING: Make sure the POWER is OFF before connecting
any additional fixtures.
Using a flathead screwdriver, or other similar tool, pry off the
plastic receptacle cap that covers the input receptacle on the
fixture in order to insert the linking cord (D).
2.
Attach the linking cord (D) to the input receptacle on one end
of the fixture (A). The 2 receptacles are designed to only
accept a specific plug. NOTE: The linking cord (D) will only
plug into one end correctly. Do not try to force it into the
wrong receptacle as this could cause damage to the
fixture. The linking cord (D) is fitted with distinct plugs at each
end of the cord. Similarly, the power cord only works with the
correct plug/receptacle combination. Trace the line cord over to
the nearest outlet and plug in. The light is ready to use.
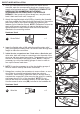
3. Each additional fixture (not included) should be mounted in
the same way as the first installed fixture (A). After each
additional fixture is installed, connect to the adjacent fixture by
following the linking instructions outlined in steps 1 and 2.
Make sure the power is off before connecting additional
fixtures. Also, make sure the distance between fixtures does
not exceed the connector cord (D) length.
LINKING INSTRUCTIONS
A
1
A
2
3
D