
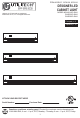
Installation Guide


3
insulation may go unnoticed. To prevent fire danger, do not run cord behind walls, ceilings, soffits,
cabinets, or a similiar permanent structure where it may be inaccessible for examination. Cords
should be visually examined periodically and immediately replaced when any damage is noted.
17. You must limit your installation to a total of 60 LED fixtures in any given circuit chain. Installing
more than 60 LED fixtures may overload the connector wiring and result in a hazardous situation.
18. Do not use an extension cord. Use power strip with integral overcurrent protection to supply
power to the fixture.
DIRECT WIRE SAFETY INFORMATION:
19. WARNING: Shut off power at the circuit breaker or fuse panel before removing the old fixture.
20. Remove the old fixture. Make a sketch of how the fixture is wired (index the sketch by wire color)
or mark the wires themselves with masking tape and a pencil so you will know how to connect the
wires to your new fixture. If several wires are involved or if the wiring seems more complicated
and perhaps even includes a red wire, take note of the connections before you disconnect them.
21. Do NOT install these LEDs inside of enclosed cabinents unless they are hard wired to meet your
local electrical code.
22. Do NOT leave bare wires exposed outside of the electrical connections.
IMPORTANT: These LED light heads use light emitting diodes to provide light. LEDs are electronic
semiconductors and do not have a filament that can burn out like an ordinary light bulb. As such, the
LED light heads can last up to 50,000 hours when used intermittently, and therefore, never need
replacing.
SAVE THESE INSTRUCTIONS IN A LOCATION CLOSE TO YOUR LIGHT FIXTURE SO YOU CAN
REFER TO THEM AT A LATER TIME. Before installation, plug in fixture to a 120 V 60 Hz electrical
outlet to check for proper operation. Then, unplug and begin the installation.
IMPORTANT SAFETY INSTRUCTIONS
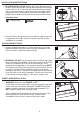
A
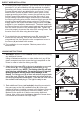
1. Find a suitable location to mount the fixture (A) that will reach
the power supply.
The fixture (A) can be installed
using captive mounting screws
which are preinstalled on the inside of the wire compartment or
installed at the keyhole locations using the provided hardware
kit. To begin first remove the screws from both sides of the
wire compartment cover (B).
Once the screws are removed,
place the cover aside to expose the captive mounting screws
and the keyhole locations. These will be located on both ends
of the wire compartment.
2. EASY INSTALLATION: The fixture can be mounted in two
ways. For installation using pilot holes for the screws, place the
fixture (A) firmly against the mounting surface. While holding in
position, mark the surface for the pilot hole locations by turning
both screws with a phillips head screwdriver until they dimple
the surface. Using a 1/16 in. drill bit, drill the pilot holes for the
screws. Secure the fixture to the cabinet by tightening the
mounting screws into the drilled pilot holes. The fixture can
also be mounted without the use of pilot holes by firmly holding
the fixture against the mounting surface and turning the
mounting screws until the fixture is snug against the surface.
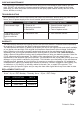
INSTALLATION INSTRUCTIONS
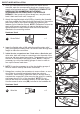
1
2
A
B
Before beginning installation of product, make sure all parts are present. Compare parts with package
contents list and hardware contents list. If any part is missing or damaged, do not attempt to
assemble, install or operate the product.
Estimated assembly time: 30 minutes
Tools required for assembly (not included): Safety Glasses, Tape Measure, Phillips Screwdriver,
Flathead Screwdriver, Pliers, Drill, Drill Bit, Ladder, Soft Cloth.
PREPARATION