
Installation Guide


Nudo Products, Inc.
1500 Taylor Avenue
Springfield, IL 62703
Phone 1.800.826.4132 * 1.217.528.5636
Fax 1.217.528.8722
Form 6009.A Rev. 06 09/17
!
Vertical Wall
Preparation
THE CEILINGS SHOULD BE INSTALLED PRIOR TO WALLS. If the ceiling has
just been installed use the existing inside corner trim to edge wall panels. Panels
can be installed over masonry block, metal and wood framing studs, so make sure
you have selected the proper fasteners for the application
.
Pre-Install
Planning
Vertical
Installation
Method
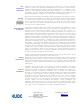
J-Cap
Open Face-down
Ceiling
J-Cap
Open Face-up
Floor
Measure Area. Panels should be pre-fit cut ½ shorter than actual wall height to
allow for expansion and contraction. Cove base molding should not restrict panel,
but allow for expansion and contraction. Poured molding should be completed
prior to installation of panels. Cut panels ¼” short of where the base molding will
extend.
Start in one corner and lay J-Cap edge, open face-up, along the floor and open
face-down along ceiling creating a channel to insert wall panel (unless inside corner is
installed at ceiling). Insert a thin bead of clear silicone caulking along the inside of J-
Trim to provide a waterproof seal and fasten every 16" or 24" along top and bottom of
wall.
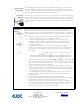
§ Make a nice clean border around doors and window openings by installing
J- Cap or Outside Corner prior to installing wall panels.
§ Depending on the application and conditions, you may want to apply
adhesive to the back center of the panels from top to bottom and add a
small bead of clear silicone caulking on channel opening of trim piece to
provide waterproofing.
§ Take first wall panel which is ½" shorter than actual wall, and place in
corner, tongue first and raise up into the ceiling trim (IC or J-Cap) and then
bend slightly in the middle as to get the panel to fit into J-Cap channel at
base of wall.
§ To allow for expansion and contraction, raise the panel ¼ off the floor and
fasten the panels groove flange every 16" - 24". On the first panel you must
also fasten the tongue side with screws near the corner, within 1" from the
edge allowing the trim piece to cover them.
§ Make sure first panel is level in place and proceed to install the remaining
panels in the same fashion. You may choose to use a 2x4 wood piece to tap
groove flange onto tongue of panels. Continue to add trim pieces to terminate
top and bottom of panel in the process.
§ To create a water-tight corner at door and window openings insert a small
bead of clear silicone caulking on channel opening of trim pieces before
installing panels.
§ Continue the method working in one direction around the room.
§ You may need to trim down last panel to complete install. Measure remaining
space distance at the groove edge of panel. Cut panel ¼ short of
measurement, allowing 1" wall trim to cover edge. Insert a small bead of
clear silicone caulk into edge trim piece, slide the last panel in to terminating
trim channel, fasten screws along the cut edge within 1" of the corner,
allowing trim to cover screws completing installation.