
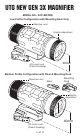
Operating Instructions


4. For SCP-MF3WQS, go to Step 5 directly.
For SCP-MF3WQ, based on your selection in Step 2,
attach the mount/riser as follows:
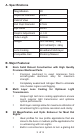
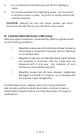
• For QD Mount Only:
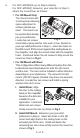
The mount comes with
3 locking holes allowing
space adjustment to
achieve optimal eye
relief. The mount can
be used bi-directionally
per your preference.
Locate two set screws
and install a spring washer onto each screw. Based on
your eye relief preference in Step 3, select two holes on
the QD mount, t the mount against the mating base on
the magnifer, and align the mount holes with the magnifer
holes. Install and fasten the set screws to fully secure the
mount as shown in Fig 2.
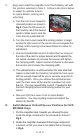
• For QD Mount with Riser:
This conguration offers many different options from the
bi-directional mounting feature for both the QD mount
and the riser. The riser can be installed in either direction
depending on your preference. The same for the QD
mount. (NOTE: Figures included only show one example
direction.) Locate four set screws and install a spring
washer onto each screw.
I. Install Riser: Align
the riser to the mating
base on the magnier
based on the direction
suitable for your
application. Install and
fasten two set screws
to fully secure the riser as shown in Fig 3.
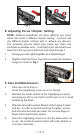
II. Install QD Mount: Based on your eye relief
preference in Step 3, select two holes on the QD
mount and align them to the mating holes on the
extruded part of the riser. Install and fasten the
remaining two set screws to fully secure the mount as
shown in Fig 3.
5 of 8
Fig 2.
Fig 3.