
User's Manual

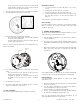
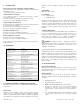
Table Of Contents

All Rights Reserved. 4 P/N 3102241 – Rev. EN03 – Jan 05, 2015
E. Reattach the alarm to the mounting base and test the system.
6. Adding to the Control Panel
Each product is programmed with a unique ID when manufactured.
The unique ID is enrolled into the control panel at the time of
installation, allowing the detector to communicate with that specific
control panel.
A. Set the Digital Life system in Discovery mode using the Digital Life
installation tools.
B. Press and hold the alarm learn button for 2 seconds.
o The learn LED will slowly blink while the device is being
discovered by the system. This process may take as long
as 60 seconds.
o If the device is successfully discovered, the learn LED will
turn solid for 15 seconds.
o If the device is not discovered, the learn LED will blink fast
for 15 seconds.
C. If desired, edit the sensor’s name and/or location in the Digital Life
system.
D. If the DLC has signal strength of Low or Weak for this device, then
install a repeater.
7. Testing the Product
This product may be tested during install or at any time. It is
recommended the product be tested in place annually.
A. Use a hair dryer (maintaining a distance of three inches) for 20
seconds or until an alarm is indicated.
The LED should stay on, the sounder should emit a temporal 3 pattern,
and an alarm should be indicated at the control panel. Be sure to
extinguish the heat source after testing!
Running the RF Communication Test
This section provides general guidelines for testing the product with the
control panel. For complete testing details, refer to the specific control
panel documentation.
o Be sure the product is normal operation.
o Using the Digital Life Direct (DLD) web tool, select the Heat
Detector.
o In the signal strength selection, click the enable button.
o The signal strength test will run for 60 seconds.
o Once the test has completed, the ping results will show the
signal strength of all links (DLC to alarm, DLC to repeater,
repeater to Heat Detector).
o If the link to the smoke is below -90 dB, then a repeater should
be installed in the link between the DLC and the Heat Detector.
8. Maintenance
This product is designed for a long service life far beyond 10-years.
Even though the control panel indicates when to service this product,
several annual and random/as required checks are recommended.
Annual - Alarm Test
Random - Visual check for LED flashing every 8 seconds
- Sensitivity Test
- Wireless Signal Strength
The control panel indications are Trouble, and Low Battery.
Trouble - the product has an internal fault, which requires
technical service.
Low Battery - batteries are low and must be replaced to
maintain proper operation.
Heat Detector Test
This product is equipped with an internal diagnostic checking function.
The diagnostic indication uses LED status to provide an overall product
operational status. If an unserviceable hardware fault has been
detected, the LED is OFF until the product is serviced. To place the
product in diagnostic mode:
A. Momentarily press the Test button on the product for the
alarm LED flashes 4 times followed by a solid LED while one
round of temporal sound and a test message will be sent.
B. If test button is still being pushed then an alarm message will
be sent to the panel and device will continue the temporal
sound pattern until the button is released.
C. Followed by another temporal three sound and 20 rapid LED
blinks indicating entry/start of heat sensitivity test. While
waiting to see heat the LED turns off then on for 1 second up
to 1 minute, if user applies heat using a hair dryer
(maintaining a distance of three inches) during this minute the
alarm LED turns on solid red and temporal 3 sounds twice
followed by LED switches from solid red to LED off ½ second
LED on ½ second for 20 seconds indicating completion of
test.
D. Check the LED status and see the table below to determine
the status of the alarm and any action to take.
Status indicators
LED
status
and/or
sound
indication
Meaning Steps to Take
Low chirp Battery is low Replace batteries.
LED
blinking
every 8 s
Alarm is
operating as
intended
None
LED off Alarm is in
trouble.
Check panel for specifics.
Trouble
Refer to Section 9 for troubleshooting guidance.
Cleaning
Clean the alarm cover with a dry or damp (water) cloth as needed to
keep it free from dust and dirt.
Low Battery
Replace the batteries per Section 5 - Installing / Replacing Battery.