
User's Manual
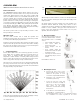
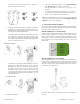


Table Of Contents

UTC. All Rights Reserved. 4 P/N 0000000 – Rev. A – 06 Nov 12
o When replacing the battery, use one of the following approved
brands, which can be purchased at your local hardware store:
− Duracell
− Energizer E91
Using a different battery can affect the detector operation detrimentally.
Constant exposures to high or low humidity may reduce battery life.
7. Adding to the Touch Screen
Each detector is programmed with a unique ID when manufactured.
The unique ID is enrolled into the control panel at the time of
installation, allowing the detector to communicate with that specific
control panel.
o From the Home screen, touch the Settings widget.
o At the keypad, enter the Installer’s keypad code (not the
customer’s Master keypad code).
o At the keyboard screen, enter your Technician Code and touch
Done.
o At the Installer Settings Menu, touch Sensors & Zones > Add a
Sensor/Zone.
o At the Locating Wireless Sensors screen, default the detector
and place it in Search mode (see section x).
The detector must not be paired with another Touch Screen. If it is, un-
pair it (refer to the TouchScreen Installation Manual).
o Touch Next. A Stop button appears on the screen and the
TouchScreen searches for the detector to be added. When the
TouchScreen finds it, a grayed icon appears.
o Fault the detector to pair it to the TouchScreen. Move hand over
the PIR Sensor.
o Touch Stop. The Wireless Sensors Located screen shows the
detector that was found and paired.
o Touch Next. The Configure Wireless Sensors screen shows an
icon for the detector that was found.
o Touch the sensor icon to configure the detector. The Add
Sensor/Zone Modify screen appears.
o When the detector is configured properly, touch Next. The Add
Sensor/Zone Modify screen appears.
o To modify any text field on the TouchScreen, such as the Zone
Label, touch the field to display a keyboard. Then use the
keyboard to enter your changes and touch Done to save your
changes.
o As the detector is configured, the circle in the top-right of the
icon changes from:
o to .
o When the detector is configured properly, touch Next in the
Configure Wireless Sensors screen.
o If all sensors have not been configured, the Modify screen
appears for each sensor to let you review its details.
o Change the details as needed or touch Next to cycle through all
the sensors.
8. Testing the Detector
This detector has two test modes: Walk mode and RF Communication
Test.
Walk Test
This is a local test to determine the coverage area of the installation.
Enable Walk mode via the internal jumper. When enabled the detector
activates for detected motion by the detector’s LED indication. The
detector does not send an alarm message to the control panel. When
finished, place the Walk mode jumper back to the default setting.
Running the RF Communication Test
This section provides general guidelines for testing the detector with
the control panel. For complete testing details, refer to the specific
control panel documentation.
o Wait at least 5 minutes after installing the detector to test.
o Be sure the detector is normal operation.
o Set the control panel to sensor test mode to prevent an alarm
signal from being sent to the central-monitoring station if you
have a monitored system.
o To generate a test alarm, walk in the detector’s viewing range.
An alarm message is sent to the control panel. To generate a
tamper alarm, remove the detectors top cover. A tamper alarm
message is sent to the control panel.
o The control panel beeps and shows the number of RF packets
received.
o At the panel, exit sensor test mode.
9. Defaulting the Detector
This step should only be performed by a qualified service technician.
o Remove the detector’s top cover.
o Remove the battery.
o Press the enrollment switch in the RF circuit inside the detector
and hold until you replace the battery. Switch location shown
below.
o Replace the battery while still pressing the enrollment switch,
then release the switch. The RF LED flashes three times to signal
the detector is not paired with a control panel.
o Reinstall the front cover.
10. Viewing Zone Event History
To view event history:
A. Tap the Security widget on the Home screen.
B. Tap the History tab. The Zone Event History shows the event
history.