
User manual

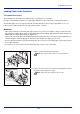
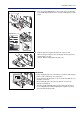


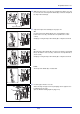
Table Of Contents
- Included Guides
- Safety Conventions in This Guide
- Symbols
- Contents
- Legal and Safety Information
- Notice on Software
- Notice
- Regarding Trade Names
- License Agreements
- Compliance and Conformity
- Energy Saving Control Function
- Automatic 2-Sided Print Function
- Resource Saving - Paper
- Environmental benefits of "Power Management"
- Environment
- Cautions when Handling Consumables
- Other precautions
- Laser Safety (Europe)
- About the Operation Guide
- Conventions
- 1 Part Names
- 2 Preparation before Use
- 3 Printing
- 4 Document Box
- 5 Status Menu
- 6 Operation Panel
- Report Print
- USB Memory (USB memory selection)
- Counter (Viewing the counter value)
- Paper Settings
- Print Settings
- Paper Source (Selecting the paper feed source)
- MP Tray Priority (the settings for priority paper feed from the MP tray)
- Paper Feed Mode (Setting the paper feed source)
- Duplex (Setting the duplex printing)
- Paper Output (Selecting the Paper Output Location)
- Override A4/LTR (Overriding difference between A4 and Letter)
- Emulation (Setting the emulation)
- Color Mode (Selecting color or black & white printing)
- Print Quality (Setting print quality)
- Page Setting (Setting pagination)
- Offset 1PageDoc. (Offset One Page Documents)
- User Name (The User Name display settings)
- Job Name (The Job Name display settings)
- Network (Network settings)
- Optional network (Optional Network settings)
- Device Common (Selecting/Setting the common device)
- Language (Selecting the message language)
- Def. Screen(Box) (Document Box default screen settings.)
- Date Setting (Date and time settings)
- Buzzer (Alarm (Buzzer) setting)
- Display Bright. (Display brightness setting)
- Disp. Backlight (Display backlight setting)
- Error Handling (Error detection setting)
- ColorToner Empty (Setting when color toner runs out)
- Timer Setting
- USB Keyboard Type (USB keyboard type selection)
- Manual Staple (Manual Staple setting)
- TonerAlert Level (Setting for the alert level for toner addition)
- Display Jobs Log
- Msg Banner Print (Preview screen setting for Banner Printing)
- Security (Security function setting)
- User/Job Account (User Login Setting/Job Account setting)
- Adjust/Maint. (Adjust/Maintenance selection/setting)
- Op Functions (Optional application settings)
- Shut down (Shutting down the machine)
- 7 Maintenance
- 8 Troubleshooting
- General Guidelines
- Print Quality Problems
- Error Messages
- Clearing Paper Jams
- Possible Paper Jam Locations
- General Considerations for Clearing Jams
- Utilizing Online Help Messages
- Cassette 1
- Cassette 2
- Optional Cassettes 3 and 4
- Multi Purpose Tray
- Inside the Right Covers 1, 3 and 4
- Duplex unit
- Duplex Unit and Cassette 1
- Bridge Unit (Option)
- 1,000-sheet Finisher (Option)
- 4,000-sheet Finisher (Option)
- Mailbox (Option)
- Center-Folding Unit (Option)
- Cassette 5 (Option)
- Cassette 6,7 (Option)
- Clearing a Staple Jam
- Appendix
- Optional Equipment
- Overview of Optional Equipment
- Paper Feeder (500-sheet x2)
- Large Capacity Feeder (1,500-sheet x 2)
- Side Feeder (3,000-sheet)
- Side Feeder (500-sheet x 3)
- Large Capacity Side Feeder (500, 1,500-sheet x 2)
- 1,000-sheet Finisher
- 4,000-sheet Finisher
- Manual staple mode
- Mailbox
- Folding Unit
- Banner Tray
- Network Interface Kit
- Wireless Network Interface Kit
- Data Security Kit
- ThinPrint Option
- Emulation Option
- Card Authentication Kit (B)
- USB Keyboard
- Character Entry Method
- Paper
- Specifications
- Common functions
- Paper Feeder (500-sheet x 2) (Option)
- Large Capacity Feeder (1,500-sheet x 2) (Option)
- Side Feeder (500-sheet x 3) (Option)
- Large Capacity Side Feeder (500, 1,500-sheet x 2) (Option)
- Side Feeder (3,000-sheet) (Option)
- 1,000-sheet Finisher (Option)
- 4,000-sheet Finisher (Option)
- Hole Punch Unit (Option)
- Mailbox (Option)
- Center-Folding Unit (Option)
- Glossary
- Optional Equipment
- Index

2-21
Preparation before Use
Before Loading Paper
When you open a new package of paper, fan the sheets to separate
them slightly prior to loading in the following steps.
1 Bend the whole set of sheets to swell them in the middle.
2 Hold the stack at both ends and stretch it while keeping the entire
stack risen.
3 Raise the right and left hands alternately to create a gap and feed air
between the paper.
4 Finally, align the paper on a level, flat table.
If the paper is curled or folded, straighten it before loading. Paper that
is curled or folded may cause a jam.
CAUTION If you copy onto used paper (paper already used for printing), do not use paper that is stapled or
clipped together. This may damage the machine or cause poor image quality.
Avoid exposing opened paper to high temperatures and high humidity as dampness can be a cause of
problems. Seal any remaining paper after loading in the multi purpose tray or cassettes back in the paper
storage bag.
If the machine will not be used for a prolonged period, protect all paper from humidity by removing it from
the cassettes and sealing it in the paper storage bag.
Note Note that some paper types have a tendency to curl and may jam in the paper eject unit.
If the output paper scatters or stacks unevenly, turn the paper over in the cassette, or change the orientation
(vertical/horizontal) of the paper in the cassette.
If you use special paper such as letterhead, paper with holes or paper with pre-prints like logo or company name,
refer to the Paper on A-9.