
User guide


Serial ATA 4-Drive NAS
User Guide
Managing Your Storage System - 78
to make these changes.
To change the disk configuration or storage space allocation:
1. In the navigation bar, click Advanced.
2. In the left pane, click Disks.
3. In Administrator password, enter your password for logging in to the Web User Interface.
4. Click Reconfigure Disks.
5. When the confirmation message appears, click OK.
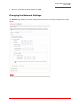
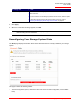
The Disk Configuration page appears. The options that appear on this page vary, depending on the
number of hard disks that are currently installed in the system.
6. If you need to add or remove hard disks, do so one at a time and click Scan after each action. If you
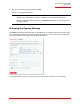
Caution: Changing the disk configuration or percentage to allocate for shared folders will delete all
user information and all data on all the disks.
Before you change these settings, have all the users disconnect from all shared folders (as
described in “Disconnecting from Shared Folders” on page 136) and remove protection from
all disks (as described in “Removing Protection” on page 122).
When you are done, you must re-add all users (as described in “Adding Users” on page 31),
create new shared folders (as described in “Creating Shared Folders” on page 34), and have
all users once again access the shared folders (as described in “Accessing Shared Folders”
on page 37) and protect their disks (as described in “Protecting Your Disks” on page 98).