
User guide


Serial ATA 4-Drive NAS
User Guide
Getting Started - 14
2. Near the front of the tray is a spacer containing four screws. Squeeze the tabs toward each other to
remove the spacer from the tray.
3. With the flat edge of the spacer up and the screws facing a flat surface (such as a table or desk top),
flex the sides of the spacer apart from each other to release the screws.
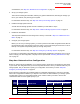
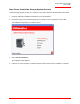
4. Make sure that the hard disk is a SATA disk. It should have a SATA connector similar to the following:
5. Slide the new hard disk into the tray (connector end down and toward the back of the tray), and fasten
the screws on the sides of the tray:
6. Slide the hard disk and tray back into the storage system until it snaps into place.