Serial ATA 4-Drive NAS User Guide R46.1702.00 rev 0.
U.S. Robotics Corporation 935 National Parkway Schaumburg, Illinois 60173-5157 USA No part of this documentation may be reproduced in any form or by any means or used to make any derivative work (such as a translation, transformation, or adaptation) without written permission from U.S. Robotics Corporation. U.S.
Contents Safety Instructions General . . . . . . . . . . . . . . . . . . . . . . . . . . . . . . . . . . . . . . . . . . . . . . . . . . . . . . . . . . . . . . . 7 Introducing Your Storage System Package Contents . . . . . . Physical Features . . . . . . Front . . . . . . . . . . . . Back . . . . . . . . . . . . System Requirements . . . Key Features and Benefits Hardware Specification . . Software Specification . . . USB Printer Limitations . . . . . . . . . . . . . . . . . . . . . . . . . . . . . .
Serial ATA 4-Drive NAS User Guide Deleting a Backup . . . . . . . . . . . . . . . . . . Deleting a Client . . . . . . . . . . . . . . . . . . . Setting Up E-mail Alerts. . . . . . . . . . . . . . . . . Upgrading the Firmware. . . . . . . . . . . . . . . . . Disconnecting USB Devices . . . . . . . . . . . . . . Changing the System Settings . . . . . . . . . . . . Changing the Network Settings. . . . . . . . . . . . Reconfiguring Your Storage System Disks . . . . Expanding the shared storage . . . . . . . . .
Serial ATA 4-Drive NAS User Guide Troubleshooting Resetting the Web User Interface Password . . . . . . . . . . . . . . . Viewing the System Log. . . . . . . . . . . . . . . . . . . . . . . . . . . . . Disconnecting from Shared Folders . . . . . . . . . . . . . . . . . . . . . Windows Users . . . . . . . . . . . . . . . . . . . . . . . . . . . . . . . . Linux Users. . . . . . . . . . . . . . . . . . . . . . . . . . . . . . . . . . . Mac Users. . . . . . . . . . . . . . . . . . . . . . . . . . . . . . . . .
Serial ATA 4-Drive NAS User Guide vi
Serial ATA 4-Drive NAS User Guide Safety Instructions Use the following safety guidelines to help ensure your own personal safety and to help protect your storage system and working environment from potential damage. General • Do not attempt to service the storage system yourself unless you are a trained service technician. Always follow installation instructions closely. • To help prevent electric shock, plug the unit and device power cables into properly grounded electrical outlets.
Serial ATA 4-Drive NAS User Guide Safety Instructions - 8
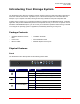
Serial ATA 4-Drive NAS User Guide Introducing Your Storage System The Serial ATA 4-Drive NAS is an intelligent network storage solution for small and medium-sized offices and home network environments. It provides up to 2.0 TB of hard disk space for both shared files and backups of your computer hard disks, offering an ideal way to distribute and protect important data.
Serial ATA 4-Drive NAS User Guide Symbol Name Disk (1–4) State Condition Off Drive not available On Drive available Flashing Drive activity Back USB Ports Ethernet Port Power Connector Power Switch System Requirements • Microsoft Windows Vista; Microsoft Windows XP; Microsoft Windows Server 2003; or Microsoft Windows 2000 Professional, Server, or Advanced Server with Service Pack 4 • Web Browser with JavaScript enabled - Internet Explorer 6.0 or Firefox 1.
Serial ATA 4-Drive NAS User Guide your network, and its informative wizards and configuration pages will help you accomplish your tasks quickly and easily. • Status at a glance—The Home page of the management interface lets you quickly determine how much space is being used and who’s currently connected. • Support for multiple platforms—Whether the computers in your network run Windows, Mac OS X or other Mac operating systems, or Linux, you can set up file sharing for each of them.
Serial ATA 4-Drive NAS User Guide Software Specification Operating System Linux Kernel 2.6.10 Network Service DHCP client/server (default IP address is 192.168.0.101) Supported Web Browsers • • Microsoft Internet Explorer 6.0 or newer Mozilla Firefox 1.
Serial ATA 4-Drive NAS User Guide Getting Started Getting started with your storage system involves the following general steps: 1. Install your storage system. This process involves installing both the hardware and software components of your storage system and specifying the initial configuration. For step-by-step instructions for this process, see “Installing Your Storage System” on page 11. 2. After installation is complete and the storage system restarts, start the Web User Interface and log in.
Serial ATA 4-Drive NAS User Guide considerations, see “Step One: Determine Your Configuration” on page 12. 2. Set up your storage system. This involves installing the hard disks, attaching any optional USB devices, attaching the storage system to your network, and powering up the system. For information about this step, see “Step Two: Set up Your storage system” on page 13. 3. Install the Storage System Console. You will need the Storage System Console to initialize your hard disks in step 4.
Serial ATA 4-Drive NAS User Guide Configuration Characteristics Number of Disks Configuration Methods Used Available Data Capacity* Redundancy Performance 3 4 Linear Independent disks 1.5 TB No Good RAID 0 Striping 1.5 TB No High RAID 5 Striping with parity 1.0 TB Yes Good Linear Independent disks 2.0 TB No Good RAID 0 Striping 2.0 TB No High RAID 5 Striping with parity 1.
Serial ATA 4-Drive NAS User Guide 2. Near the front of the tray is a spacer containing four screws. Squeeze the tabs toward each other to remove the spacer from the tray. 3. With the flat edge of the spacer up and the screws facing a flat surface (such as a table or desk top), flex the sides of the spacer apart from each other to release the screws. 4. Make sure that the hard disk is a SATA disk. It should have a SATA connector similar to the following: 5.
Serial ATA 4-Drive NAS User Guide If you have fewer than four disks, load the bottom trays first and leave the top tray or trays empty. If you have four disks that are not the same size and you intend to use RAID 10, USRobotics recommends that you load the disks in ascending order of disk capacity, starting with the smallest disk in the bottom slot (slot 1), Notes: • If you install a hard disk that was previously part of a RAID, it will rebuild automatically.
Serial ATA 4-Drive NAS User Guide Step Three: Install the Storage System Console Install the Storage System Console on a computer on the same network as the Serial ATA 4-Drive NAS: 1. Insert the USRobotics Installation CD-ROM into your CD-ROM drive. 2. If prompted, select your preferred language, then review the License Agreement and click Yes. The installation CD prompts you to make a choice: 3. Select Console Installation. The installation wizard appears. 4.
Serial ATA 4-Drive NAS User Guide the following window appears: 5. Click Finish. Step Four: Initialize the Hard Disks To initialize the hard disks, follow these steps: 1. Start the Storage System Console as follows: Windows Vista or XP: click Start > All Programs > Storage System Console. Other Windows operating systems: click Start > Programs > Storage System Console.
Serial ATA 4-Drive NAS User Guide The Storage System Console appears: 2. In the left pane, click the name of the storage system. Then click Log On Storage System Manager. If you see the Login page, your storage system was initialized and configured before you bought it. You are finished with the installation procedure and can begin using your Serial ATA 4-Drive NAS system, or you can reconfigure your disks if you choose to do so.
Serial ATA 4-Drive NAS User Guide If the System Initialization page appears, you need to initialize your disks: If not all the hard disks have been detected, or if you want to add, remove, or reorder the disks at this time, insert or remove the disks one at a time and click Scan after each action. If you are adding disks, be sure to wait until the Disk LED is blue before you click Scan.
Serial ATA 4-Drive NAS User Guide When this process is complete, the storage system restarts and displays the welcome page: Step Five: Configure your Storage System Once initial setup has been completed, follow these steps to run the System Setup wizard and perform the necessary initial configuration: 1. On the welcome page, click Next. The End User Software License Agreement page appears. 2. If you agree to the terms, select I accept the license agreement and click Next. The Host Name page appears. 3.
Serial ATA 4-Drive NAS User Guide Specify the time using the 24-hour format. For example, enter 2:00 P.M. as 14:00:00. When you click Next, the Network Settings page appears: 4. By default, if your network has a DHCP server, the storage system obtains an IP address automatically from that server. If your network does not have a DHCP server, the default IP address and subnet mask are used. (The default IP address is 192.168.0.101, and the default subnet mask is 255.255.255.0).
Serial ATA 4-Drive NAS User Guide 5. Select the configuration that you chose from the table on page 12 and click Next. By default, the storage system selects the configuration that provides the best level of data protection available: for a single disk, a linear configuration; for two disks, RAID 1; and for three or four disks, RAID 5. If you want to change the disk configuration, select the desired RAID level and then click Next. If you want to add or remove hard disks, do so one at a time.
Serial ATA 4-Drive NAS User Guide Capacity of drives: 7. In each text box, enter the size of each disk that you plan to back up (specify the size in gigabytes). To determine the size of a computer’s disk, on that computer: • Windows Vista: click Start > Computer, right-click the disk, and select Properties. • Windows 2000: on the desktop, double-click My computer, right-click the disk, and select Properties.
Serial ATA 4-Drive NAS User Guide When you click Next, the Disk Space Distribution page appears: 8. To accept the suggested percentages for file sharing and backup, click Finish. To change these proportions, enter a new percentage in either text box. (When you click anywhere on the page, the other text box updates automatically so that both percentages add up to 100%.) Then click Finish.
Serial ATA 4-Drive NAS User Guide Accessing the Web User Interface Once you have completed the initial configuration of your storage system, you can access the Web User Interface to add users, create shared folders, and perform other tasks related to managing your storage system. There are two ways to access the Web User Interface: • Using a Web browser with JavaScript enabled (Microsoft Internet Explorer 6.0 or Mozilla Firefox 1.
Serial ATA 4-Drive NAS User Guide Accessing the Web User Interface Using the Storage System Console If you want to access the Web User Interface using the Storage System Console, you must install the Storage System Console on each computer from which you plan to manage the storage system.
Serial ATA 4-Drive NAS User Guide 2. In the left pane, select the name of the storage system that you want to manage (for example, Storage), and then click Log On Storage System Manager. 3. If a certificate error is indicated, click Continue to this website. 4. Log in to the Web User Interface (as described in “Logging In to the Web User Interface” on page 27).
Serial ATA 4-Drive NAS User Guide Navigating the Web User Interface Once you log in to the Web User Interface, the Home page appears: The top of the Home page (and every page in the Web User Interface) displays a navigation bar that lets you access all the features of the storage system: Note: Do not use the navigation bar while in the process of making changes to user, group, shared folder and system settings.
Serial ATA 4-Drive NAS User Guide age system. Note: The total storage capacity will be less than the total size of all your hard disks because some of the disk space is needed for the operating system and management software. In addition, the amount of used backup capacity will be greater than the total size of all the disks listed on the Backups page because additional storage space is needed for the data that has changed between backups.
Serial ATA 4-Drive NAS User Guide configuration settings; viewing information about system events; and shutting down the system remotely. For more information, see Chapter , "Managing Your Storage System," beginning on page 45. • Contact Us—Provides information about USRobotics and the other products and services it offers. • Log Out—Logs you out of the Web User Interface.
Serial ATA 4-Drive NAS User Guide Favorites or Bookmarks If the storage system has a name registered with a DNS server on your network or uses a static IP address, Favorites (Internet Explorer) or Bookmarks (Firefox) are another browser feature you can use to naviagate between the pages of the Web User Interface. Internet Explorer and Firefox both use CTRL-D to add Favorites or Bookmarks. Refer to your browser’s Help for more information.
Serial ATA 4-Drive NAS User Guide The Users & Computers page appears: 2. Click Add. 3. Select the type of user that you want to add, and then click Next. The operating system used by the user determines which option you should choose—Windows/Mac OS X user (CIFS) or Linux/Other Mac user (NFS). Note: Linux users and Mac users who are not using OS X access shared folders using the Network File System (NFS).
Serial ATA 4-Drive NAS User Guide • Windows/Mac OS X user (CIFS) • Linux/Other Mac user (NFS) Getting Started - 33
Serial ATA 4-Drive NAS User Guide 4. Enter the requested user information and click Done: For this type of user Do this Windows/Mac OS X user (CIFS) Enter the user name and password for accessing the shared folders. (You must enter the password a second time to confirm it.) The user name can be up to 20 characters long and can include letters and numbers.
Serial ATA 4-Drive NAS User Guide To create a shared folder: 1. In the navigation bar, click Shared Folders. The Shared Folders page appears: Note: The Shared folders list includes usbdisk1 and usbdisk2, whether or not any USB disks have been connected to the storage system. In addition, shared folders created as the result of adding a Windows/Mac OS X user do not appear in the Shared folders list. 2. Click Add.
Serial ATA 4-Drive NAS User Guide 3. In Shared folder name, enter a unique name for the shared folder. This name can be up to 64 characters long and can contain letters, numbers, hyphens, underlines, and spaces. It cannot begin with a period or contain a double period or the following characters: / \ [ ] : ; | = , + * ? < > @ " ' # ~ ` % $.. Note: Each shared folder name must be unique.
Serial ATA 4-Drive NAS User Guide there (if her access level was changed). Note: Linux users and Mac users who are not using OS X access shared folders using NFS. In this environment, access to shared folders is given to entire computers, not to individual users of those computers. However, in Windows and Mac OS X environments, each computer user can have individual access to a shared folder. If you created groups (as described in “Adding a Group” on page 49), you can perform this step with the Group tab.
Serial ATA 4-Drive NAS User Guide where you install the Storage System Console must be on the same network as the storage system. Note: If your storage system uses Active Directory authentication mode (as described in “Changing the Authentication Mode” on page 53), only the public folder is accessible via the Storage System Console. To access all other shared folders, you must use Windows Explorer. Using Windows To access a shared folder using Windows: 1. Windows Vista: click Start > Computer.
Serial ATA 4-Drive NAS User Guide \\Storage\Photos Note: You can use the storage system name if: • Your computer is in the same subnet as the storage system. • You added the IP address and name of the storage system to your local hosts file. • You manually registered the name with a DNS server in your network. Alternatively, you can click Browse and select the shared folder from the Microsoft Windows Network. 5.
Serial ATA 4-Drive NAS User Guide view of all the storage system servers it found: Note: If you connect a storage system to the network after the Storage System Console has already scanned it, or if you change the IP address of the storage system, you must click Discover Storage Systems to scan the network again and update the tree in the left pane. 3. In the left pane, double-click the name of the storage system that contains the shared folders that you want to access.
Serial ATA 4-Drive NAS User Guide that can be accessed using the guest user name and password are listed first: Note: All shared folders appear in the left pane. However, you can access only the ones that you are authorized to use. If your storage system uses Active Directory authentication mode, you must manually create a guest user account in order to use and create shared folders. 4. In the left pane, select the shared folder that you want to access and then click Map Drive Letter.
Serial ATA 4-Drive NAS User Guide logon. If you clear this option, you must repeat this procedure each time you want to access the shared folder. 7. Click Finish. 8. If prompted, enter your user name and password for accessing this shared folder, and then click OK. Note: If the user name and password for accessing the shared folder are the same as your Windows user name and password, you are not prompted to provide a user name and password to access the shared folder.
Serial ATA 4-Drive NAS User Guide /NASDisk-00002/folder /mnt/my_directory). 4. Repeat steps 1 through 3 for each shared folder that you want to access. Mac Users The procedure for accessing a shared folder on a Mac varies, depending on whether the Mac is running OS X or an older operating system. (Macs running OS X can access the same shared CIFS folders as Windows users. Mac running older operating systems can access the same shared NFS folders as Linux users.
Serial ATA 4-Drive NAS User Guide Getting Started - 44
Serial ATA 4-Drive NAS User Guide Managing Your Storage System The Web User Interface lets you perform a number of tasks to help you get the most from your storage system: • Managing Users—Add, modify or remove users, or put users into groups. • Managing Shared Folders—Create shared folders, rename existing shared folders, change which users can access existing shared folders or their access rights, and delete shared folders that you no longer need to keep.
Serial ATA 4-Drive NAS User Guide list of all currently configured Windows and Mac OS X users, as well as all Linux and other Mac computers. Only the individuals or computers that appear on this page can access the shared folders or back up their local hard disks on the storage system. (In this guide, the term user refers to both individuals and computers.) You can add, modify, or remove users at any time.
Serial ATA 4-Drive NAS User Guide Modifying Users In local authentication mode, for Windows and Mac OS X users you can change the password used to access the shared folders, but not the user name. This change will not affect current connections, but will take effect the next time the person tries to connect to a shared folder. (In Active Directory authentication mode, you cannot modify Windows and Mac OS X users, only Linux and other Mac users.
Serial ATA 4-Drive NAS User Guide • Linux/Other Mac user (NFS) 4. Make the desired change and click OK: For this type of user Do this Windows/Mac OS X user (CIFS) Enter the password for accessing the shared folders. (You must enter the password a second time to confirm it.) Note: If the user name and password specified here are the same as the person’s Windows user name and password, the person will not be prompted to provide a user name and password when accessing the shared folders.
Serial ATA 4-Drive NAS User Guide 1. In the navigation bar, click Users. 2. Select the user that you need to remove. 3. Click Remove. Note: If the storage system uses Active Directory authentication mode and you select a Windows or Mac OS X user, this button is dimmed. 4. When prompted to confirm the removal, click OK. The user no longer appears in the list on the Users page.
Serial ATA 4-Drive NAS User Guide You can create up to 128 groups. To add a group: 1. In the navigation bar, click Users. 2. In the left pane, click Groups. 3. Click Add. Note: If the storage system uses Active Directory authentication mode and you select a Windows or Mac OS X user, this button is dimmed. 4. In Group name, enter a unique name for the group. This name can be up to 15 characters long and can include letters, numbers, hyphens, and underlines.
Serial ATA 4-Drive NAS User Guide a To select multiple, contiguous users, hold down the Shift key and select the first user, then select the last user. All users between the first and last selected user are selected. To select multiple, non-contiguous users, hold down the Ctrl key as you select each user. Changing the Group Membership In local authentication mode, you can change which users are members of each group at any time.
Serial ATA 4-Drive NAS User Guide 5. Specify which users should belong to this group, and then click OK: To do this Do this Add all users to the group Click Add All Users. Add selected users to the group In Available users, select the user(s) that you need to add and then click Add Selected User(s).a Remove all users from the group Click Remove All Users.
Serial ATA 4-Drive NAS User Guide The group no longer appears in Groups. Changing the Authentication Mode Your storage system can operate in one of two modes: • Local authentication mode • Active Directory authentication mode In local authentication mode, the storage system authenticates all users who try to connect to shared folders, and you can add, modify, or remove all types of users. By default, the storage system uses local authentication mode.
Serial ATA 4-Drive NAS User Guide To change the authentication mode: 1. In the navigation bar, click Users. 2. In the left pane, click Authentication Mode. The Authentication Mode page displays the current authentication mode. 3. In Administrator password, enter the password for accessing the storage system. 4. Click Change Authentication Mode. If you are currently using local authentication mode, the Active Directory Server page appears. 5.
Serial ATA 4-Drive NAS User Guide The Active Directory User Login page appears. 8. In User name, enter the name of a user who has privileges to access the Active Directory tree. When accessing the Active Directory server, this name is appended to the fully qualified domain name shown on this page. 9. In Password, enter the password associated with the specified user name. 10.
Serial ATA 4-Drive NAS User Guide When you click Next, the Active Directory Tree page appears. Note: If the storage system time and Active Directory server time differ by more than five minutes, an error message appears. You must adjust the storage system time, time zone, or both to ensure that they match (as described in “Changing the System Settings” on page 69). 11.
Serial ATA 4-Drive NAS User Guide 13. In Password, enter the password associated with the specified user name, and then click Finish. All users and groups associated with the selected organizational unit are imported into the storage system and appear on the Users & Computers and Groups pages. At this point, you can assign these users and groups to shared folders (as described in “Changing User Access to Shared Folders” on page 59).
Serial ATA 4-Drive NAS User Guide To change this Do this The user name or password In User name, enter the name of a user who has privileges to access the Active for browsing the Active Directory tree. Directory tree In Password, enter the password associated with that user name. This user name and password is used to obtain new user and group information from the Active Directory server at every synchronization.
Serial ATA 4-Drive NAS User Guide preceded by an @ symbol.) By default, the storage system includes a shared folder named public. In local authentication mode, all users are automatically assigned to this folder and can create, modify, or delete files there (unless you change the list of authorized users or their access rights as described in “Changing User Access to Shared Folders” on page 59).
Serial ATA 4-Drive NAS User Guide disconnects or shuts down her computer. The next time she connects, she will either not have access (if she was removed from the list of authorized users), or she will be able to only view the files there (if her access level was changed). To change user access to shared folders and USB disks: 1. In the navigation bar, click Shared Folders. 2. In Shared folders, select the shared folder or USB disk whose user access you need to change. 3. Click Assign Access. 4.
Serial ATA 4-Drive NAS User Guide Notes: • You cannot delete the public folder. • You cannot delete the contents of a USB disk using the Shared Folders page. To delete its contents, you must give yourself read/write access to that disk (as described in “Changing User Access to Shared Folders” on page 59), access the disk (as described in “Accessing Shared Folders” on page 37), and then delete the desired folders and files.
Serial ATA 4-Drive NAS User Guide page in DiskSafe Express). If a user needs to recover a disk using the recovery CD or remotely boot from a backup on the storage system, the user will be prompted for a password. The user provided this password when protecting the disk. If the user forgets it, you can reset the password using the Web User Interface. (For information about recovering a disk using the recovery CD, refer to “Recovering a System Disk or Partition” on page 116.
Serial ATA 4-Drive NAS User Guide can only enter ASCII characters whose code values are less than 128. 4. Click Change Password. 5. When the confirmation message appears, click OK. The user must provide this password when recovering a disk from this storage system using the recovery CD or when remotely booting from a backup on the storage system.
Serial ATA 4-Drive NAS User Guide 6. When the confirmation message appears, click OK. If you changed the backup for booting remotely, an asterisk appears next to the selected backup. Deleting a Backup You can delete all backups of a given disk, but you cannot delete just an individual backup from a specific date and time. Note: If you delete all backups of all disks for a particular computer, that computer no longer appears on the Backups page.
Serial ATA 4-Drive NAS User Guide 4. When prompted to confirm the deletion, click OK. All backups of all disks associated with this computer are deleted, and the computer name is also deleted from the storage system. Note: If you delete a client and the user did not previously remove protection for that disk, when the user subsequently accesses DiskSafe Express, the Status page will indicate that the backup of the protected disk is offline.
Serial ATA 4-Drive NAS User Guide network or through an Internet service provider. Note: The e-mail might not be sent immediately when the problem occurs, but will be sent within an hour of the event. In addition, if the problem is fixed within an hour of its occurrence—for example, if you replace the disk that failed—the alert will not be sent. To set up e-mail alerts: 1. In the navigation bar, click Advanced. 2.
Serial ATA 4-Drive NAS User Guide This sends a test message to the specified recipients. If they do not receive the test message, make sure that all the entries on this page are correct. You might also need to modify the network settings (such as the gateway to use). For information about changing the network settings, refer to “Changing the Network Settings” on page 72. Upgrading the Firmware The Firmware page displays the current version of the firmware that is installed on your storage system.
Serial ATA 4-Drive NAS User Guide 5. Click Upgrade. 6. If you are upgrading from version 1.0 or 1.1, click Continue to delete all home folders and proceed with the upgrade. 7. When the confirmation message appears, click OK. Disconnecting USB Devices The USB page displays a list of all USB devices that are currently attached to the storage system, including the type of device it is, the manufacturer, and the name. USB disks are identified by the names usbdisk1 and usbdisk2.
Serial ATA 4-Drive NAS User Guide 5. When the confirmation message appears, click OK. You can now unplug the USB device. Note: If you inadvertently disconnect a USB device that you need to retain, unplug it from the storage system, plug it back in, and then click Scan. This reactivates the USB device. Since the USB device always remains on the Shared Folders page, any user assignments are always retained.
Serial ATA 4-Drive NAS User Guide authentication mode, you cannot change the storage system name. Note: If you change the name of the storage system, be sure to also change that name in any local hosts files or on the DNS server in your network. The storage system does not register its name with your DNS server automatically. For example, if users connected to the storage system using its IP address, changing the name has no effect.
Serial ATA 4-Drive NAS User Guide To change this Do this The system date, time, or time zone In Date, enter or select the desired month, date, and year. In Time, enter or select the desired hour, minute, and second. In Time zone, select the desired time zone. Note: The storage system time does not automatically change to reflect daylight saving time.
Serial ATA 4-Drive NAS User Guide 5. When the confirmation message appears, click OK. Changing the Network Settings The Network page displays the network settings that were set when you initially configured the storage system.
Serial ATA 4-Drive NAS User Guide You can change these settings at any time. Note: Changing the IP address or subnet mask can have several effects: • Access to the Web User Interface will be temporarily disrupted. If you access the Web User Interface using the Storage System Console or using the IP address of the storage system, you will need to access it again using the new IP address.
Serial ATA 4-Drive NAS User Guide To change this Do this The IP address of the gateway If your network includes a gateway, and if the storage system uses a specified IP address rather than obtaining one from the DHCP server, enter the IP address of the default router in Gateway IP address. If your network does not include a gateway, leave these text boxes blank. (If the storage system obtains its IP address from a DHCP server, the gateway will obtain its IP address from the DHCP server as well.
Serial ATA 4-Drive NAS User Guide To change this Do this The FTP settings If you need to use the storage system as an FTP server, select the Enable FTP server check box. If you do not need to use the storage system as an FTP server, clear this option. For information about accessing the storage system using FTP, refer to “Accessing the Storage System through FTP and SSH” on page 85. 4. Click Apply. 5. When the confirmation message appears, click OK.
Serial ATA 4-Drive NAS User Guide • The overall status of the disks: • Normal—All the disks are working properly. • Degraded—One or more disks have failed but all the data is still available. • Failed—The storage system has stopped working properly. • The slot where each hard disk resides • The model number, serial number, and size of each hard disk • The current status of each disk: • • RAID n—The disk is working properly as part of the specified RAID level.
Serial ATA 4-Drive NAS User Guide have been backed up to the storage system. To expand the amount of disk space allocated for shared folders: 1. In the navigation bar, click Advanced. 2. In the left pane, click Disks. 3. In Administrator password, enter your password for logging in to the Web User Interface. 4. Click Expand Shared Storage. The Expand Shared Storage page appears: 5. Specify how much disk space to add to the space that is currently allocated for shared folders.
Serial ATA 4-Drive NAS User Guide to make these changes. Caution: Changing the disk configuration or percentage to allocate for shared folders will delete all user information and all data on all the disks. Before you change these settings, have all the users disconnect from all shared folders (as described in “Disconnecting from Shared Folders” on page 136) and remove protection from all disks (as described in “Removing Protection” on page 122).
Serial ATA 4-Drive NAS User Guide are adding disks, wait until the disk LED is blue before you click Scan. To accept the default disk configuration (which will provide the best level of data protection available for the number of hard disks currently installed), click Next. By default, a linear disk configuration is used for a single hard disk, RAID 1 is used for two hard disks, and RAID 5 is used for three or four hard disks.
Serial ATA 4-Drive NAS User Guide The screen displays the progress of the process: When this process is complete, the storage system restarts. 9. Close the browser window. After the system has restarted, you can access the Web User Interface and re-create your users and shared folders (as described in “Adding Users” on page 31 and “Creating Shared Folders” on page 34).
Serial ATA 4-Drive NAS User Guide To update the information on this page, click Refresh. Note: The fan speed changes depending on the temperature of the unit. If the temperature of the motherboard reaches or exceeds 85° C (185° F), or if the temperature of the drive bay reaches or exceeds 55° C (131° F), the storage system shuts down automatically.
Serial ATA 4-Drive NAS User Guide 3. To log back in to the Web User Interface later, click Log In. Shutting Down the Storage System To shut down the storage system, you use the power button on the unit itself, or you can shut the system down remotely using the Web User Interface. Shutdown by Using the Power Button For a gradual shutdown (recommended), press and release the power button quickly. For an immediate shutdown (not recommended), press and hold the power button until the LEDs turn off.
Serial ATA 4-Drive NAS User Guide 1. In the navigation bar, click Advanced. 2. In the left pane, click Shut Down. 3. In Administrator password, enter the password for logging in to the Web User Interface. 4. Click Shut Down. A message appears, indicating that the system is shutting down. Once the storage system shuts down, if you refresh the browser window, it will be blank.
Serial ATA 4-Drive NAS User Guide Managing Your Storage System - 84
Serial ATA 4-Drive NAS User Guide Accessing the Storage System through FTP and SSH FTP If you enabled the storage system to act as an FTP server, all Windows or Mac OS X users can use a Web browser to access the public folder and their personal folders.
Serial ATA 4-Drive NAS User Guide has no effect on file transfers between the users and the storage system in any way. To enable SSH support: 1. Enter this URL in the browser’s address bar, and then press Enter: http://storage_system/ssh_controlF.cgi where storage_system is the name or IP address of the storage system. Note: You can use the storage system name only if that name is registered with a DNS server on your network. The SSH page appears.
Serial ATA 4-Drive NAS User Guide http://storage_system/home_mainF.cgi where storage_system is the name or IP address of the storage system. This URL returns to the Home page of the Web User Interface. To disable SSH support: 1. Enter this URL in the browser’s address bar, and then press Enter: http://storage_system/ssh_controlF.cgi where storage_system is the name or IP address of the storage system.
Serial ATA 4-Drive NAS User Guide To return to the Web User Interface, click the browser’s Back button until the Web User Interface reappears, or enter this URL in the browser’s address bar, and then press Enter: http://storage_system/home_mainF.cgi where storage_system is the name or IP address of the storage system. This URL returns to the Home page of the Web User Interface.
Serial ATA 4-Drive NAS User Guide Protecting Local Disks Even if most of your data is stored and protected on your storage system, your operating system files, applications, and many other files still reside on each individual computer in your network. If one of those local disks fails, it can take many hours to re-install and reconfigure the operating system and applications on a new or repaired hard disk, and some files might be completely lost.
Serial ATA 4-Drive NAS User Guide operating system or applications. Getting Started System Requirements Each computer where DiskSafe Express is installed must have the following: • • One of the following operating systems: • Microsoft Windows XP Home Edition or Professional with Service Pack 2 or newer • Microsoft Windows Server 2003 • Microsoft Windows 2000 Professional, Server, or Advanced Server with Service Pack 4 Microsoft iSCSI Initiator 2.
Serial ATA 4-Drive NAS User Guide 4. If a security warning appears, click Run. The installation wizard starts. 5. On the first page of the installation wizard, click Next. 6. On the page with installation options, click Next. (Initiator Service and Software Initiator are selected by default.) 7. If a message box appears telling you to configure the settings in the Control Panel, click OK. Note: You do not need to configure the Microsoft iSCSI Initiator.
Serial ATA 4-Drive NAS User Guide 3. If the Microsoft iSCSI Initiator 2.0 is already installed, go to step 4. If this component is not currently installed, the following prompt appears: Click OK to go to the Microsoft website, click iSCSI Software Initiator v2.0, and follow the instructions in “Installing the Microsoft iSCSI Initiator” on page 90. You must install the Microsoft iSCSI Initiator 2.0 before you can install DiskSafe Express.
Serial ATA 4-Drive NAS User Guide It might take some time to copy and configure the associated files. Note: The remaining time might be reported as 0 but the configuration is continuing in the background. 6. When a message appears, indicating that the installation of Microsoft .NET Framework 1.1 is complete, click OK. After you click OK, the Intelligent Management Agent is installed automatically (if it is not already installed), and the welcome page for installing DiskSafe Express appears: 7.
Serial ATA 4-Drive NAS User Guide 9. Click Next to install DiskSafe Express in the displayed location. Alternatively, you can click Browse, select or enter a different location, click OK, and then click Next. Note: You must install DiskSafe Express on the drive that you boot from (that is, where Windows is installed, typically C:). 10. To complete the installation and restart your computer, click Finish.
Serial ATA 4-Drive NAS User Guide After you restart the computer, the Add License dialog box appears: 11. Type the key code for licensing the product and click OK. The license key is on the back of the recovery CD envelope. Note: If you previously used this key code on a different computer, an error message appears, and you must re-activate your license. For more information, refer to “Activating Your license” on page 96. If your computer has an Internet connection, the license is activated automatically.
Serial ATA 4-Drive NAS User Guide If you already protected a disk, the application window appears: The Status page displays the name of the disk that you protected and related information, such as the size of the disk, the name of the storage system where the backup resides, the number used to identify the backup disk on the storage system (Backup disk ID), the current status, information about any ongoing activity, and the date and time of the last backup and next scheduled backup (if any).
Serial ATA 4-Drive NAS User Guide the next section). Note: Activation is tied to your computer’s hardware. Once you have activated a particular license, if your computer hardware changes, or if you subsequently install DiskSafe Express on a different computer using the same key code, an error message appears. You must export your current license data (Action > License > Offline Activation > Export License Data) and e-mail the license file to Activate.Keycode@falconstor.
Serial ATA 4-Drive NAS User Guide 11. On the confirmation message, click OK. The license is now activated and you can continue to backup up and recover your data. 12. To close the dialog box, click Exit. Replacing Your Existing License To replace your existing license: 1. From the Action menu, click License > Add License. The Add License dialog box displays your current license key code. 2. In License key code, enter the new key code. 3. Click OK. 4. When the confirmation message appears, click OK.
Serial ATA 4-Drive NAS User Guide 2. In the Available disks list, select the disk or partition that you need to protect. Even if your computer has only one hard disk, two items appear in this list. The first item represents the entire hard disk, and the second item represents the partition on that disk. (If there’s only one partition on the disk, the partition is the same as the entire disk.
Serial ATA 4-Drive NAS User Guide What to do next: In this case Go to this step You never previously completed the Protect a Disk wizard 3 You previously completed the Protect a Disk wizard and connected to a storage system 4 You previously protected this disk and removed protection (as described in “Removing 5 Protection” on page 122) 3. When the Add Storage System dialog box appears, DiskSafe Express automatically scans your subnet for storage systems.
Serial ATA 4-Drive NAS User Guide first backup location in the list is selected by default.) If you need to scan the network for new storage systems, or add a new one manually, click Add and repeat step 3. If you need to remove a storage system that’s not valid or that you no longer want to use, select the storage system from the Backup locations list, click Remove, and then click Yes to confirm the removal. (You can remove a storage system only if it is not currently being used to protect another disk.
Serial ATA 4-Drive NAS User Guide to the next step. If you select Create a new backup and click Next, you must select the desired backup location as described in step 4. 6. Specify when you need backups to occur. For example, if you need backups to occur every day, select Daily from the Recurrence list. If you want backups to occur once a week, select the day of the week from the Recurrence list. Then select the time.
Serial ATA 4-Drive NAS User Guide If you clear this option, the disk will be backed up at the next scheduled time or the next time you perform a manual backup. 8. If you ever need to recover your disk using the recovery CD, you’ll be prompted for a password. In Recovery password, enter the password that you’d like to use, enter it again in Retype your password, and then click Next. Notes: • The recovery password must be 12–16 characters long. It cannot contain multi-byte words.
Serial ATA 4-Drive NAS User Guide 9. Review all your selections and click Finish. If you selected the Back up now check box, the backup process begins as soon as you click Finish, and you can review its progress on the Status page in DiskSafe Express. 10. If you need to protect additional disks or partitions, repeat this procedure for each one. Note: If you subsequently change the drive letter of a protected disk or partition, you must restart DiskSafe Express to update this application.
Serial ATA 4-Drive NAS User Guide 1. Click Status. 2. In the Protected disk list, select the disk that you need to back up. 3. Click Back Up Now. The Current activity area displays information about what’s happening, the percentage of the backup that has completed, and the speed at which the data is being sent over the network. The Progress bar graphically indicates how much of the backup is complete. To stop a backup in progress, click Stop Current Activity.
Serial ATA 4-Drive NAS User Guide 1. Click Status. 2. In the Protected disk list, select the disk whose backup or recovery you want to stop. 3. Click Stop Current Activity. If you are stopping a backup, the backup stops immediately. If you are stopping a recovery, a confirmation message appears. Click OK to stop the recovery now, or click Cancel to proceed with it. Changing the Backup Schedule When you protect a disk, you specify when you need backups to occur.
Serial ATA 4-Drive NAS User Guide 1. Click Schedule. 2. In the Protected disk list, select the disk whose backup schedule you need to change. 3. Specify when you need backups to occur. For example, if you want backups to occur every day, select Daily from the Recurrence list. If you need backups to occur once a week, select the day of the week from the Recurrence list. Then select the time. If you do not need backups to occur automatically, select Not Scheduled from the Recurrence list.
Serial ATA 4-Drive NAS User Guide 1. Click Restore. 2. In Protected disk, select a disk whose backup resides on the storage system whose recovery password you need to change. To double-check your selection, click Status. The name of the storage system appears in the Backup location area. Then click Restore to return to the Restore page. 3. Click Recovery Password. 4. In Recovery password, enter the desired password. This password must be 12–16 characters long. It cannot contain multi-byte words.
Serial ATA 4-Drive NAS User Guide Enabling or Disabling Remote Boot If you need to recover your system disk or partition, using the recovery CD is recommended (as described in “Recovering a System Disk or Partition” on page 116). However, if your computer does not support the recovery CD but does support the PXE protocol, you can remotely boot your computer from a backup on the storage system and then recover your system disk.
Serial ATA 4-Drive NAS User Guide Enabling Remote Boot To enable remote boot: 1. In the Protected disk list on any page, select your system disk or partition. If you protected multiple system disks or partitions, select the first system disk or partition on your computer (typically Disk 0). 2. From the Action menu, click Enable Remote Boot. The Enable Remote Boot dialog box displays a list of all the NICs on your computer. 3.
Serial ATA 4-Drive NAS User Guide For Windows 2000, click Yes. For Windows XP only: If the Found New Hardware Wizard asks to connect to the Windows update Web site to search for software, select No, not this time and click Next. With Install the software automatically (Recommended) selected, click Next. If remote boot was successfully enabled (as indicated in the Details area), a new backup is created automatically.
Serial ATA 4-Drive NAS User Guide mat of the data in a file—without adversely affecting the data on your local disk. For more information, refer to “Recovering Files from a Backup” on page 113. • Recover an entire non-system disk or partition—If you protected a disk or partition that isn’t being used to run the operating system, you can recover that disk or partition using DiskSafe Express. You might need to do this if the disk has become corrupted or the data has been extensively damaged.
Serial ATA 4-Drive NAS User Guide Recovering Files from a Backup To recover selected folders, files, or sections of files from a backup: 1. Click Restore. 2. In the Protected disk list, select the disk that contains the folders or files that you need to recover. 3. In the Backups list, select the backup from the desired date and time. You can select only a backup for which No appears in the Backup View Open column. 4. Click View Backup. 5. When the confirmation message appears, click OK.
Serial ATA 4-Drive NAS User Guide Notes: • If the first drive letter after your local disks is mapped to a shared network folder, you must use Disk Management to change the drive letter assigned to the backup view so that you can access it.
Serial ATA 4-Drive NAS User Guide Recovering a Non-system Disk or Partition You can recover a non-system disk or partition only as long as that disk or partition is not currently being backed up, and only as long as a more recent backup view is not open. For example, if you created backups on Monday and Tuesday, and Tuesday’s backup view is open, you cannot recover Monday’s backup until you close Tuesday’s view.
Serial ATA 4-Drive NAS User Guide 6. When the confirmation message appears, click Yes. The disk or partition is recovered to exactly its state at the date and time of the selected backup. To let you monitor the progress of this activity, the Status page appears automatically. The Current activity area displays the percentage of the recovery that has completed, and the speed at which the data is being sent over the network. The Progress bar graphically indicates how much of the recovery is complete.
Serial ATA 4-Drive NAS User Guide 4. Review the settings for your NIC and select Next. The recovery CD obtains the IP address to use from your DHCP server. If the displayed settings are not the ones you need to use, or if no IP address is displayed, select Config and specify the desired IP address or subnet mask. (If you make a mistake typing either the IP address or subnet mask, select Disable to clear the displayed information.) Then select OK and select Next. 5.
Serial ATA 4-Drive NAS User Guide If you select Base Disk, a backup of that disk image on the storage system is created, and this backup is recovered. As a result, if the maximum number of backups have already been performed, the oldest backup is deleted to make room for this backup. 12. Specify whether or not to delete all backups that occurred after the selected date by selecting or clearing Rollback the remote disk. Caution: This action is not reversible.
Serial ATA 4-Drive NAS User Guide 19. When the completion screen appears, review the results and do one of the following: To do this Do this Review information about any sectors that were not successfully recovered Select Failed Sectors, review the displayed information, and select Back. Recover another disk or partition Select Continue.
Serial ATA 4-Drive NAS User Guide • At least one backup must have been performed after remote boot was enabled. • The network must have a DHCP server, or your storage system must be configured to act as a DHCP server (as described in “Changing the Network Settings” on page 72). • If you plan to remotely boot your computer from a different computer’s backup, you or your administrator must enter the MAC address of your computer’s network interface card (NIC) on the storage system.
Serial ATA 4-Drive NAS User Guide 8. Start DiskSafe Express. Caution: While booting remotely, do not try to use DiskSafe Express for any operation other than recovering the system disk. 9. When a message advises you that the computer name has changed, click OK. 10. Click Restore. The Protected disk list displays the disk or partition that you are currently booting from. 11. In Backups, select the most recent backup. You cannot recover any backup except the most recent one.
Serial ATA 4-Drive NAS User Guide The Restore dialog box appears. 13. Specify whether you are restoring to the original disk or a new disk. If you are recovering to a new disk, select the desired disk from the list. Then click Restore. 14. When the confirmation message appears, click Yes. The backup is recovered to your local disk, and the progress of this process is displayed. You can cancel the recovery at any time by clicking Stop in the progress dialog box.
Serial ATA 4-Drive NAS User Guide recovery is not currently in progress for that disk or partition. (If a recovery is in progress, you must cancel it or wait until it completes before you can remove protection.) Note: If you plan to delete a protected partition, be sure to remove protection before you delete that partition. Otherwise, you might not be able to protect other partitions on that disk.
Serial ATA 4-Drive NAS User Guide Protecting Local Disks - 124
Serial ATA 4-Drive NAS User Guide Disk Configurations Your storage system supports the following types of disk configurations: • Linear—A linear configuration is similar to using multiple hard disks in a regular computer. Each disk is an independent entity, and the data on it is self-contained. You can add or remove the disks without affecting the other disks. All the available disk space is used for data. If your storage system has only one disk, you must use a linear configuration.
Serial ATA 4-Drive NAS User Guide • RAID 10—RAID 10 is similar to RAID 1, but rather than having one disk mirror to one other disk, two disks mirror to the two other disks. You can use RAID 10 only if your storage system has four disks. The disks in the first two slots constitute the first pair, and the disks in the second two slots constitute the second pair. In each pair, the smaller of the two disks is used for data, and the larger of the two disks is used as the mirror.
Serial ATA 4-Drive NAS User Guide The Disk Change Notification page appears: 3. To add the disk to the storage system, click Add New Disk. If the information on this page is not correct, click Scan to scan the storage system again and update the page. You can also click Shut Down to shut down the storage system, but you will be presented with this page again the next time you access the Web User Interface.
Serial ATA 4-Drive NAS User Guide 4. Take the desired action: To do this Do this Add the disk to a linear configuration or use it as a spare for a normal three-disk RAID 5 configuration Click Add. The Disks page indicates the current state of the disk configuration. Add the disk to the storage system but not Click Ignore. add it to the RAID at this time The Disks page lists the disk is part of the storage system, but its status is New, indicating that it is not being used.
Serial ATA 4-Drive NAS User Guide 3. Click Ignore to continue rebuilding the disk and return to the Web User Interface. The Disks page shows the progress of the rebuilding progress. Alternatively, if the information on this page is not correct, click Scan to scan the storage system again and update the page. You can also click Shut Down to shut down the storage system. When you restart the storage system, this page re-appears.
Serial ATA 4-Drive NAS User Guide your disks (as described in “Reconfiguring Your Storage System Disks” on page 75). Caution: Reconfiguring your disks will delete all the data on your storage system.
Serial ATA 4-Drive NAS User Guide Responding to RAID Failure When disk removal/failure causes the entire RAID to fail, the Disk Change Notification page appears when you access the Web User Interface or refresh the browser window: Take the appropriate action: To do this Do this Scan the storage system again and update the information on the page Click Scan. Re-install the same disk Click Shut Down. After the storage system shuts down, re-install the same disk and then restart the system.
Serial ATA 4-Drive NAS User Guide or not the storage system is running. However, if you do this when the storage system is running, you can swap only two disks, and you must restart the system after you swap the disks. If you swap the disks when the storage system is not running, you can swap all four disks, and the system will function as it previously did when you restart it. Caution: If the hotplug indicator for a disk is red or yellow, removing the disk will result in a loss of data.
Serial ATA 4-Drive NAS User Guide click Shut Down to shut down the system. Note: If the firmware on your new unit is newer than that on your hard disks, you can obtain the latest firmware from www.USR.com. To apply it, see “Upgrading the Firmware” on page 67 If no message appears, you can manage the unit as you did before.
Serial ATA 4-Drive NAS User Guide Disk Configurations - 134
Serial ATA 4-Drive NAS User Guide Troubleshooting Resetting the Web User Interface Password To reset the password to its factory default: 1. If the storage system is running, shut it down by pressing the power button unit for approximately 5 seconds. 2. After the storage unit has shut down, press and hold the power button until the power LED comes on, and then release the button. 3.
Serial ATA 4-Drive NAS User Guide 2. In the left pane, click System Log. The System Log page displays the date and time of the event, the type of event (I for informational, E for error, W for warning, and C for critical), and a brief description of the event. 3. If an event occurs while you are viewing this list, click Refresh to update it.
Serial ATA 4-Drive NAS User Guide 3. In the left pane, select the name of the shared folder from which you want to disconnect, and then click Unmap Drive Letter. Linux Users To disconnect from a shared folder using LInux: • Unmount the desired shared folder by entering the following command: umount /my_directory where my_directory is the name of the local directory. For example, if you mounted the shared folder using the following command: mount 192.168.0.
Serial ATA 4-Drive NAS User Guide I cannot access the Web User Interface. If you are using the Storage System Console, make sure the computer where the Storage System Console is installed is in the same subnet as the storage system. If you are using a Web browser, make sure the name or IP address of the storage system is correct. You can use the storage system name only if that name is registered with a DNS server in your network.
Serial ATA 4-Drive NAS User Guide case, you must change both the time zone and time on the storage system. For example, if the Active Directory server time is 2:00 P.M. in the Central Time zone (GMT-06:00), you would set the storage system time zone to Eastern Time (GMT-05:00) and then set the time to match the Active Directory server (14:00). If you do this, do not synchronize the storage system with an NTP server, as the time will be readjusted based on the time zone.
Serial ATA 4-Drive NAS User Guide the unit name is no longer than 256 characters and does not contain a slash (/), that the unit contains no more than 100 subunits, and that you preceded the unit name with a slash (such as /Sales). • Make sure the storage system time and Active Directory server time do not differ by more than five minutes. If they do, you must adjust the storage system time, time zone, or both to ensure that they match (as described in “Changing the System Settings” on page 69).
Serial ATA 4-Drive NAS User Guide displays in parentheses the number of users, AD Bind Point total users, and the limit for number of users. If the numbers within the parentheses indicate zero users and zero AD Bind Point users (0/0/128), navigate to the Advanced : System Log page and look for synchronization or clock errors. If synchronization or clock errors are indicated, navigate to the Advanced : System page and compare the system time settings with the Active Directory server’s time.
Serial ATA 4-Drive NAS User Guide If the network configuration is correct and it still doesn’t work, the DHCP service might not be working properly. Restart the storage system. The users cannot access the storage system using FTP.
Serial ATA 4-Drive NAS User Guide where IP_address is the IP address of the storage system. If you do not see Reply from..., the problem is with your network. • If the storage system already exists, select it in the list of backup locations and then click Remove. Then click Add to add it again. This resets the settings in the iSCSI initiator which might be causing the authentication problem. Note: When authentication errors occur, invalid backups might be created on the storage system.
Serial ATA 4-Drive NAS User Guide If the Status is Offline, review the troubleshooting procedures in the preceding section. • If you changed the name of your computer, the storage system will not recognize it any longer.
Serial ATA 4-Drive NAS User Guide If desired, you can save the file in a different location. Once the file has been created, you can send it to Technical Support. Using the Recovery CD To create a diagnostic file using the recovery CD: 1. Insert the recovery CD into the computer’s CD-ROM drive and press Alt+F2. 2. At the command line, enter the following command and then press Enter: xray 3. When prompted, enter your e-mail address and press Enter.
Serial ATA 4-Drive NAS User Guide Microsoft iSCSI Initiator will not match the recovery password on the storage system. To address this issue, you must reconfigure the Microsoft iSCSI Initiator to use the password that you specified on the storage system. If you are using the recovery CD, you must do this after you recover your system disk. If you are booting remotely, you must do this while in Network Boot Mode (before you recover your system disk) and again after you recover your disk and boot locally.
Serial ATA 4-Drive NAS User Guide Support Information If you are having trouble with the configuration or operation of your Storage System: 1. Refer to "Troubleshooting," beginning on page 135 in this guide. 2. Go to the Support section of the USRobotics Web site at www.usr.com/support/. Many of the most common difficulties that users experience have been addressed in the FAQ and Troubleshooting Web pages for your product. The product number of the USR8700 Network Attached Storage is 8700.
Serial ATA 4-Drive NAS User Guide Country Webmail Voice Turkey / Türkiye www.usr.com/emailsupport/tk 0212 444 4 877 United Arab Emirates www.usr.com/emailsupport/me 0800 877 63 United Kingdom www.usr.com/emailsupport/uk 0870 844 4546 For current support contact information, go to www.usr.com/support.
Serial ATA 4-Drive NAS User Guide Regulatory Information Manufacturer’s Declaration of Conformity U.S. Robotics Corporation 935 National Parkway Schaumburg, IL 60173 U.S.A. declares that this product conforms to the FCC’s specifications: Part 15, Class B Operation of this device is subject to the following conditions: 1. this device may not cause harmful electromagnetic interference, and 2. this device must accept any interference received including interference that may cause undesired operations.
Serial ATA 4-Drive NAS User Guide UL Listing/CUL Listing: This information technology equipment is UL Listed and C-UL Listed for both the US and Canadian markets respectively for the uses described in the User Guide. Use this product only with UL Listed Information Technology Equipment (ITE).
Serial ATA 4-Drive NAS User Guide U.S. Robotics Corporation Two (2) Year Limited Warranty 1.0 GENERAL TERMS: 1.1 This Limited Warranty is extended only to the original end-user purchaser (CUSTOMER) and is not transferable. 1.2 No agent, reseller, or business partner of U.S. Robotics Corporation (U.S. ROBOTICS) is authorised to modify the terms of this Limited Warranty on behalf of U.S. ROBOTICS. 1.3 This Limited Warranty expressly excludes any product that has not been purchased as new from U.S.
Serial ATA 4-Drive NAS User Guide 2.2 CUSTOMER is specifically advised to make a backup copy of all software provided with this product. 2.3 CUSTOMER assumes full responsibility to properly install and configure this product and to ensure proper installation, configuration, operation and compatibility with the operating environment in which this product is to function. 2.4 CUSTOMER must furnish U.S. ROBOTICS a dated Proof of Purchase (copy of original purchase receipt from U.S.
Serial ATA 4-Drive NAS User Guide 4.2 Any product or part returned to U.S. ROBOTICS without an RMA issued by U.S. ROBOTICS or its authorised U.S. ROBOTICS Service Centre will be returned. 4.3 CUSTOMER agrees to pay shipping charges to return the product or part to the authorised U.S. ROBOTICS Return Centre; to insure the product or assume the risk of loss or damage which may occur in transit; and to use a shipping container equivalent to the original packaging. 4.
Serial ATA 4-Drive NAS User Guide 5.3 TO THE FULL EXTENT ALLOWED BY LAW, THE FOREGOING WARRANTIES AND REMEDIES ARE EXCLUSIVE AND ARE IN LIEU OF ALL OTHER WARRANTIES, TERMS, OR CONDITIONS, EXPRESS OR IMPLIED, EITHER IN FACT OR BY OPERATION OF LAW, STATUTORY OR OTHERWISE, INCLUDING WARRANTIES, TERMS, OR CONDITIONS OF MERCHANTABILITY, FITNESS FOR A PARTICULAR PURPOSE, SATISFACTORY QUALITY, CORRESPONDENCE WITH DESCRIPTION, AND NON-INFRINGEMENT, ALL OF WHICH ARE EXPRESSLY DISCLAIMED. U.S.