Table of Contents English Installation ............................................................................... 3 Step 1. Prepare for Installation ............................................................3 Step 2. Connect the Modem ...............................................................4 Step 3. Select the Driver ......................................................................6 Step 4. Reboot ....................................................................................
USB ADSL Modem Quick Installation Guide for Windows 98 FE, 98 SE, 2000, Me and XP Operating Systems Enlglish Español Italiano Model #8500 R24.0255.
U.S. Robotics Corporation 935 National Parkway Schaumburg, Illinois 60173-5157 USA No part of this documentation may be reproduced in any form or by any means or used to make any derivative work (such as translation, transformation, or adaptation) without written permission from U.S. Robotics Corporation. U.S.
English Installation Step 1. Prepare for Installation NO T E : It is very important that you have your serial number NOT written down for future reference. If you ever need to call our Technical Support department, you will need this number to receive assistance. You can find your serial number on a bar code sticker on the bottom of the modem and also on the box. Write your serial number in the space provided below.
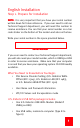
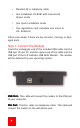
• Standard RJ-11 telephone cable • One Installation CD-ROM with manual and drivers inside • One Quick Installation Guide • One registration card (complete and return to U.S. Robotics) Inform your dealer if there are any incorrect, missing, or damaged parts. Step 2. Connect the Modem Insert the rectangular end of the included USB cable into the USB port of your PC, and the square end of the cable into the USB port of the U.S. Robotics USB ADSL Modem.
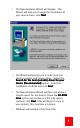
• The New Hardware Wizard will display. This Wizard will help you through the installation of your device driver, click Next Next. • The Wizard will prompt you to select how you want to acquire your device driver. Select the Search for the best (suitable) driver for your device (Recommended) option. Insert the Installation CD-ROM and click Next Next. • The New Hardware Wizard will then ask where it should search for the drivers.
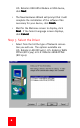
U.S. Robotics USB ADSL Modem or USB device, click Next Next. • The New Hardware Wizard will prompt that it will complete the installation of the software files necessary for your device, click Finish Finish. • Wait for the Welcome screen to display, click Next Next. If the Select Language screen displays, click Cancel Cancel. Step 3. Select the Driver • 6 Select from the list the type of Network connection you will use. The options available are U.S. Robotics LAN (RFC1483), U.S.
• If you are uncertain which driver to select, refer to your DSL Internet Service Provider for assistance. Once you select the appropriate option, click Next Next. • Your current modem settings will display, click Next Next. If the VPI/VCI values shown in the current settings are incorrect, click Customize to change the values. Files will begin to copy to your system, this may take a moment. The Setup Complete screen will display, click Finish Finish.
Troubleshooting My computer did not detect the modem. Possible Solution: • Make sure that the USB cable is connected to the USB port located in the back of your computer. • If a second USB port in the back of your computer is available, connect the USB cable into this USB port. • Make sure the USB cable is securely plugged into the modem. • Check the computer provider’s documentation if the USB devices are not recognized.
After configuring the TCP/IP settings, the modem does not establish a connection to the Internet. Possible Solution: • Double-check the ATM settings of the modem. Click the DSL icon in your Windows system tray located in the right, lower corner of the screen near the clock, or go to the Control Panel by clicking Start Start, Settings Settings, and Control Panel Panel. Double-click U.S. Robotics USB ADSL Modem Modem.
I cannot browse the Internet. Possible Solution: Your Transmission Control Protocol/Internet Protocol (TCP/IP) settings may be incorrect. Contact your Internet Service Provider to supply you with the proper settings. Ar e You S till Having P roblems? Are Still Problems? Call the Dealer Who Sold You this U.S.
Warning! This equipment has been tested and found to comply with the limits for a Class B digital device, pursuant to Part 15 of the FCC Rules. These limits are designed to provide reasonable protection against harmful interference in a residential installation. This equipment generates, uses and can radiate radio frequency energy and, if not installed and used in accordance with the instructions, may cause harmful interference to radio communications.
FCC Part 68 Registration 1. This equipment complies with Part 68 of the FCC rules. This unit bears a label, which contains the FCC registration number and ringer equivalence number (REN). If requested, this information must be provided to the telephone company. 2. This equipment uses the following standard jack types for network connection: RJ11-6 3. This equipment contains an FCC compliant modular jack.
tomer should be aware that compliance with the above conditions might not prevent degradation of service in some situations. Repairs to certified equipment should be coordinated by a representative designated by the supplier. Any repairs or alterations made by the user to this equipment, or equipment malfunctions, may give the telecommunications company cause to request the user to disconnect the equipment.
PC Requirements Host Interface: USB Specification 1.1 or up System Requirements: A PC and Windows 98 FE, 98 SE, Me or 2000 operating system. 32 MB of RAM and 10 MB of hard disk space (memory extensive applications may require more RAM) Pentium 100 MHz (minimum) Physical Characteristics Port: Upstream: 1 USB Type B, USB spec. 1.1 differential and bi-directional, 12 Mbps (high-speed device) Downstream: RJ-11 Phone wire connection to ADSL service provider LEDs: Power, Data Dimensions: Width = 6.134, Depth = 4.
place any defective media with software which substantially conforms to applicable U.S. Robotics published specifications. Customer assumes responsibility for the selection of the appropriate applications program and associated reference materials. U.S.
OTHER PERSON TO ASSUME FOR IT ANY OTHER LIABILITY IN CONNECTION WITH THE SALE, INSTALLATION, MAINTENANCE OR USE OF ITS PRODUCTS. U.S.
U.S. Robotics Corporation 935 National Parkway Schaumburg, Illinois 60173-5157 EE.UU. Queda prohibida la reproducción parcial o íntegra de esta documentación, así como su utilización para realizar cualquier trabajo derivado (como traducción, transformación o adaptación) sin contar con el consentimiento por escrito de U.S. Robotics Corporation. U.S.
Español Instalación Paso 1. Preparación para la instalación. NO TA : Es muy importante que usted escriba su numero de NOT serie para futuras referencias. Si alguna vez necesita llamar a nuestro departamento de Soporte Técnico, necesitará este número para recibir asistencia. Encontrará su número de serie en la pegatina del código de barras en la parte de abajo de su módem y también en la caja. Escriba su número de serie en el espacio que se muestra a continuación, reservado a tal efecto.
• Un cable USB, del módem al ordenador (Tipo B a Tipo A) • Cable telefónico estándar RJ-11 • CD-ROM de instalación que incluye manual y controladores (drivers) • Una guía de instalación rápida • Tarjeta de registro (por favor, rellénela y envíela a U.S. Robotics) Por favor informe al lugar donde adquirió el producto si existe algo incorrecto en el paquete, si falta algún accesorio o si está dañado. Paso 2.
• El Asistente de Nuevo Hardware aparecerá en pantalla. Este asistente le ayudará durante el proceso de instalación del controlador de su dispositivo. Haga clic en Siguiente Siguiente. • El Asistente le permitirá seleccionar el recurso donde se encuentra ubicado el controlador del dispositivo. Seleccione la opción Buscar el mejor controlador para su dispositivo (recomendado). Introduzca en su unidad lectora de CD.ROM el CD de instalación y haga clic en Siguiente Siguiente.
• Windows indicará que se ha encontrado el U.S. Robotics Módem USB ADSL o dispositivo USB. Pulse el botón Siguiente Siguiente. • El Asistente de Nuevo Hardware le indicará que se va a completar la instalación de los archivos de programa necesarios para su dispositivo. Pulse Finalizar Finalizar. • Espere hasta visualizar la pantalla de bienvenida y pulse Siguiente Siguiente. Si la ventana de selección de idioma, pulse Cancelar Cancelar. Paso 3.
• Si no está seguro del Controlador a seleccionar, contacte su Proveedor de Servicios de Internet ADSL para recbir asistencia. Una vez que haya seleccionado la opción correcta pulse Siguiente. • Aparecerá una pantalla mostrando las propiedades del módem, Haga clic en Siguiente Siguiente. Si los valores VPI/VCI mostrados en la configuración no son correctos pulse Personalizar para modificar dichos valores. Los archivos empezarán a copiarse en su sistema.
¡Enhorabuena! Se ha completado la instalación. En este momento puede insertar de nuevo el CD-ROM de instalación para instalar programas adicionales. Solución de problemas Mi ordenador no ha reconocido el módem. Posible solución: • Asegúrese de que el cable USB está conectado al puerto USB, situado en la parte posterior del PC. • Si dispone de un segundo puerto USB en la parte posterior del PC, conecte el cable USB en dicho puerto. • Asegúrese de que el cable USB está enchufado correctamente al módem.
• Desenchufe el cable USB del módem durante 2 ó 3 minutos, pero deje la línea telefónica conectada. Vuelva a enchufar el cable USB al módem. Con ello, el módem debería volver a conectarse. Tras configurar TCP/IP, el módem no establece la conexión con Internet. Posible solución: • Revise los valores de ATM del módem.
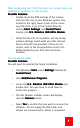
• Haga clic en Agregar o quitar. • Cuando se inicie la aplicación de instalación del módem DSL, haga clic en Remove (Quitar) y seleccione Sí cuando aparezca la pregunta Are you sure you want to remove this software? (¿Está seguro de que desea quitar este software?) No desenchufe el cable USB hasta que los controladores se hayan eliminado y se solicite que reinicie el ordenador. No puedo navegar por Internet Posible solución: Sus propiedades del protocolo TCP/IP deben estar incorrectamente configuradas.
Declaración de conformidad del fabricante Declaramos bajo nuestra exclusiva responsabilidad que el U.S. Robotics USB ADSL Modem, al que se refiere esta declaración, es conforme a las siguientes normas u otros documentos normativos: Normas CE: • EN55022 Clase B (EMC) • EN55024 - (Inmunidad) • EN60950 - (Seguridad) Emisiones: (EE.UU.) FCC Parte 15 Clase B, (Canadá) ICES-003 Seguridad: (EE.UU./Canadá) CSA C22.2 Número 950-95 NRTL/C Telecomunicaciones: (EE.UU.
Declaración de renuncia del fabricante La información contenida en este documento está sujeta a cambios sin previo aviso y no representa ningún compromiso por parte del proveedor. No se ofrece ninguna garantía ni se hace ninguna afirmación, ya sea de forma expresa o implícita, en cuanto a la calidad, la exactitud o la adecuación para un fin en particular de este documento.
5. 6. 7. From time to time, the telephone company may make changes in its facilities, equipment, or operations, which could affect the operation of this equipment. If this occurs, the telephone company is required to provide you with advance notices so you can make the modifications necessary to maintain uninterrupted service. If you experience difficulties, check your connection and software configurations. There are no user repairs that can be done on the unit.
An explanatory note on Ringer Equivalence Numbers (see Section 10.0) and their use must be provided for the terminal equipment user in the information accompanying the terminal equipment. A notice similar to the following would be suitable: NO T ICE: The Ringer Equivalence Number (REN) assigned to each terminal device NOT provides an indication of the maximum number of terminals allowed to be connected to a telephone interface.
aplicación suministrado por terceros, que el funcionamiento de los productos de software sea ininterrumpido o esté exento de errores, o que se corrijan todos los defectos en los programas de software. Para los productos de terceros enumerados como compatibles en la documentación o en las especificaciones de productos de software de U.S. Robotics, U.S.
U.S. Robotics Corporation 935 National Parkway Schaumburg, Illinois 60173-5157 USA Questa documentazione non può essere né parzialmente né interamente riprodotta in alcuna forma o utilizzata per ottenere opere derivate (quali traduzioni, trasformazione o adattamento) senza l’autorizzazione scritta di U.S. Robotics Corporation. U.S.
Italiano Installazione Step 1. Prepararsi all’installazione NOTA: E’ molto importante che voi segnate il vostro serial number in caso ne abbiate bisogno in futuro. Se avrete bisogno di chiamare l’Assistenza Tecnica, sarà necessario avere questo numero per ricevere assistenza. Potete trovare il serial number sull’adesivo del codice a barre sulla parte inferiore del modem e anche sulla scatola. Scrivete il vostro serial number nello spazio qui sotto.
• Cavo telefonico standard RJ-11 • Un CD-ROM di installazione, contenente manuale e drivers • Una Guida all’Installazione Veloce • Una scheda di registrazione (da compilare e rispedire a U.S.Robotics) Informate il vostro rivenditore se ci sono parti mancanti, non corrette o danneggiate. Step 2. Connettere il modem Inserite il connettore rettangolare all’estremità del cavo nella porta USB del computer e il connettore quadrato nella porta del Modem USB ADSL U.S.Robotics.
• Apparirà la finestra Nuovo Hardware. Questa applicazione vi aiuterà nel processo di installazione del driver del vostro. Cliccate il tasto “Avanti” “Avanti”. • Il Wizard vi inviterà a selezionare come volete cercare il vostro device driver. Selezionate l’opzione “Cerca il miglior driver per il vostro dispositivo (Consigliato)” Inserite il CD dell’Installazione e selezionate “Avanti” “Avanti”. • L’installazione guidata Nuovo Hardware vi chiederà ora dove deve cercare i drivers.
• Windows indicherà che ha trovato il Modem USB ADSL U.S.Robotics o il dispositivo USB; selezionate “Avanti” “Avanti”. • L’installazione guidata Nuovo Hardware indicherà che sta per completare l’installazione dei file necessari per il Vostro dispositivo; selezionate “Fine” “Fine”. • Attendete che appaia la schermata di Benvenuto; selezionate “Avanti” “Avanti”. Se appare la schermata Selezionate la lingua, cliccate “Annulla” . Step 3.
• Se non sapete quale driver selezionare, fate riferimento al vostro provider di servizi Internet DSL per ricevere assistenza. Una volta che avete selezionato l’opzione corretta selezioante “Avanti” “Avanti”. • Appariranno le impostazioni correnti del modem; Selezionate “Avanti” “Avanti”. Se i valori VPI/VCI mostrati nelle impostazioni correnti non sono corretti, cliccate “Personalizza” per cambiare i valori. I files saranno copiati sul vostro sistema; questo potrebbe richiedere qualche momento.
una luce verde e il vostro LED DSL potrebbe lampeggiare. Congratulazioni! La vostra installazione è completata. Ora potete inserire nuovamente il CD per accedere ai software aggiuntivi. Risoluzione dei problemi Il mio computer non ha rilevato il modem Possibile soluzione: • Assicuratevi che il cavo USB sia connesso alla porta USB allocata sul retro dl vostro PC. • Se sul retro del vostro PC c’è un’altra porta USB disponibile, connettete il cavo USB in questa porta.
• Assicuratevi che i microfiltri siano posizionati tra la presa telefonica e il telefono, fax, segreteria telefonica o qualsiasi altra apparecchiatura nonDSL. (I microfiltri vengono di solito forniti dal vostro Fornitore di Servizi DSL). • Staccate il cavo USB per 2-3 minuti, lasciando connessa la linea telefonica. Inserite nuovamente il il cavo USB nel modem. Questo dovrebbe far sì che il modem si riconnetta.
• Individuate la voce relativa al Modem USB SB DSL U.S. Robotics e cliccatela due volte. Potreste dover far scorrere la barra verso il basso per trovare il modem. • Apparirà la schermata di Installazione del Modem DSL. Selezionate il tasto Rimuovi Rimuovi. • Selezionate Sì per confermare che volete rimuovere il software. Non staccate il cavo USB fino a quando i drivers non saranno stati rimossi e viene richiesto di riavviare il computer. Non posso navigare in Internet.
Dichiarazione di conformità del produttore Si dichiara che il modem U.S. Robotics USB ADSL, a cui si riferisce questa dichiarazione, è conforme ai seguenti standard o ad altra documentazione normativa rilevante. Contrassegno CE: • EN55022 Class B (EMC) • EN55024 - (Immunita) • EN60950 - (Sicurezza) Emmissioni: (U.S.) FCC Part 15 Class B, (Canada) ICES-003 Sicurezza: (U.S./Canada) CSA C22.2 No. 950-95 NRTL/C Telecom: (U.S.
U.S. Robotics requires that you use a quality interface cable when connecting to this device. Changes or modifications not expressly approved by US Robotics could void the user’s authority to operate this equipment. Suggested cable type is 90-ohm USB cable for the USB port, and standard telephone cable for the RJ-11 port. Negazione di responsabilità del produttore Le informazioni nel presente documento sono soggette a modifiche senza preavviso e non costituiscono un impegno da parte del rivenditore.
5. 6. 7. From time to time, the telephone company may make changes in its facilities, equipment, or operations, which could affect the operation of this equipment. If this occurs, the telephone company is required to provide you with advance notices so you can make the modifications necessary to maintain uninterrupted service. If you experience difficulties, check your connection and software configurations. There are no user repairs that can be done on the unit.
An explanatory note on Ringer Equivalence Numbers (see Section 10.0) and their use must be provided for the terminal equipment user in the information accompanying the terminal equipment. A notice similar to the following would be suitable: NO T ICE: The Ringer Equivalence Number (REN) assigned to each terminal device NOT provides an indication of the maximum number of terminals allowed to be connected to a telephone interface.
LED: Power, Data Dimensioni: Larghezza = 15,580 cm, Profondità = 11,673 cm, Altezza = 3,502 cm Peso: 0,164 kg Input: +5VDC, 500mA (massimo) (alimentato tramite bus dal controller o dall'hub dell'host USB) Alimentazione Consumi: 2,5 watt massimo (alimentato tramite BUS o tramite USB) Ambiente Temperatura: da 0 a 50 gradi Celsius Umidità: fino al 95% Garanzia limitata U.S. Robotics Corporation HARDWARE U.S.
eccezione per i casi in cui l’incompatibilità sia dovuta a un “difetto” del prodotto di un’altra casa o per i casi in cui il software non sia stato utilizzato in conformità alle specifiche pubblicate di U.S. Robotics o alla guida per l’utente. QUESTO PRODOTTO U.S. ROBOTICS PUÒ INCLUDERE SOFTWARE DI TERZI OPPURE FARNE PARTE; L’USO DI TALI SOFTWARE È REGOLATO DA UN DISTINTO CONTRATTO DI LICENZA PER L’UTENTE FINALE. LA PRESENTE GARANZIA U.S. ROBOTICS NON SI APPLICA A TALI PRODOTTI SOFTWARE DI ALTRE CASE.
CLIENTE O TERZI, OPPURE DA ALTRE CAUSE CHE VANNO OLTRE L’USO PREVISTO DEL PRODOTTO, OPPURE DA INCIDENTI, INCENDI, FULMINI O ALTRI EVENTI PERICOLOSI. LIMITAZIONE DI RESPONSABILITÀ FATTE SALVE LE DISPOSIZIONI PREVISTE DALLA LEGGE, U.S.
Printed in Tawain.