
User manual


2-28 Basic Installation and Setup
Setting Up the I-modems
Unlike V.34 modems, each I-modem must be configured before
you can use them. Follow the steps below.
1.
Taking the information given you by your local telephone
company, specify the interface name (mod:1, mod:2, etc.) ,
switch protocol type, SPIDs and directory numbers.
Note: If you check the back panel, you’ll notice there are two
interfaces per connector. You can select only one switch type per
connector but a SPID (European customers disregard) ,
directory number and TEI for each interface (mod:1/mod:2) on
that connector.
It’s unlikely you’ll have to change terminal end type (TEI) and call
type values from the factory defaults. TEIs are assigned only by
your telco: if you telco supports PPP, the TEI is 0, if it supports
Multilink Protocol, set the value given you.
The auto call type (default) option chosen by default will
automatically handle whatever call you choose to make.
Providing an AT command string is not necessary at this time.
Use the following command to configure each I-modem:
set imodem interface
<interface_name>
at_command
<string>
call_type
[auto | clear | internet | modemfax | v110 | v120]
directory_number
<string>
spid
<string>
switch
[att | dms100 | ni1 | euro-isdn
]
terminal_endpoint_id
<string>
For example (abbr.):
set imod mod:1 dir 551000 spid 0555100001 swit ni1
2.
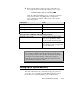
When the Switch Settings screen appears, check your
configuration to be sure it’s correct. If not, go back to step 1.
3.
Save each I-modem’s configuration to its FLASH memory
with an AT&W command. (Repeat for each I-modem.) Type:
set imodem interface mod:1 at_command at&w