
User manual
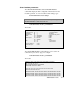


9-22 Administrative Tool
s
WARNING! This switch erases everything. After you
use it, you must start over from scratch. We
recommend you save your present FLASH files to a PC
in case you want to reinstall the old image later.
5-10 Reserved
These switches are reserved for use by U.S. Robotics.
Please do not change their settings.
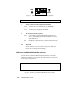
Installation
Begin the software download process by following the steps
below. The section describes how to download the PCSDL files.
IMPORTANT: Be sure your NETServer is turned OFF before
you begin.
1
Attach a serial cable from the NETServer console port to
either the Com 1 or Com 2 serial port of your PC.
2
Be sure the 10-pin DIP switches are set correctly for both
Modem and NETServer DIP switches. All Modem DIP
switches should be OFF. For NETServer CONFIGURATION
DIPs, set DIP Switch 3 OFF (recommended), and DIP Switch
4 ON to ensure the FLASH files are erased.
3
Open a DOS window session on your computer.
4
Create a directory to hold the FLASH code. Type:
mkdir c:\flash\newcode
5
Change directory to that location. Type:
cd c:\flash\newcode
6
Copy all files for downloading to the above directory. Type:
a: *.* c:\flash\newcode
7
Examine the sdl.bat file to be sure your com port and baud rate
settings match those of your hardware DIP switches. See an
example of the sdl.bat file below. Type: type sdl.bat