
Instruction Manual

09
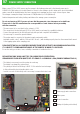
SHOOTING TIME SETTING
To set the shooting time, after removing the plastic front cover, in the middle of PCB is located the FIRETIME (S2) button.
By holding down the button, the 3 coloured front leds will flash and the buzzer emit an acustic signal, each flash/beep is
equivalent to one second of fog emission from the device.
By pressing the button again, the shooting time is not added to the one previously set, but will restart the count from zero.
If the button is pressed for a time higher than the unit capabilities, the fog emission will be set to the maximum allowed for
the unit. A short pressure on FIRETIME (S2) button will activate the shooting time verification mode: the buzzer will emit a
series of “beep”corresponding to the currently stored shooting time (1 beep each s). In this mode no changes will be made.
N.B. Before opening the cover ensure that the control panel is set to “service”, so that the opening of
“anti-sabotage or tamper” circuit does not cause any shooting.
N.B. Shooting time can be setted second by second, anyway it is recommended a minimum time
of 4 seconds.
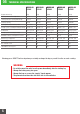
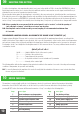
RECOMMENDED SHOOTING SECONDS ACCORDING TO THE VOLUME SPACE TO PROTECT (m
3
)
Fogging systems Modular CPlus are able to produce fog continuously till the maximum time allowed, according to the
model specifications. There might be cases in which, due to specific characteristic of the location, levels of air temperature
and pressure, degree of the fog density and light in the target area, that the shooting time can be increased or decreased.
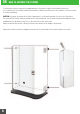
For example, above 5 m of height the shooting time must be 20% more and above 7 m, every additional meter should be
consideredas double.
HxLxP-------- Height x Width x Depth of the area to protect
D------------- Density of the produced fog
V------------- Temperature and air pressure
R------------- Acceptable residue in case of saturation of V parameter
I-------------- Intensity of the surface light
(HxLxP) x D x V x R x I
The following tables indicate the suggested fog emission in relation to the number of seconds of shooting set in average
condition of temperature, air pressure and humidity.
N.B. To correctly dimension the machines it is needed to verify that the saturation of the area occurs in faster time than
the one supposed for the theft.
10
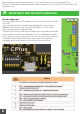
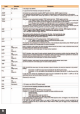
ERROR CHECKING
The machine is equipped with a full set of self-diagnosys checks. If a problem is detected, that requires the installer
intervention, the red led DL7 will switch on. In this case it is possible to have an indication of the problem by briefly
pressing RESET button: the buzzer will then emit a number of “beep” according to the following table.
1 heat exchanger overtemperature
2 temperature regulation fault
3 thermocouple reference fault
4 triac overtemperature
5 thermocouple error
6 eeprom error
7 missing battery
beep error type
8 low battery voltage
9 mains power supply missing
10 mains power supply low
11 pump overcurrent
12 pump shortcicuit
13 empty fluid bag
beep error type
10