
Install Instructions


www.uponorpro.com
46
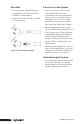
Tubing Supports
• Use plastic or metal supports designed
for use with plastic tubing.
• Place horizontal support every 32" for
PEX tubing. If installed in fire-rated
construction, local code requirements
are in force.
• Provide vertical support every 4 to 5
feet with a mid-story guide placed
between floors.
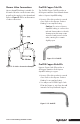
• Bends within 6" of a ProPEX
connection to
3
⁄8" and
1
⁄2" tubing and
within 10" of a ProPEX connection to
3
⁄4" and 1" tubing require support.
• Allow
1
⁄8" to
3
⁄16" of slack per foot of
run on installed Uponor AquaPEX
tubing for expansion and contraction.
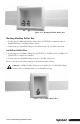
General
Recommendations
• Protect Uponor AquaPEX tubing
passing through hollow masonry
walls or metal studs with sleeves
or grommets. Protective sleeves or
grommets are not required when
Uponor AquaPEX passes through wood
studs or joists.
• Protect Uponor AquaPEX tubing from
damage (e.g., nail, screw, etc.) with
Steel Plate Protectors (F5700002).
• The minimum bend radius of PEX is six
times the outside diameter.
• Uponor EP, DZR, Red Brass or
Lead-free Brass fittings are suitable
for burial.
Pressure Testing
• During the rough-in stage, open all
valves prior to pressure testing. These
valves are to remain open
until the pressure test is complete.
• You must pressure test the system to
the system working pressure (40 to
60 psi) with air or water. Consult the
local code and pressure test at the
current ambient temperature. Slight
fluctuations of pressure are normal due
to ambient temperature changes.
Caution: If using water to
pressure test the system, purge
all water from the system prior to
ambient air temperatures nearing
32ºF (0ºC). Failing to remove the
water from the system can result
in damage to the tubing and
associated equipment.